C&BT Shops Boxcars

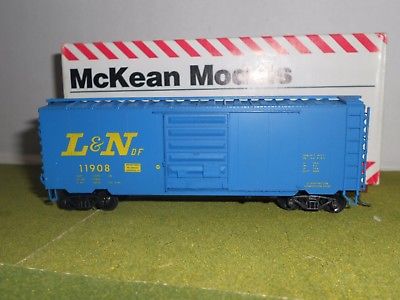
During my latest kitbashing job, it occurred to me that probably few modellers today have ever heard of C&BT Shops boxcar kits. Back when they first came out in the late 1980s, these were a big deal. After years of nothing but generic ‘Blue-Box’ boxcars from Athearn and MDC, HO-scale modellers were being supplied with affordable, yet good quality models with separate detail parts. We now had kits to build specific prototype models, like the PS-1 from McKean, or the 1950s-era AAR boxcar from Front Range.

The C&BT Shops kit added to the variety by offering the 1944-AAR designed boxcar, an importance predecessor model to the car Front Range produced. This was an even bigger deal for Canadian modellers because the ends of a 1944-AAR boxcar, what hobbyists coined the 4-4 pattern Dreadnaught end, where found on thousands of Canadian-built boxcars well past their usage dates in the USA. These ends were utilized from the late 1940s right until the early 1960s, and helped us Canuck modellers by making it easier to re-create accurate boxcars with minimal effort. Back in the WRMRC’s early years, these were a critical model for us.

C&BT Shops Kit

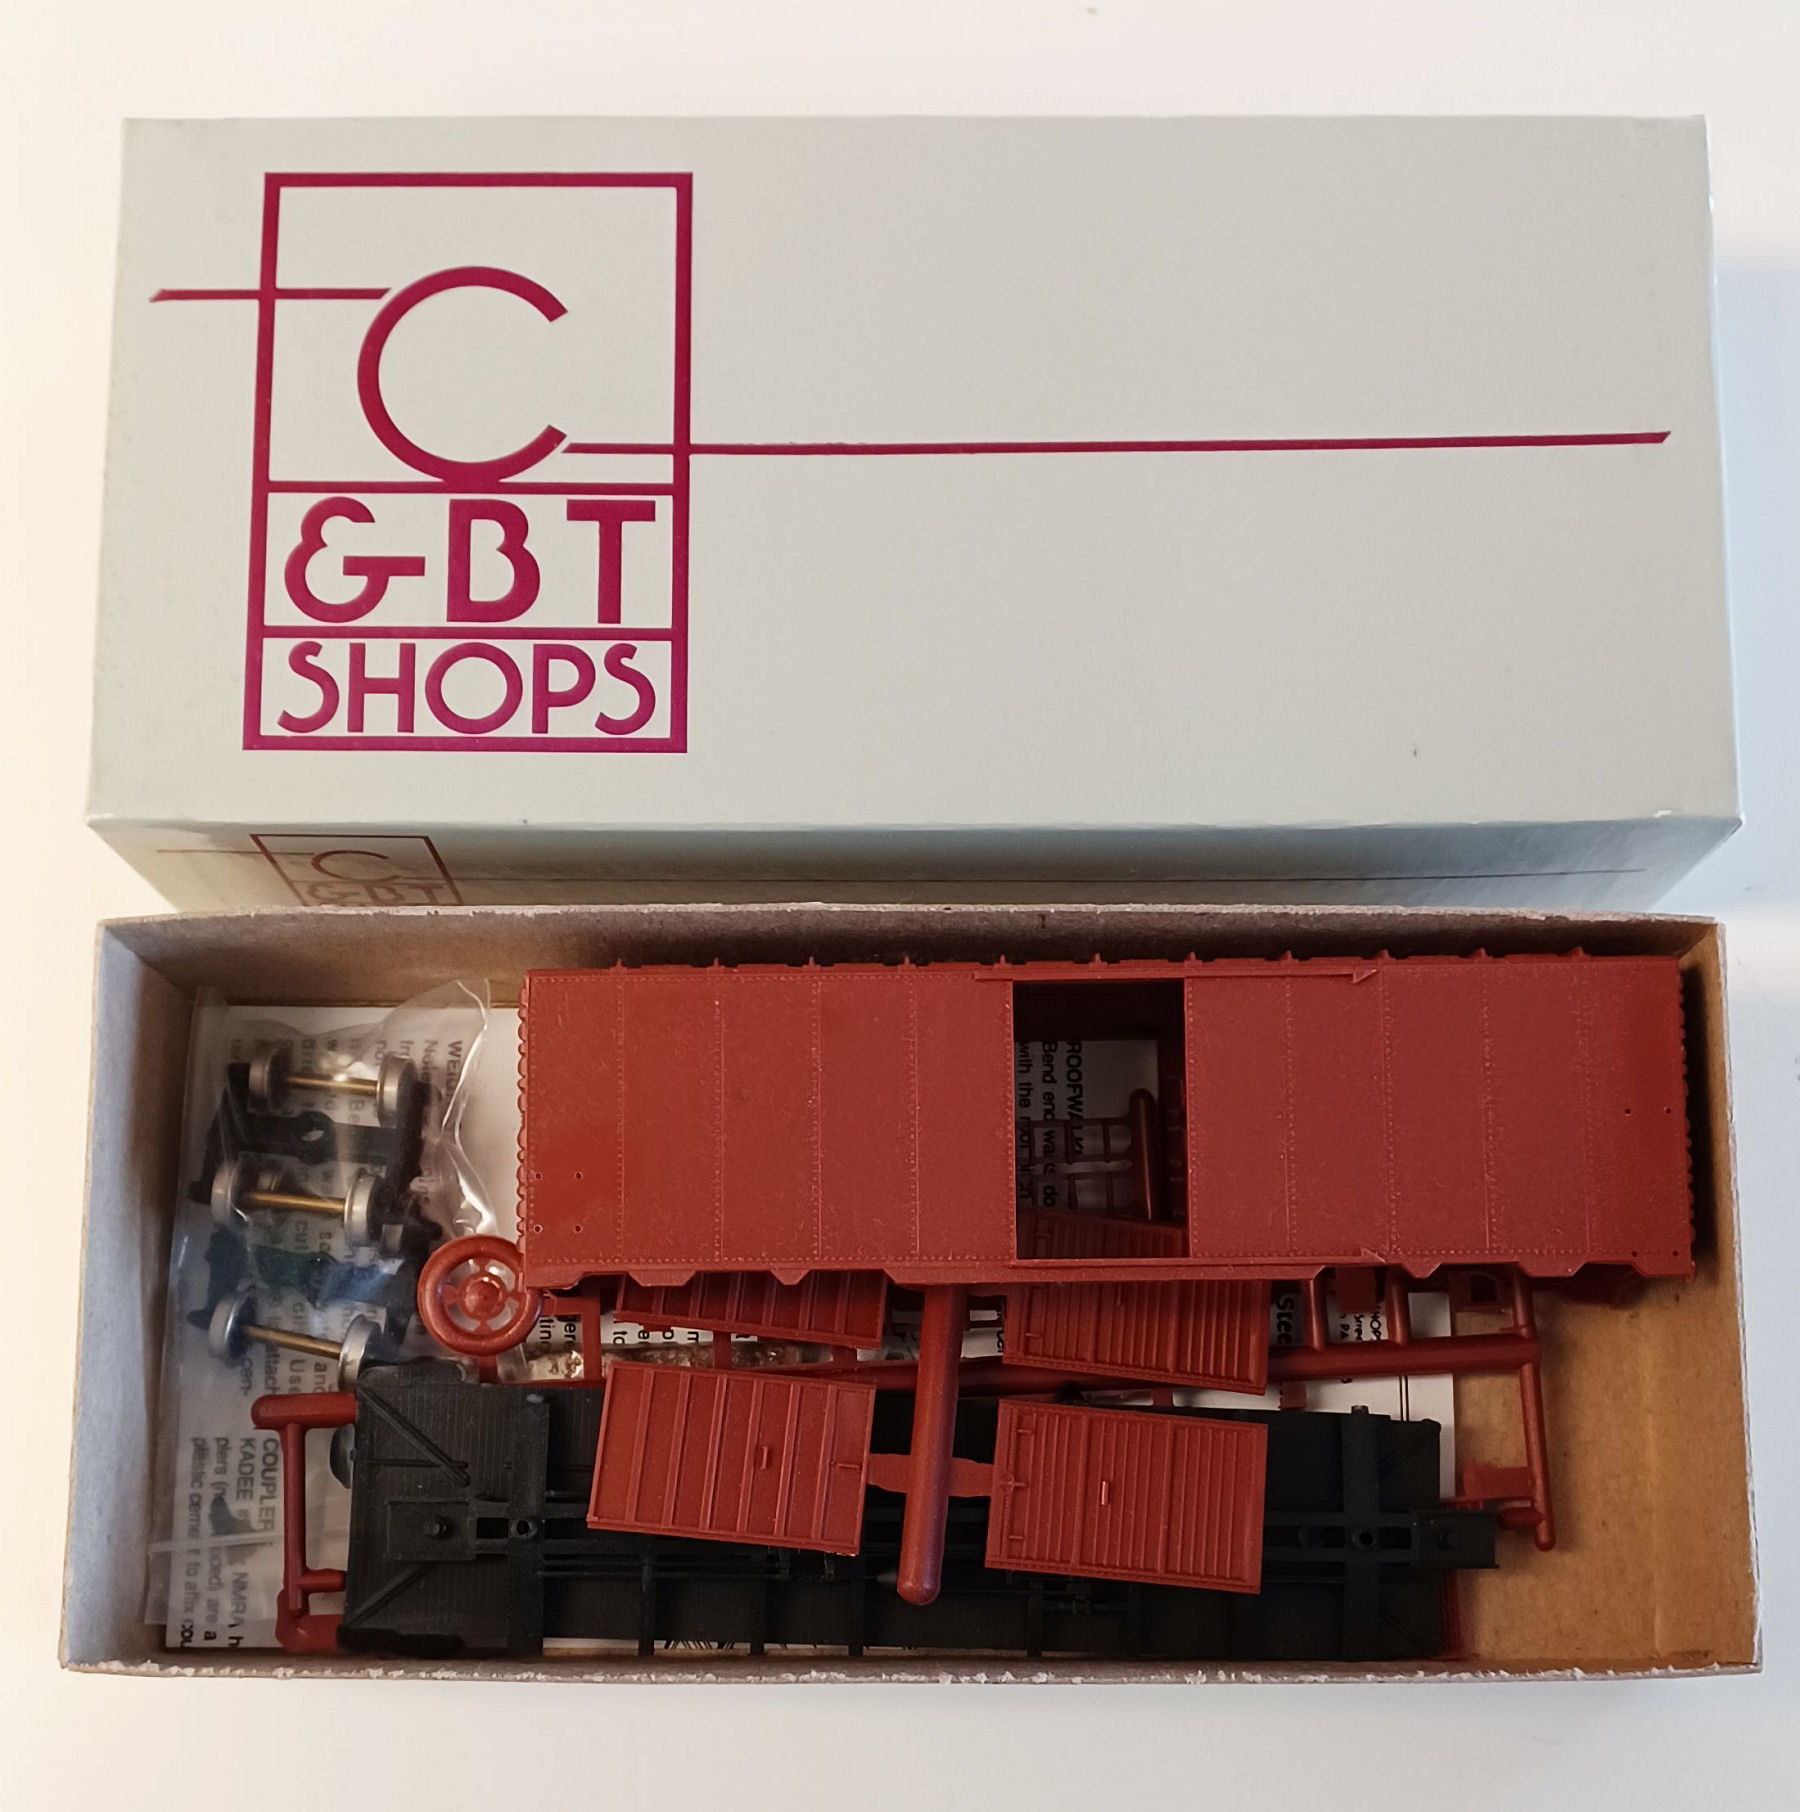
C&BT Shops kit for the 1944-AAR Boxcar with 6ft-door. They also offered a 1949-AAR car, and both kits were available in 6′, 7′, 8′, and double-door versions. Though the main body, doors and underframe are all good quality, the detail parts provided were rather crude and brittle.

There was however a big drawback with the C&BT kit. Though the moulding of the boxcar model itself was very good (they stand up to many models still in production today), the detail parts provided were coarse and of poorer quality. Also the plastic used was brittle, so you’d easily break these parts just cutting them from their sprues. This probably was what ultimately doomed C&BT from becoming a bigger player in the hobby, like Intermountain or Proto 2000 became, even though those manufacturers arrived on the scene later.

Over the decades, I’ve come to learn the history behind C&BT’s troubles. The story was their original tool & die maker had passed away just after finishing the main model, and another person of leaser experience was rushed in to complete the detail parts. Then once on the market, rather than upgrading the parts sprue, they decided to go the Accurail route (who just started up in the early 1990s) by re-engineering the moulds with cast-on details. The company lasted a number of years like this well into the 2000s, but with their momentum gone, they eventually exited the market.

CBT_Kit_002

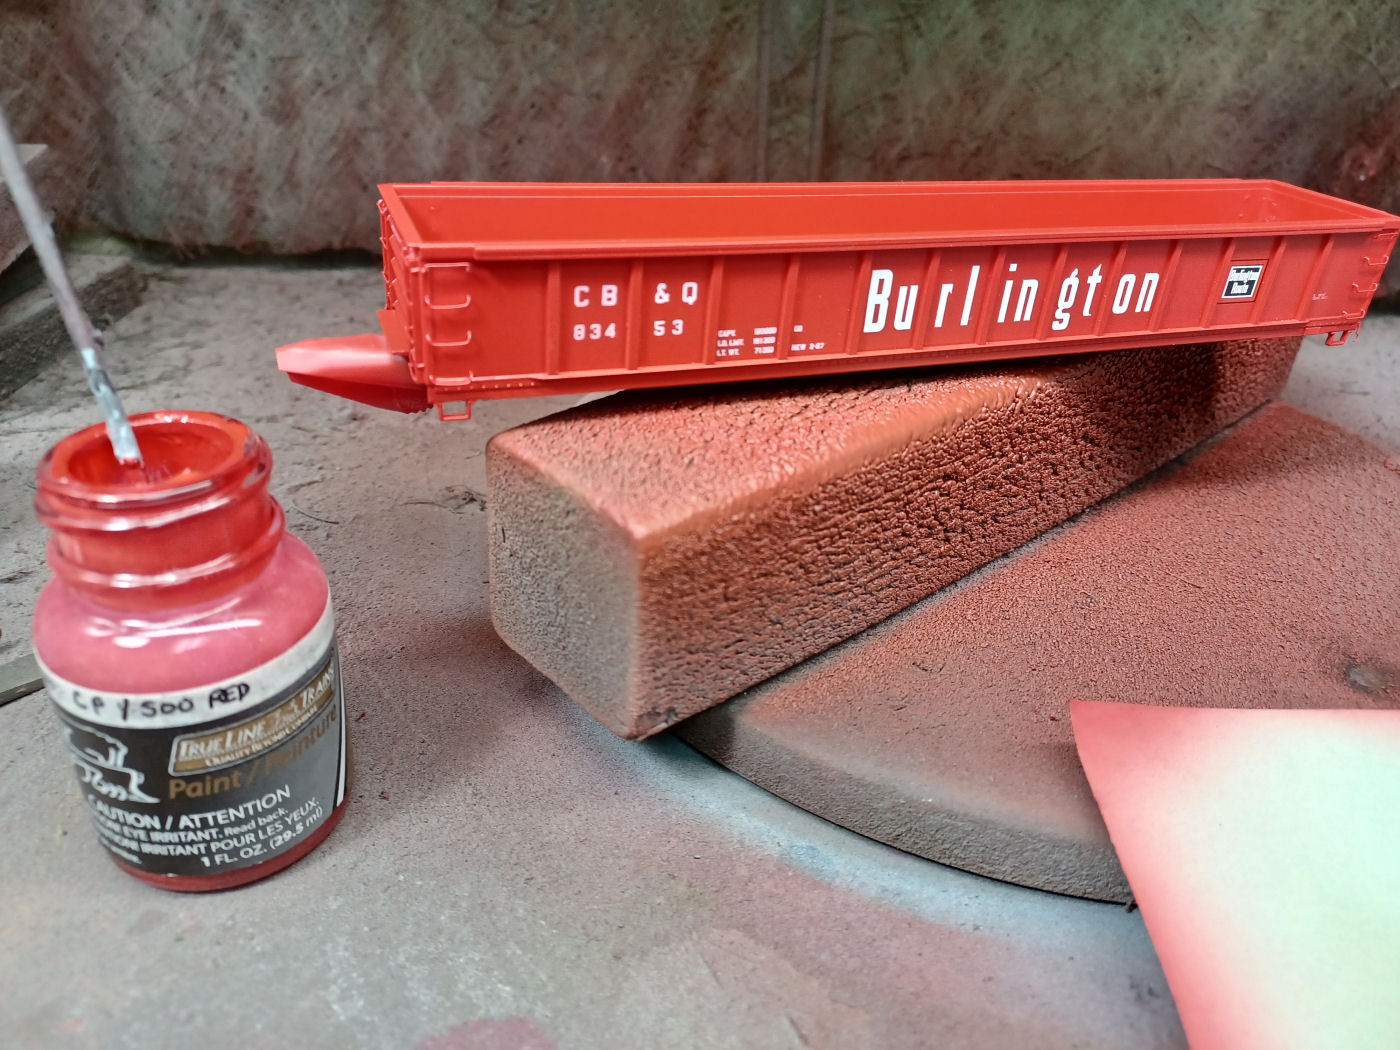
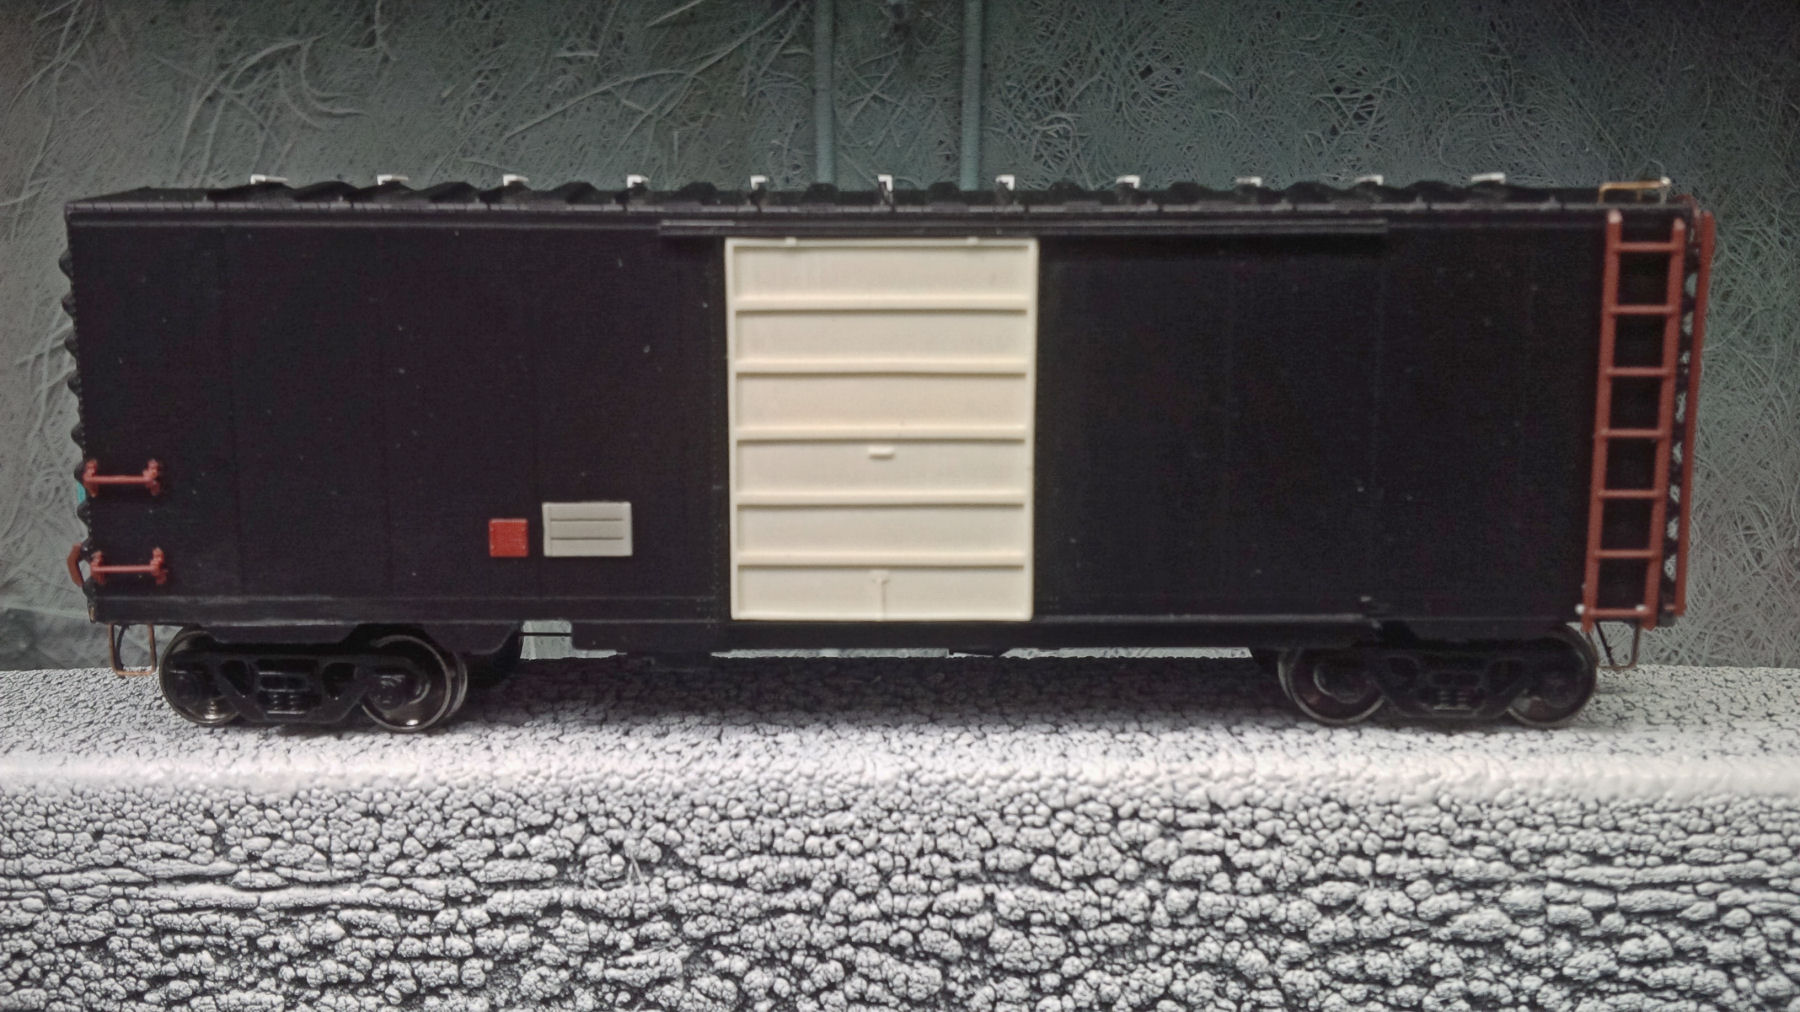
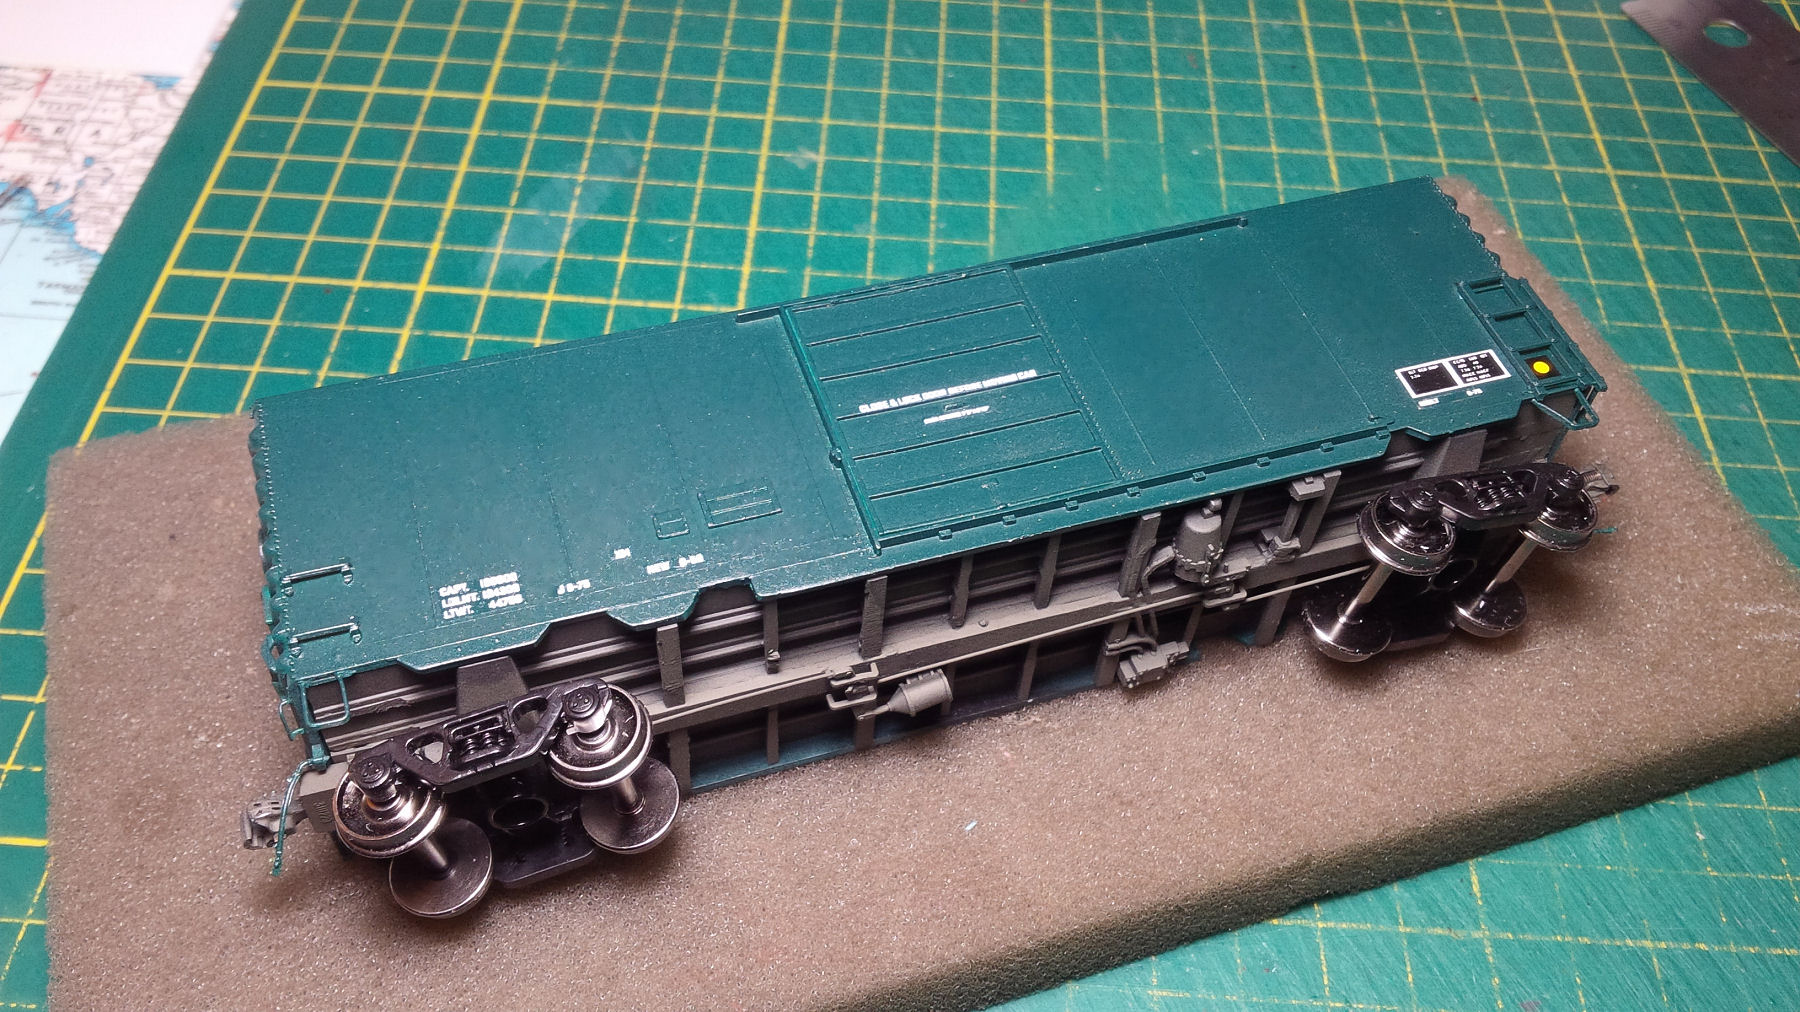
This started off as a later C&BT car with moulded-on detail, and pre-painted in the CPR ‘stepped-Gothic’ scheme. Look close you can still see the original lettering under the primer. All moulded labbers and grabirons were removed, new resin NSC-3 ends added, and miscellaneous details applied. Grabirons will be added later as they will get in the way of Multimark application.

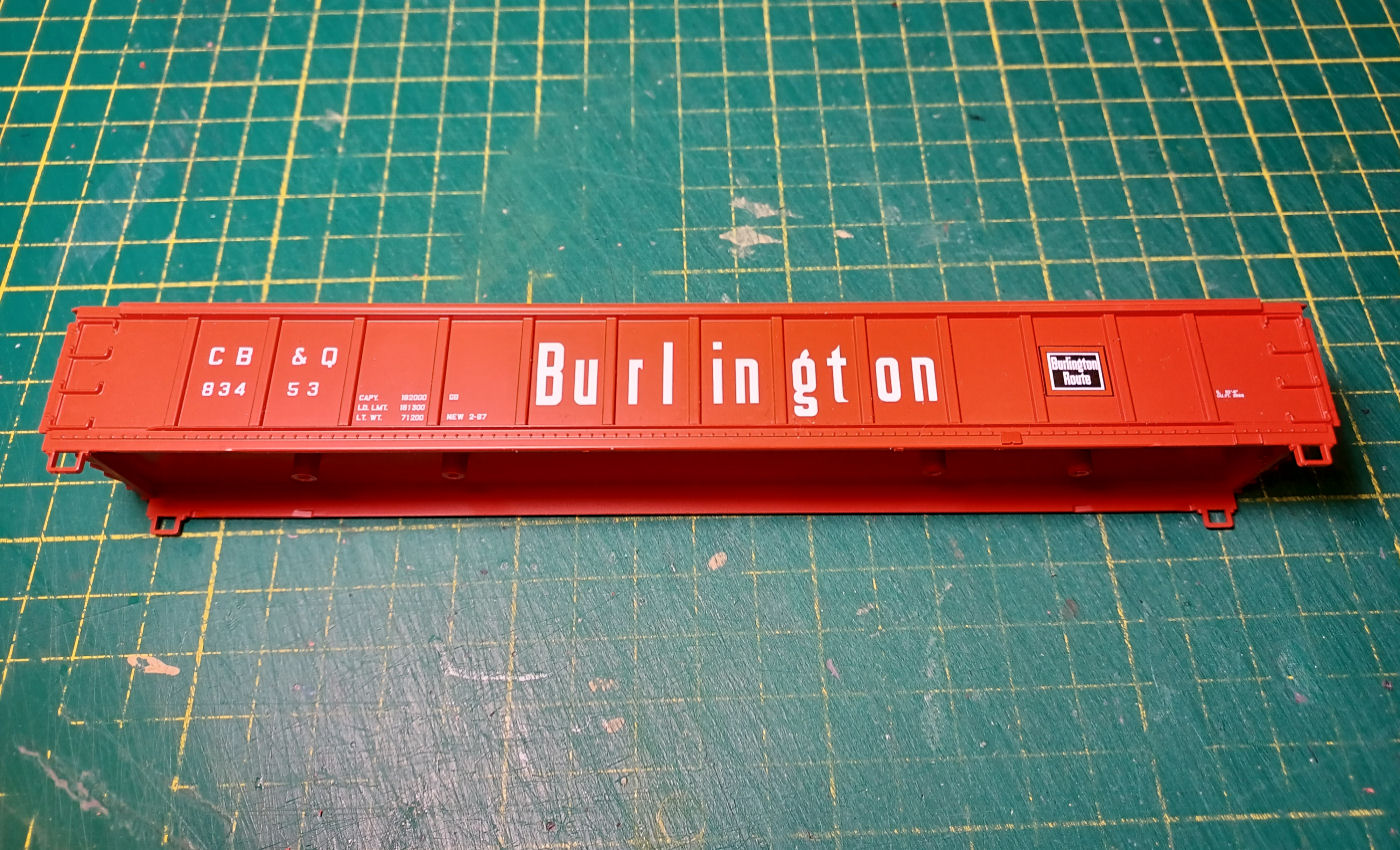
The impetus for this project was a gift of surplus equipment given to the CP Sudbury Division. The donation consisted of several CPR boxcar models from different manufacturers, and included this C&BT blast-from-the-past. It was a later-issued kit with moulded details, and pre-painted in the Canadian Pacific ‘stepped-Gothic’ paint scheme. Additionally the paint was a very bright oxide red, much more like CN oxide than CP tuscan, and also the lettering was too thick. It was however an accurate model for a CPR boxcar featuring; a diagonal panel roof, 4/4 pattern Dreadnaught ends, and appropriately numbered in the CP 258xxx-series. I initially considered salvaging the original paint, but the detail-nut in me could not tolerate the moulded-on details.

CBT_Kit_003

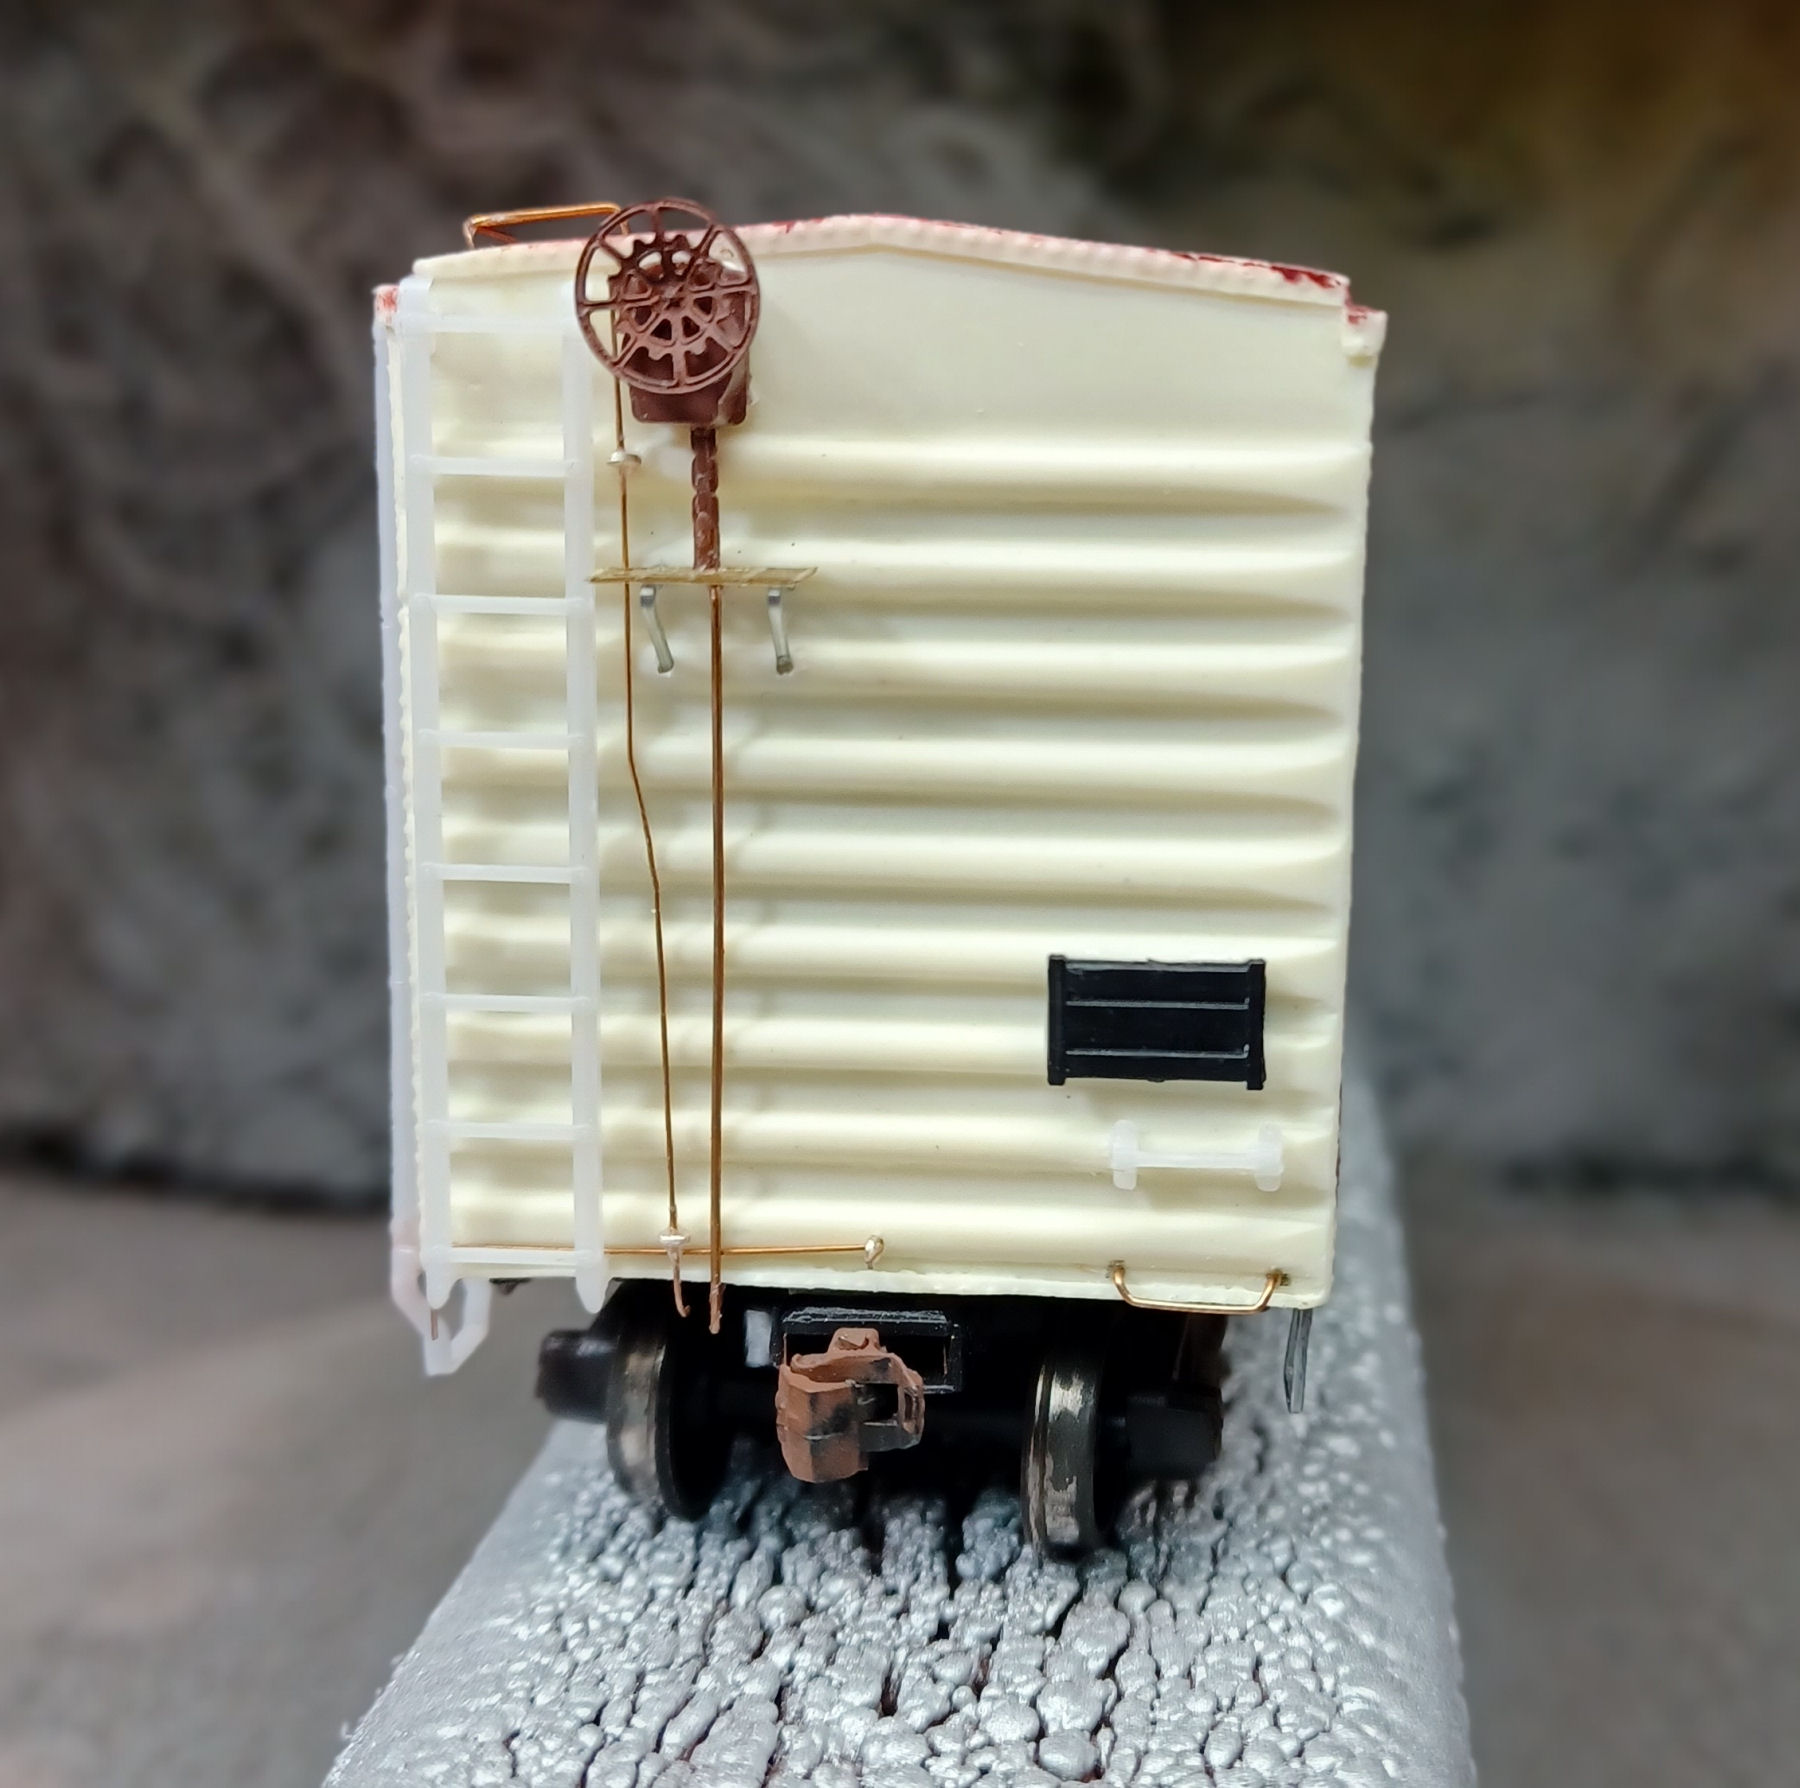
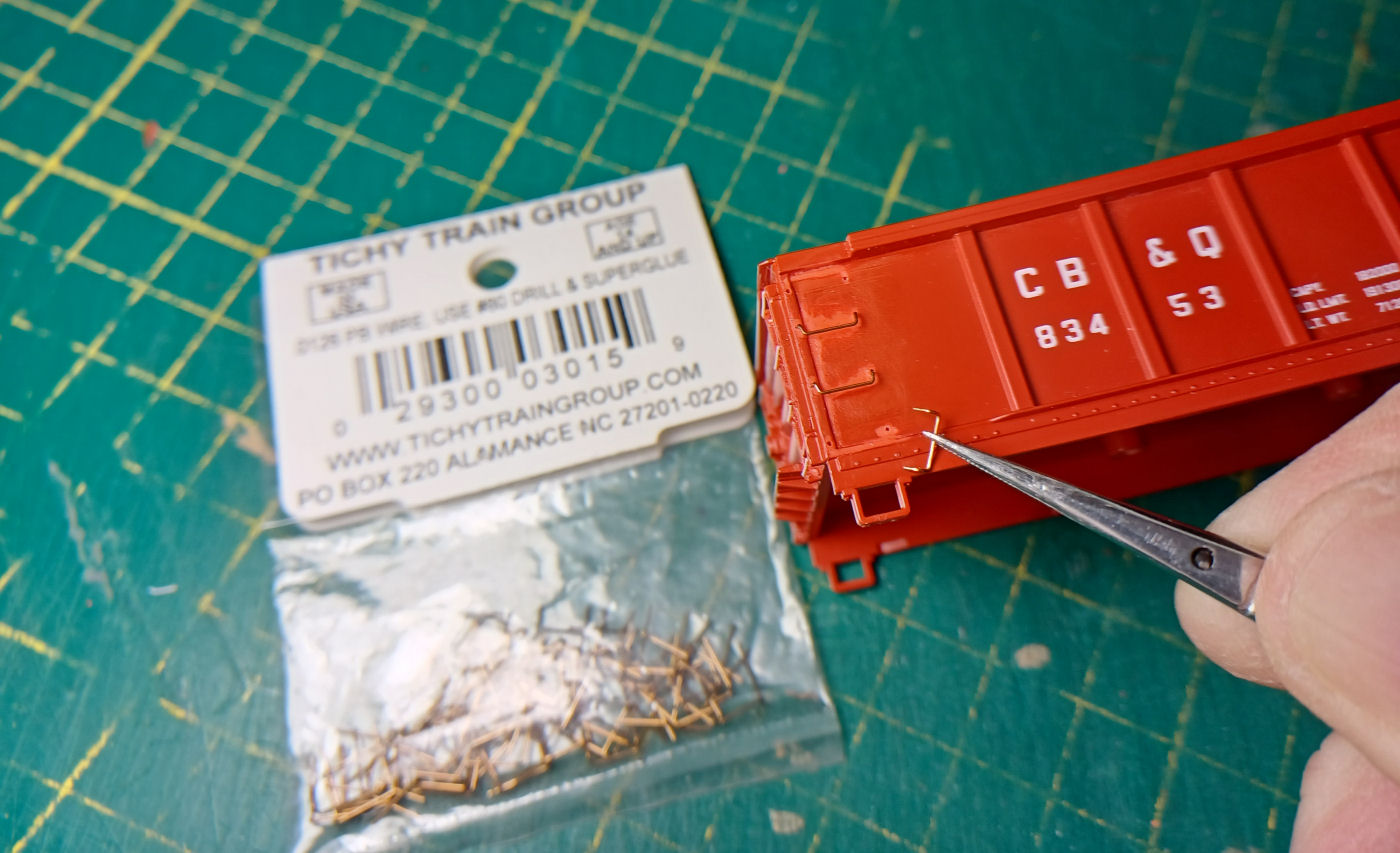
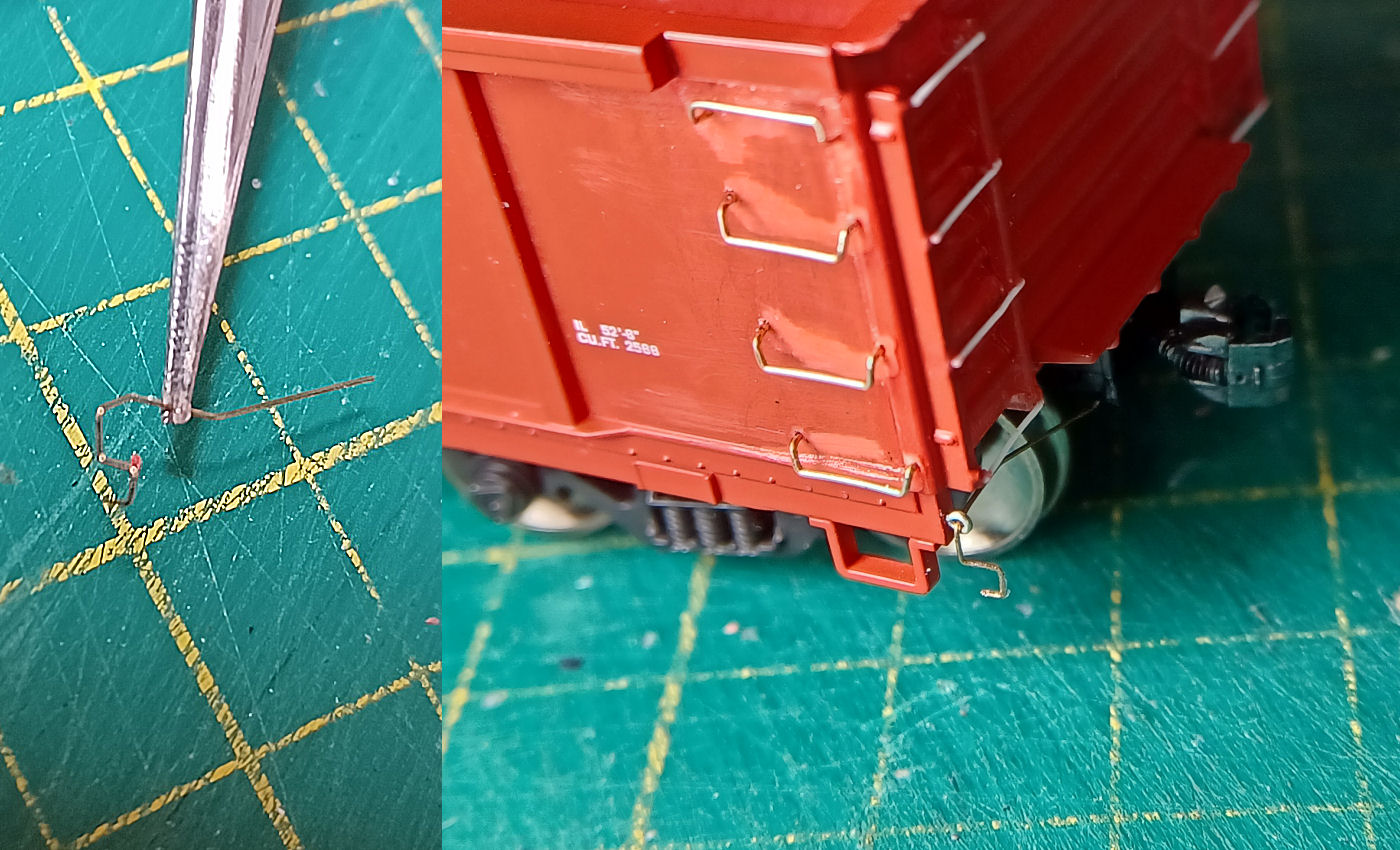
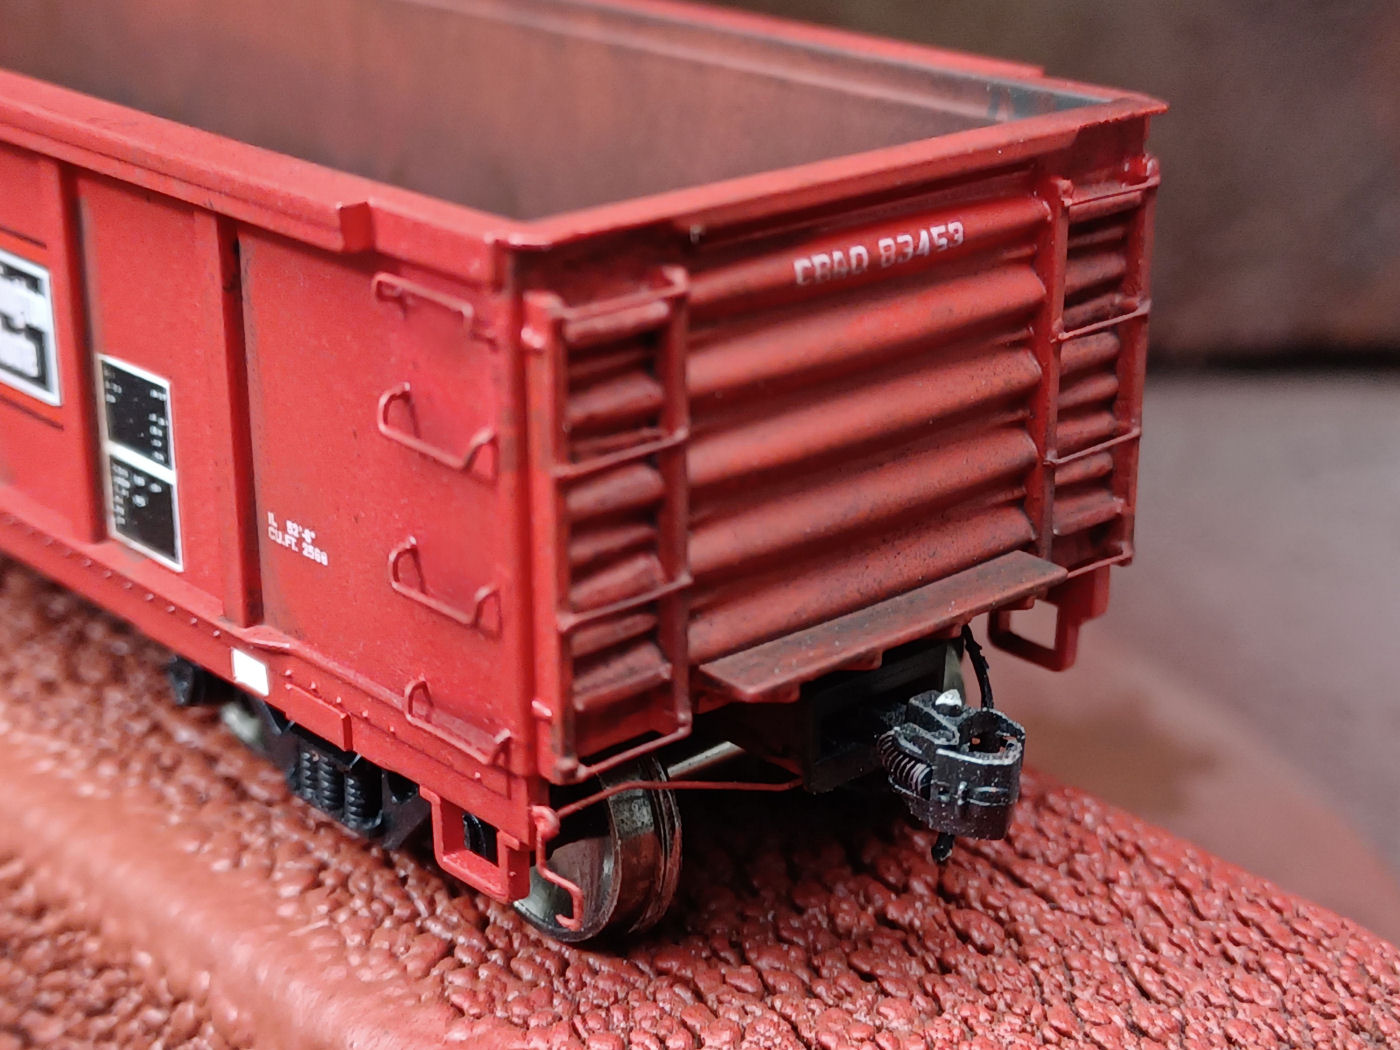
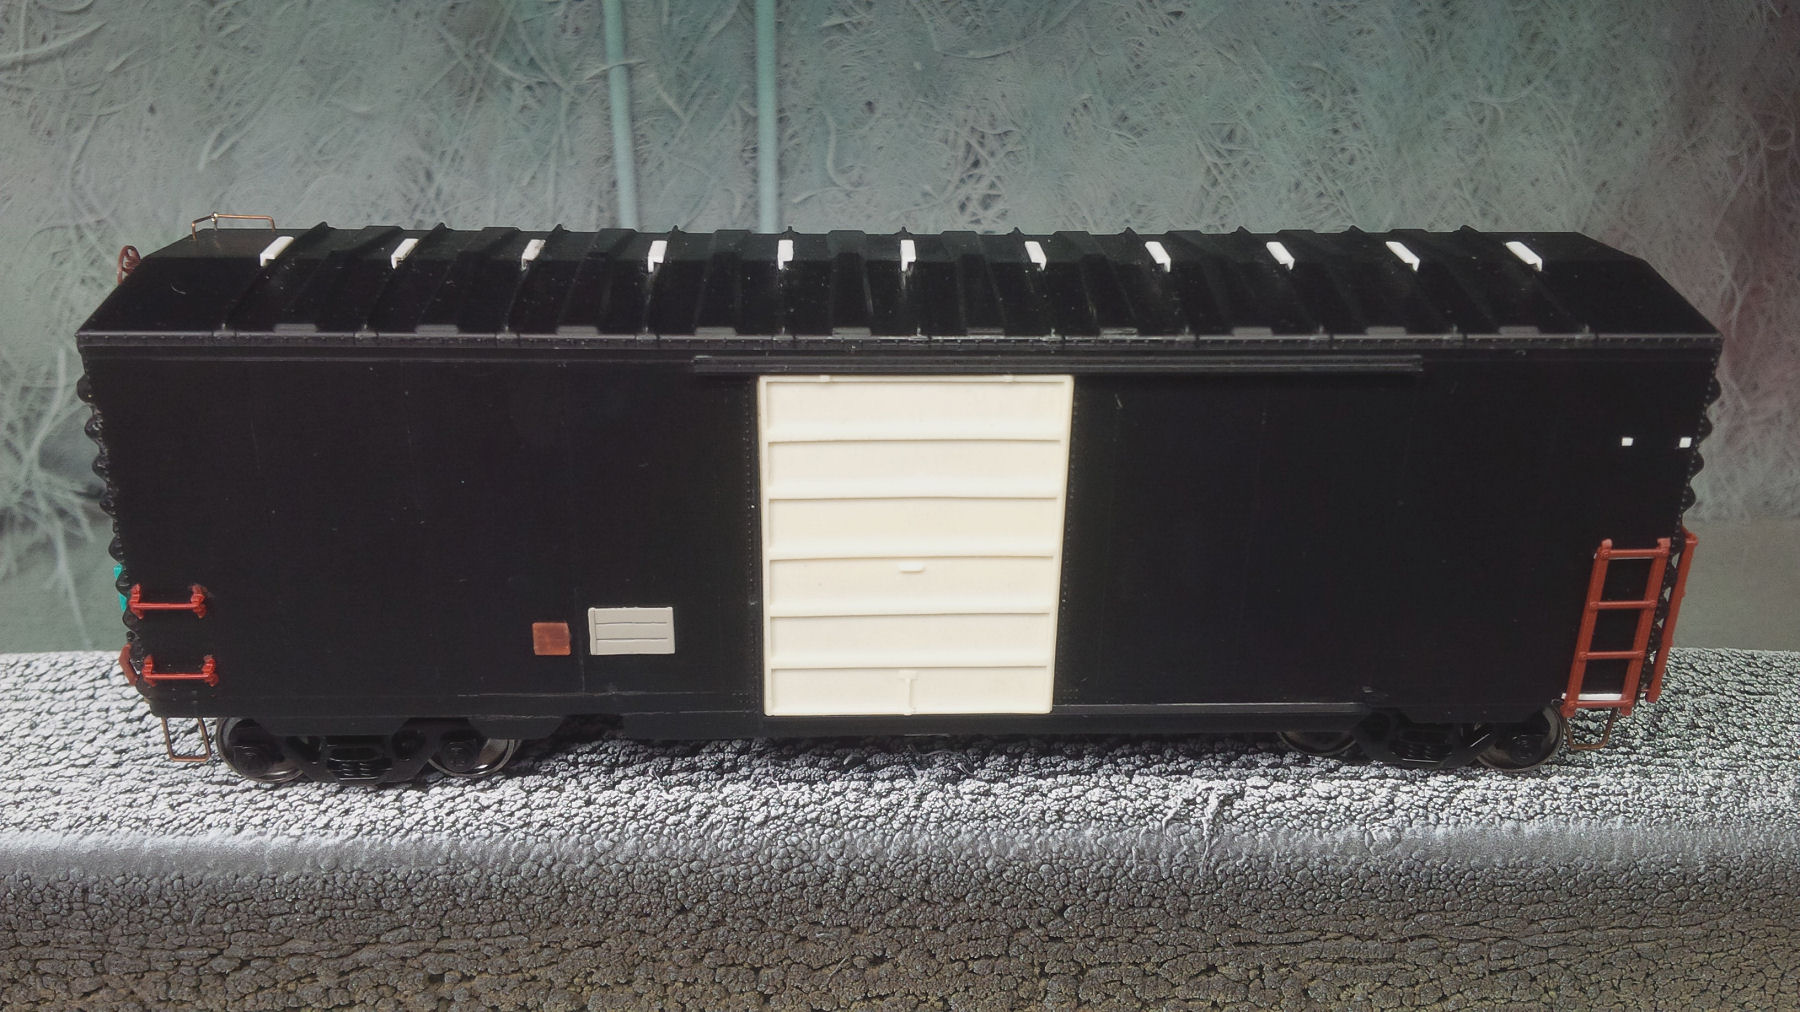
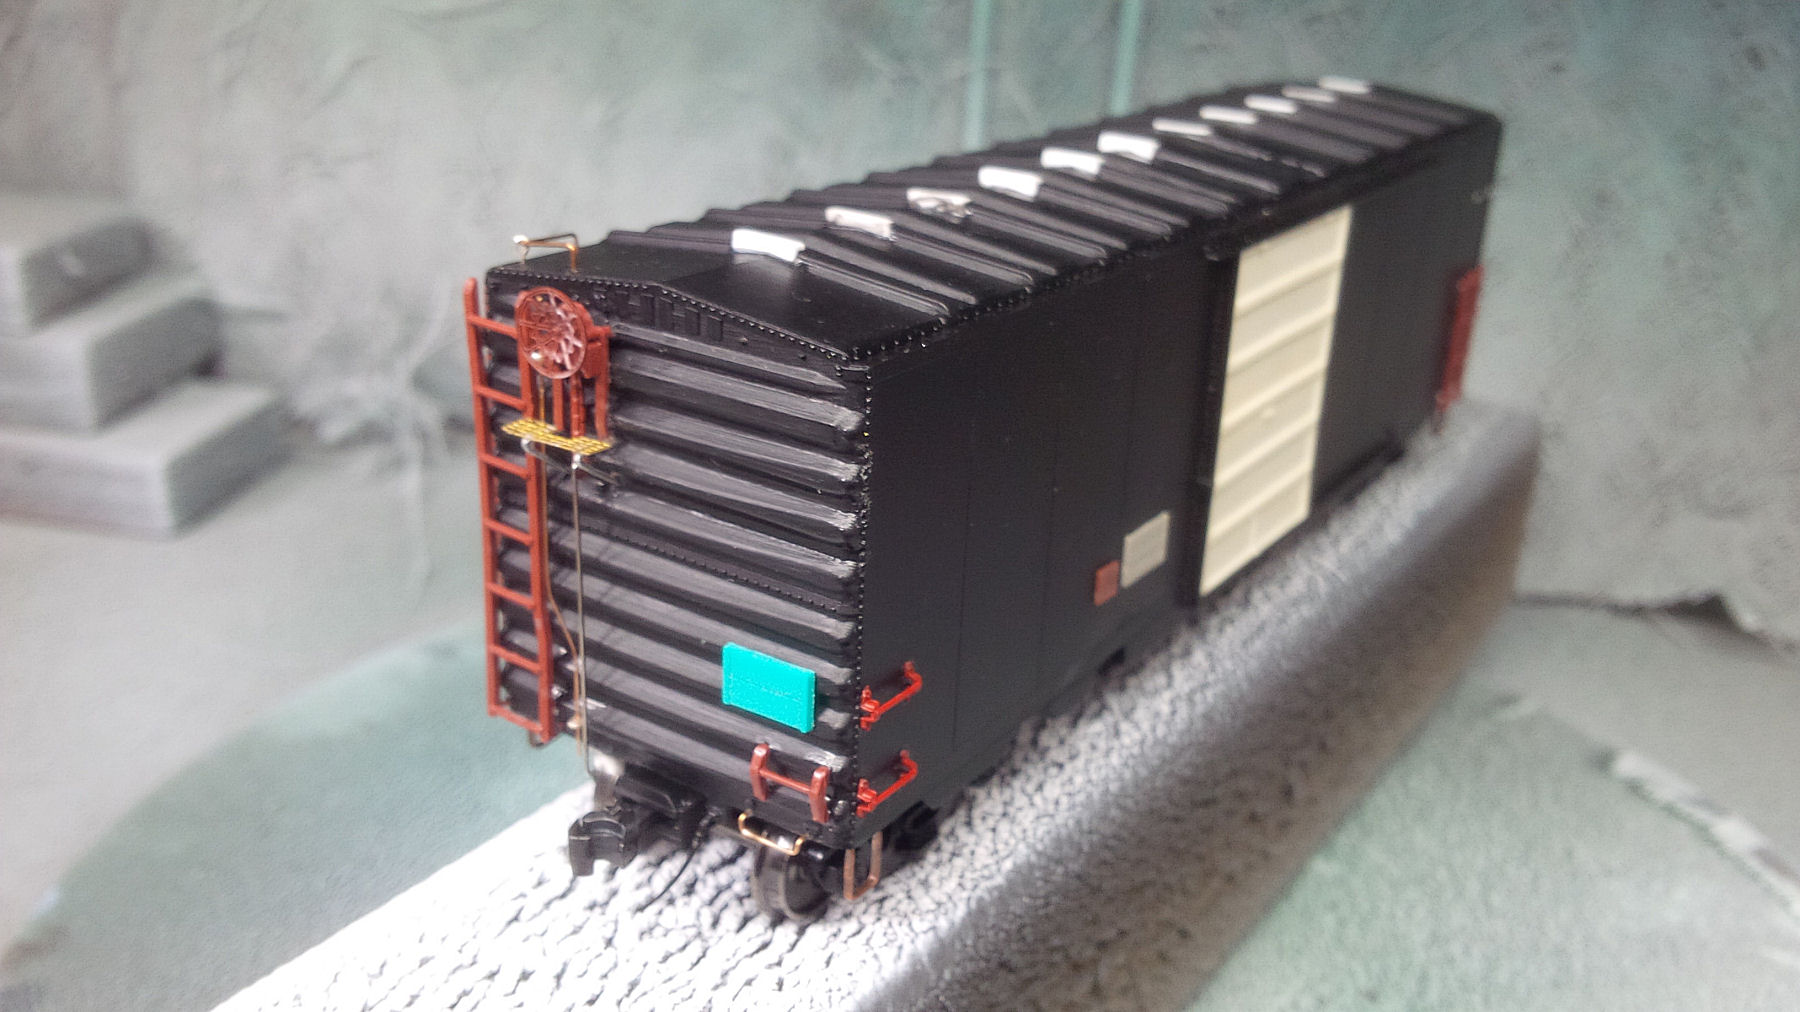
‘B’ end details shown here before a primer coat was applied. Ladders and grabirons are Intermountain parts. Brakewheel is Kadee, in an old Front Range (I think) housing. The brake platform was fabricated with re-bent staples and a piece of photo-etched roofwalk material.

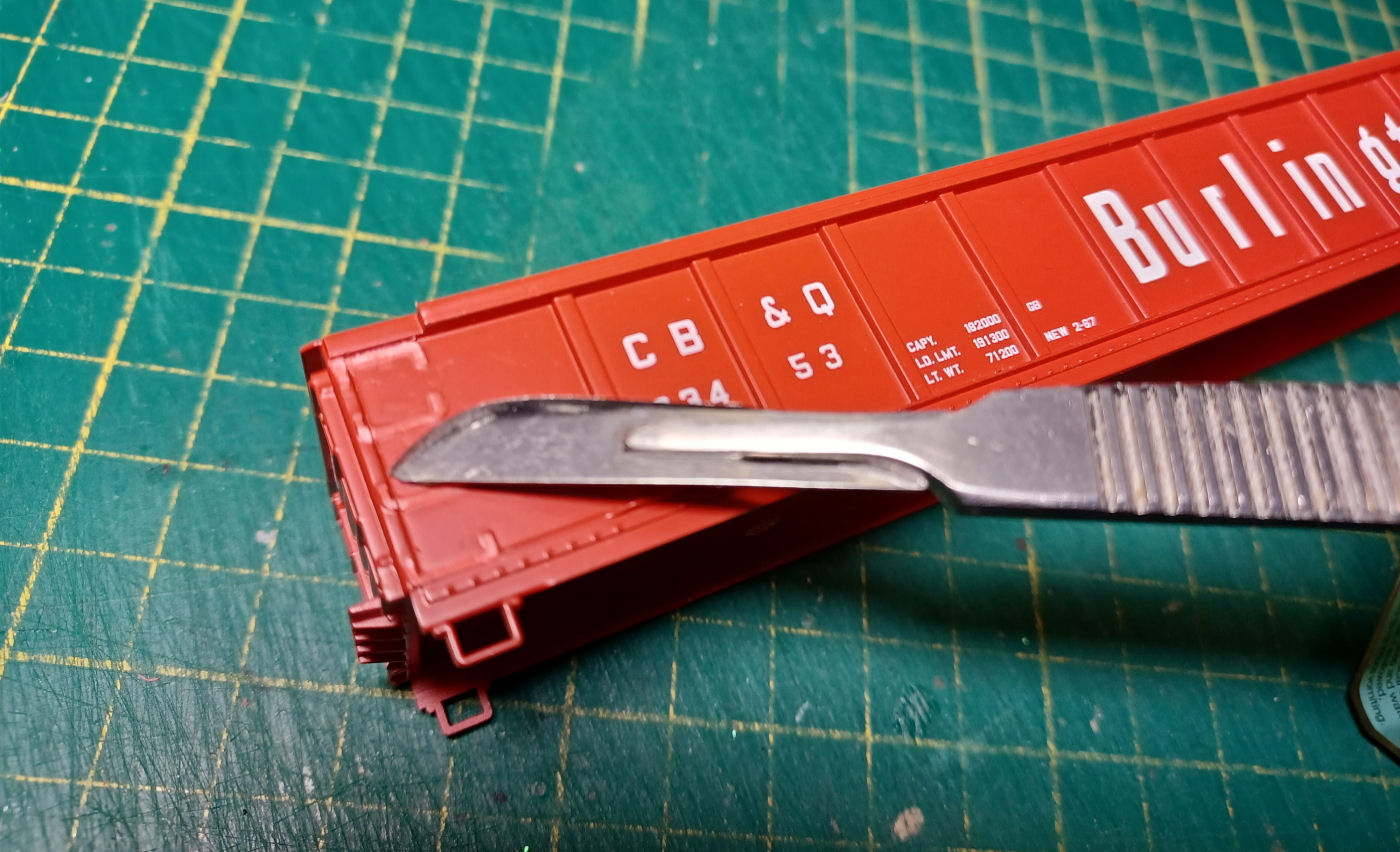
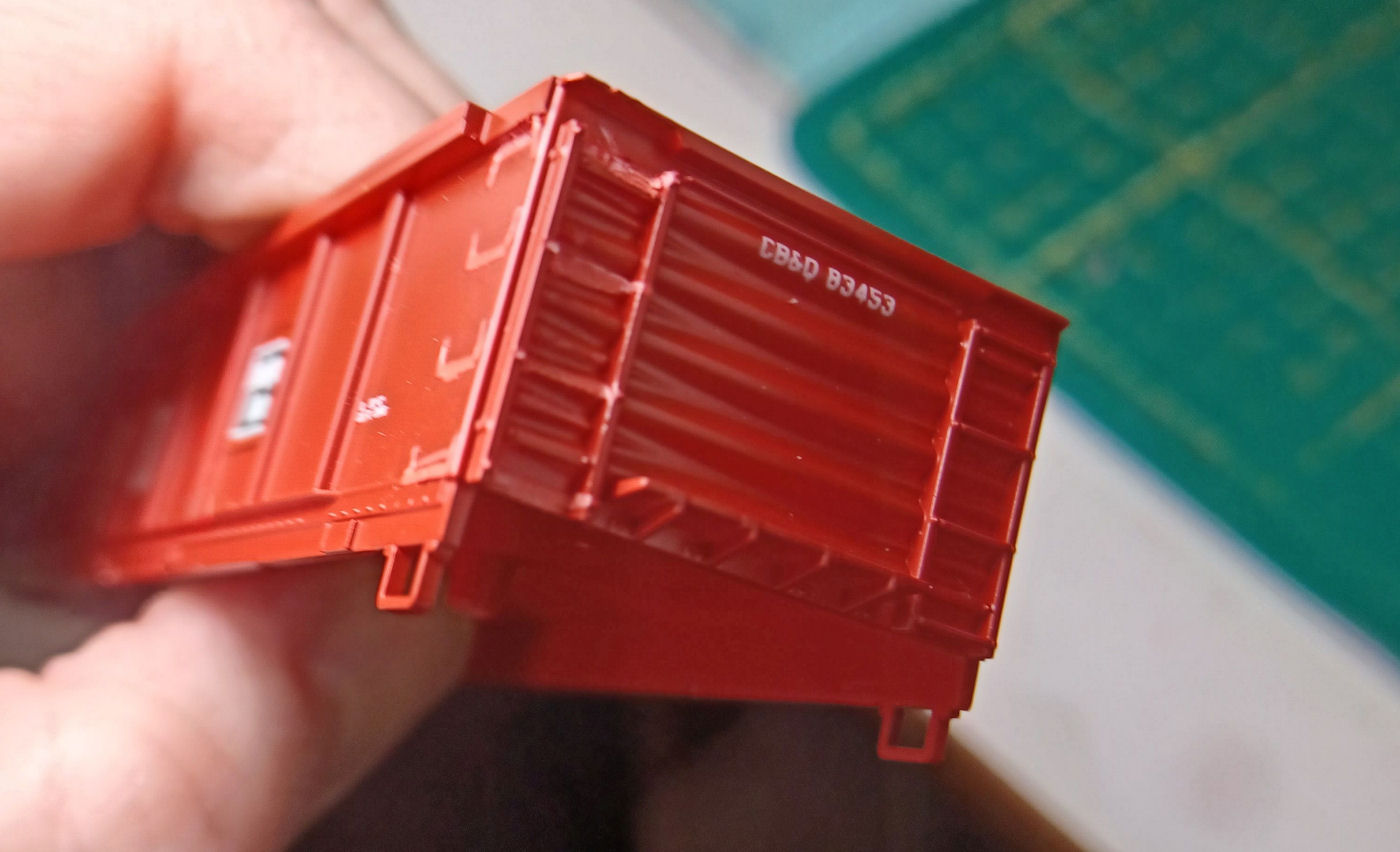
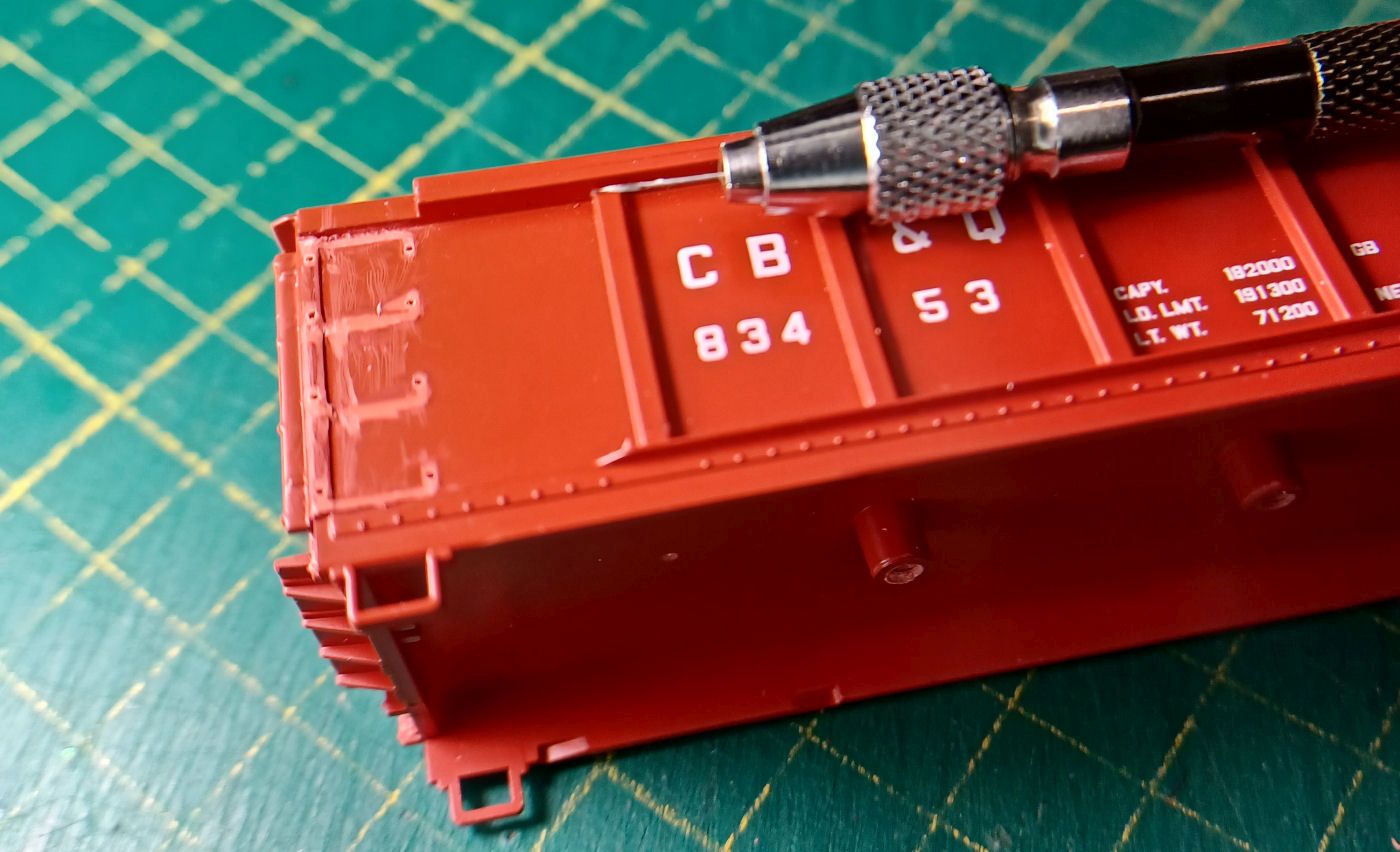
The ladders and grabirons were removed and sanded down from the car-sides easily enough, but cutting into the ladders on the car ends was a challenge. I found the plastic much tougher that the polystyrene which Accurail uses, who’s kit’s I’ve hacked and modified many times over the years. So I chose to cut the ends off entirely, as I reasoned that replacement had to be easier than all the hacking, gouging and sanding my original approach would take. That and I’ve collected many different boxcar ends from various old kits over the years. Then as I looked though the collection, I noticed how many stored Sylvan NSC-3 ends were in there (now offered by Yarmouth Model Works). Rather than kitbashing a run-of-the-mill 40ft boxcar that Intermountain and Atlas already offer ready-to-run, why not make it an uncommon car? And heck, if I’m going this far, it deserves a new paint job. My quickie kitbash job soon turned into the dictionary definition of mission creep.

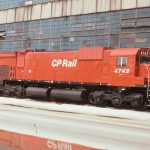
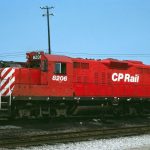
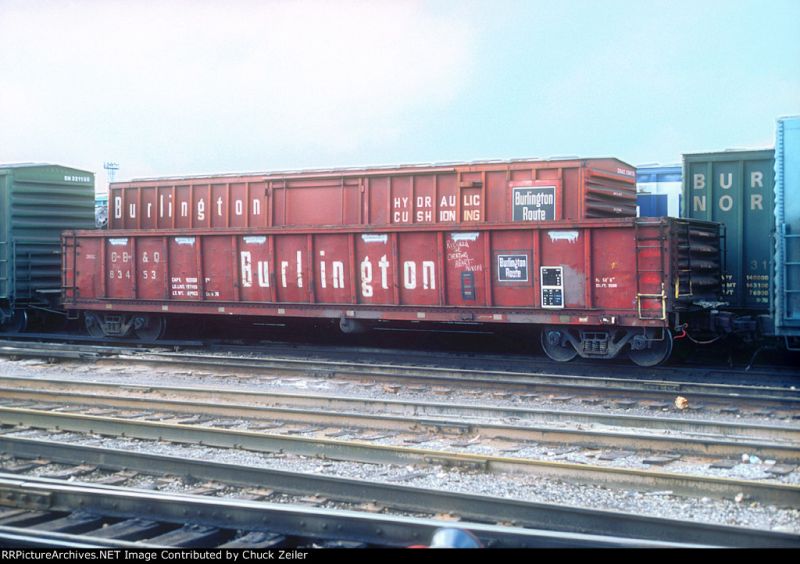
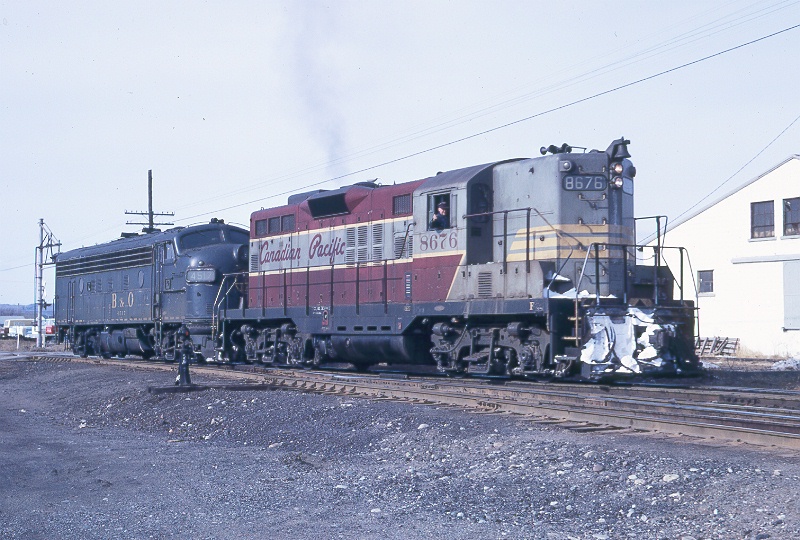
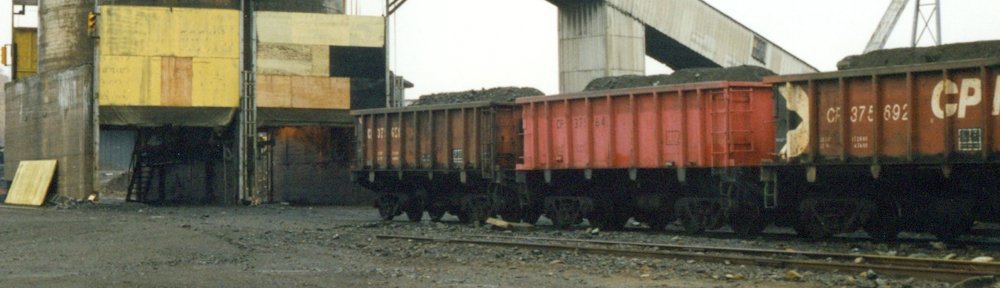
Now that this project had gotten well into the weeds and had become a serious kitbash, I had to choose a prototype to work from. The decision to add an NSC-3 end onto a car equipped with a 6ft Youngstown door and a diagonal panel roof narrowed it down to just one specific order of Canadian Pacific 40ft boxcars; series CP 140950-141699 delivered in 1954 from National Steel Car. Using Chris vanderHeide’s invaluable Canadian Freight Car Gallery website, I found a great photo of CP 141184 within this specific series.

CP_141184

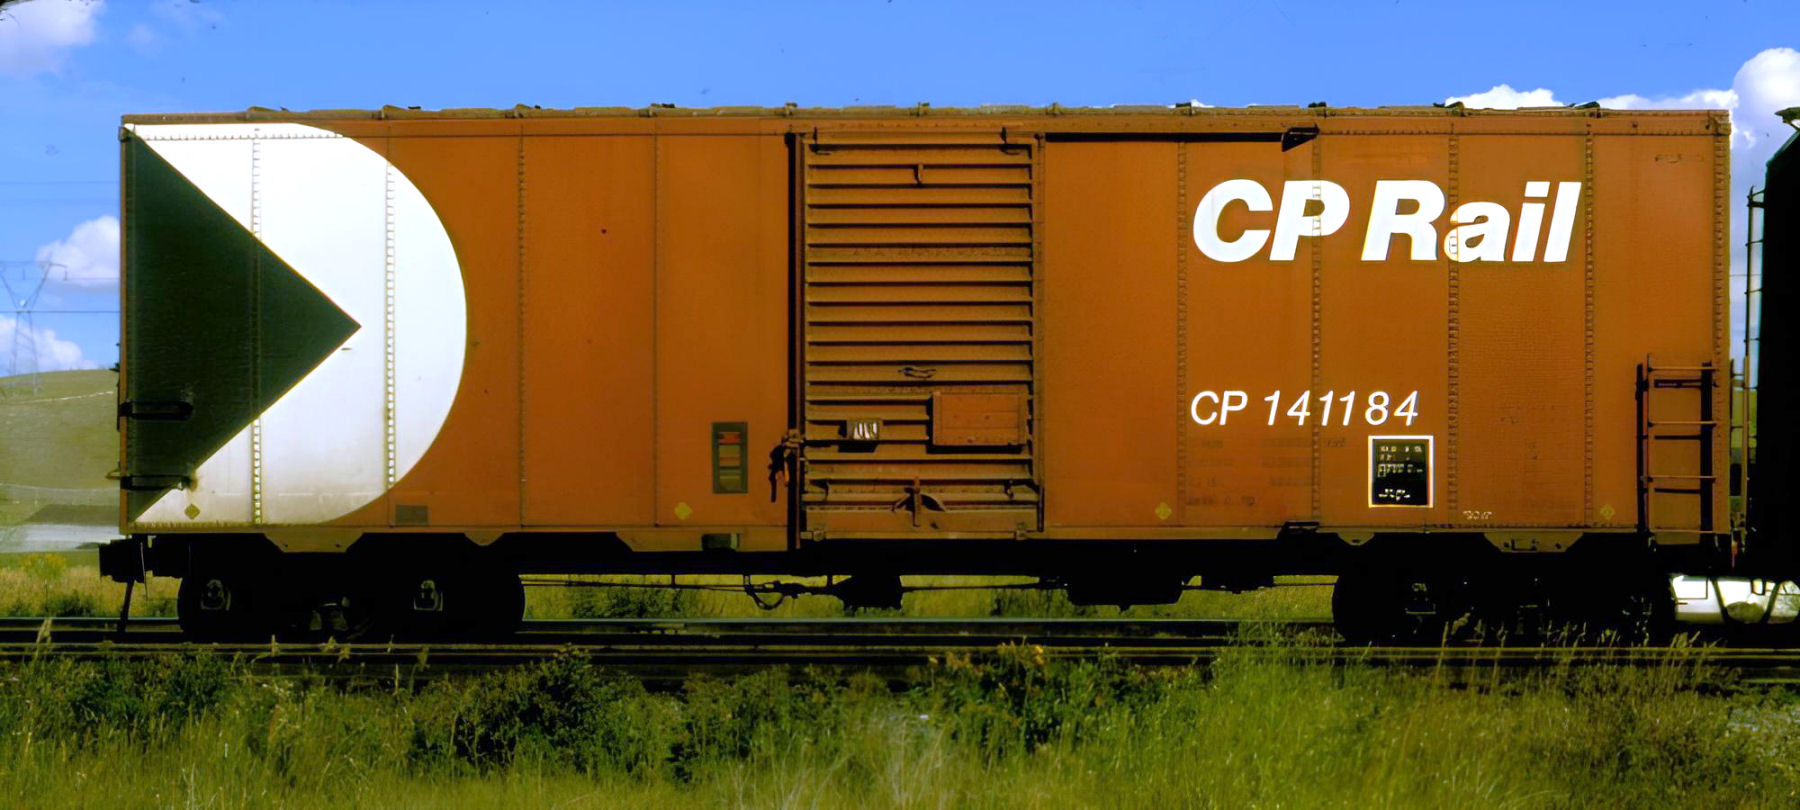
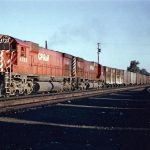
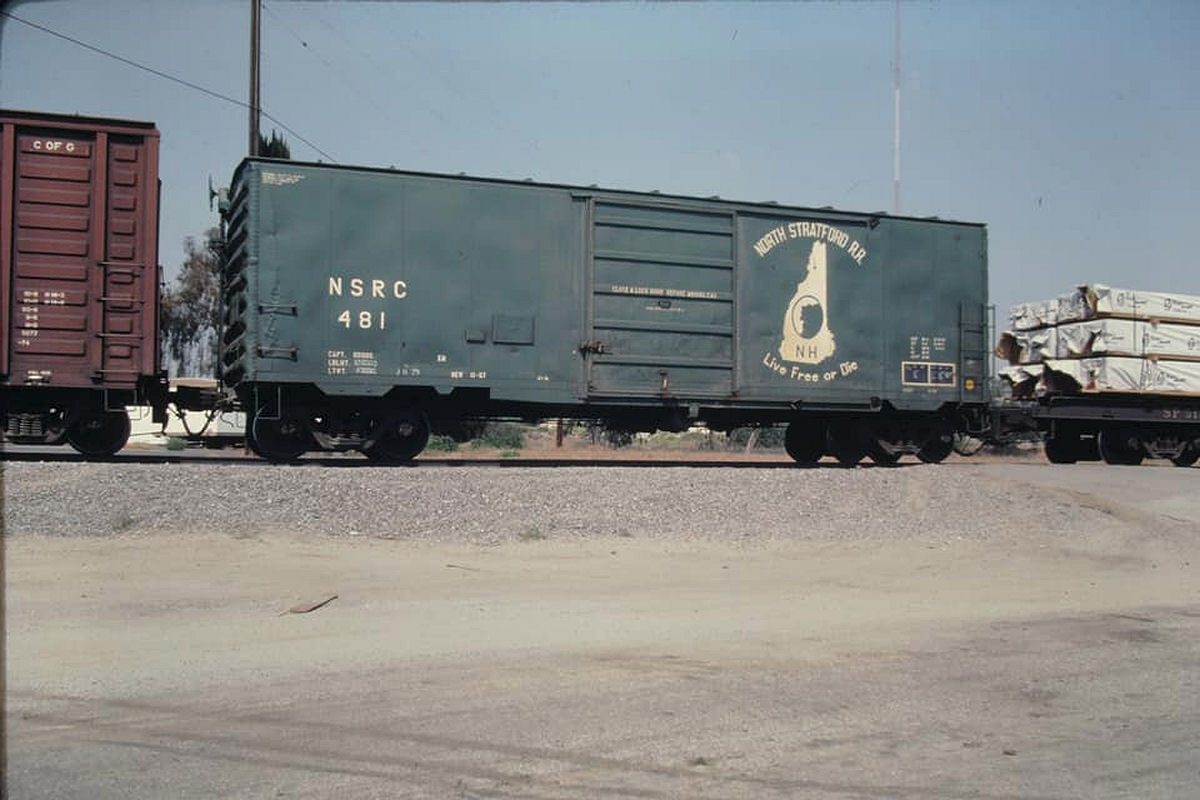
Built in 1954 by National Steel Car, CP 141184 was photographed by Andy J. Broscoe at Bowness, Alberta on 29 August, 1980. Photo courtesy of canadianfreightcargallery.ca

These 1954 built cars were among the last 40 foot boxcars with 6 foot doors received by the CPR, as North American industries began to adopt palatalization and forklifts for logistics and shipping. The following year railways would adopt the 8 foot door as the new standard, and Canadian Pacific was no exception to this.

The CPR received four different orders of 40ft boxcars through 1954, two a piece from Canadian Car & Foundry of Montreal, and two from NSC in Hamilton ON. After receiving literally thousands of near look alike 40-foot boxcars from three different builders within the 250/260xxx series from the late ’40s to early ’50s, these last four orders were each unique. To start, CP was running out of space in the 260xxx’s, and placed these in a new 140xxx-series of road numbers. Next, each one of these orders featured variations in end, roof and door designs; so even the same builder’s two deliveries that year each had visual differences between them. This is another case why prototype modellers should use photographs and reference materials before embarking on any super-detailing projects. This also provides a segway to mention that we have a multi-part series on CP 40ft steel boxcars in the works, so stay tuned.

Since I wished to paint this boxcar in the Action Red 1970s CP Rail scheme, all details were added except the grabirons found on the lower, left-hand sides of the model. The simple reason is they would interfere with the future application of the Mulitmark, and thus are easier to apply after all painting and decal work is complete.

CBT_Kit_004

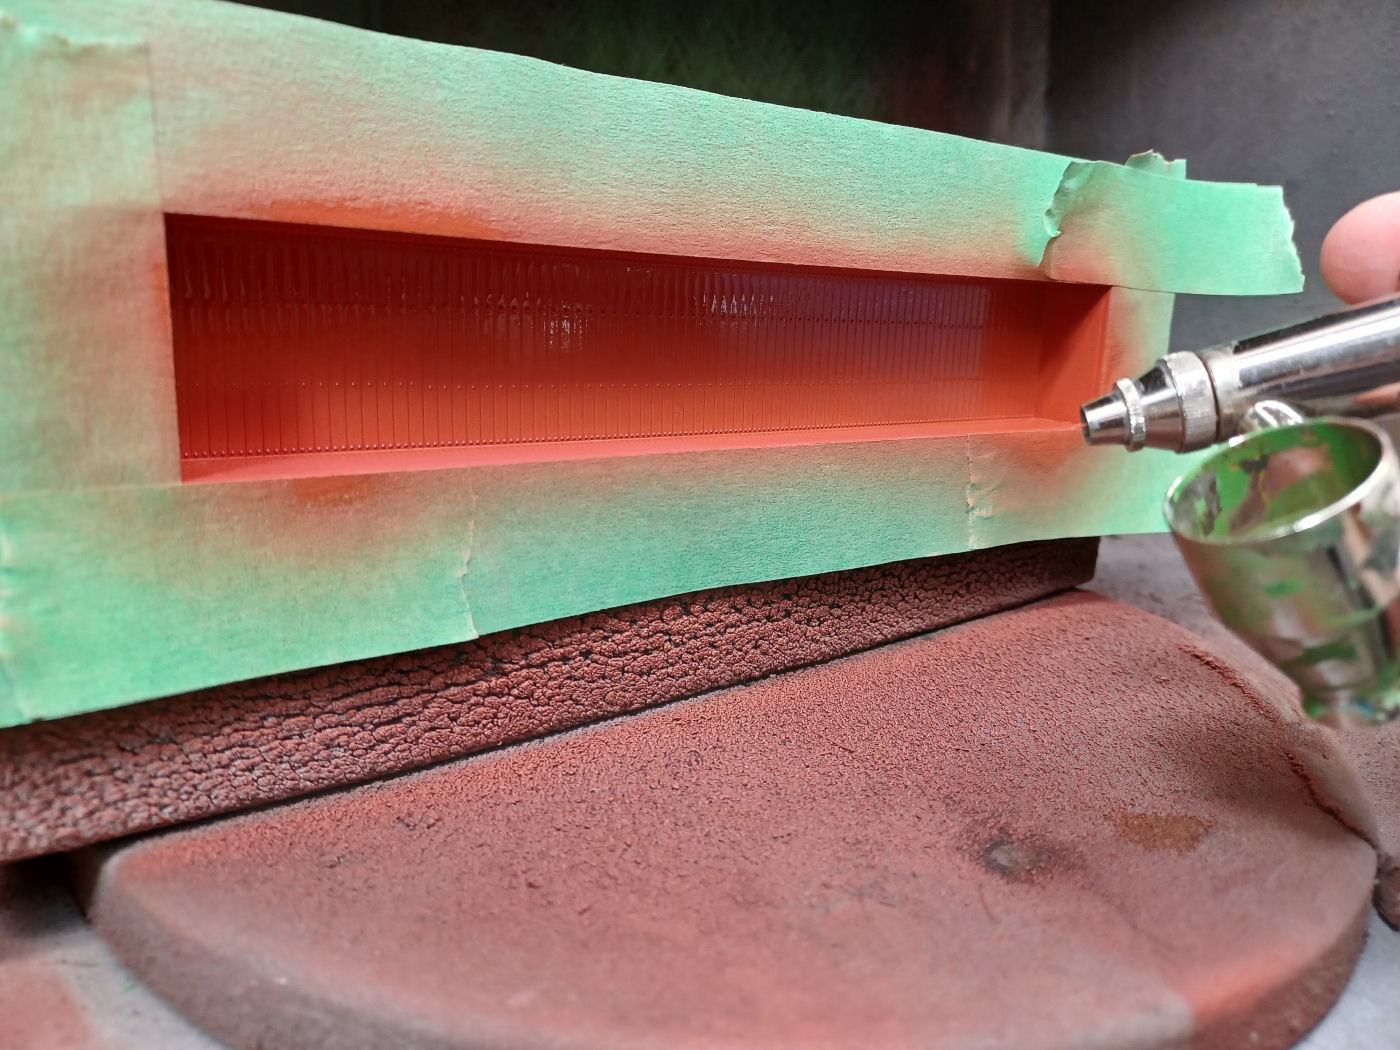
C&BT car at the spraybooth with a fresh coat of Vallejo Air 71085 ‘Ferrari Red’. Click on this image and you can see traces of the old CPR lettering. Normally I remove old graphics before repainting a model, but a barely detectable older scheme showing on a CP Rail boxcar was a real thing.

I am a long-time convert to airbrushing with water-based acrylic paints, and I’m often asked what product I’ve switched to with Polyscale being gone. For a few years I continued to use Testors products, as their ‘Chevy Engine Red’ aqueous acrylic was a close match. But with them leaving the market for good, like most everyone else I’ve switched to Vallejo. After my first few sprays, my initial reaction was Testors who? Vallejo manufactures a superior product. Full stop. The problem of course is they offer no railway specific colours, though that is slowly changing.

For CPR freight equipment tuscan oxide, I find 71039 Hull Red is a good match. Please don’t let the internet fool you, the colour is lighter and more reddish than that image appears, at least from the one displayed on my screen anyhow. For Action Red, I don’t think you will at all be displeased when you spray with 71085 Ferrari Red. To my eyes, it is an almost exact match to the old Accupaint Action Red, which I’ve always considered was the closest thing to the real deal. The daylight LED lighting at our club may affect photography, but the image below is straight from my phone. To my eyes, that’s the orange-red appearance typical of good old CP Rail Action Red.

CBT_Kit_005

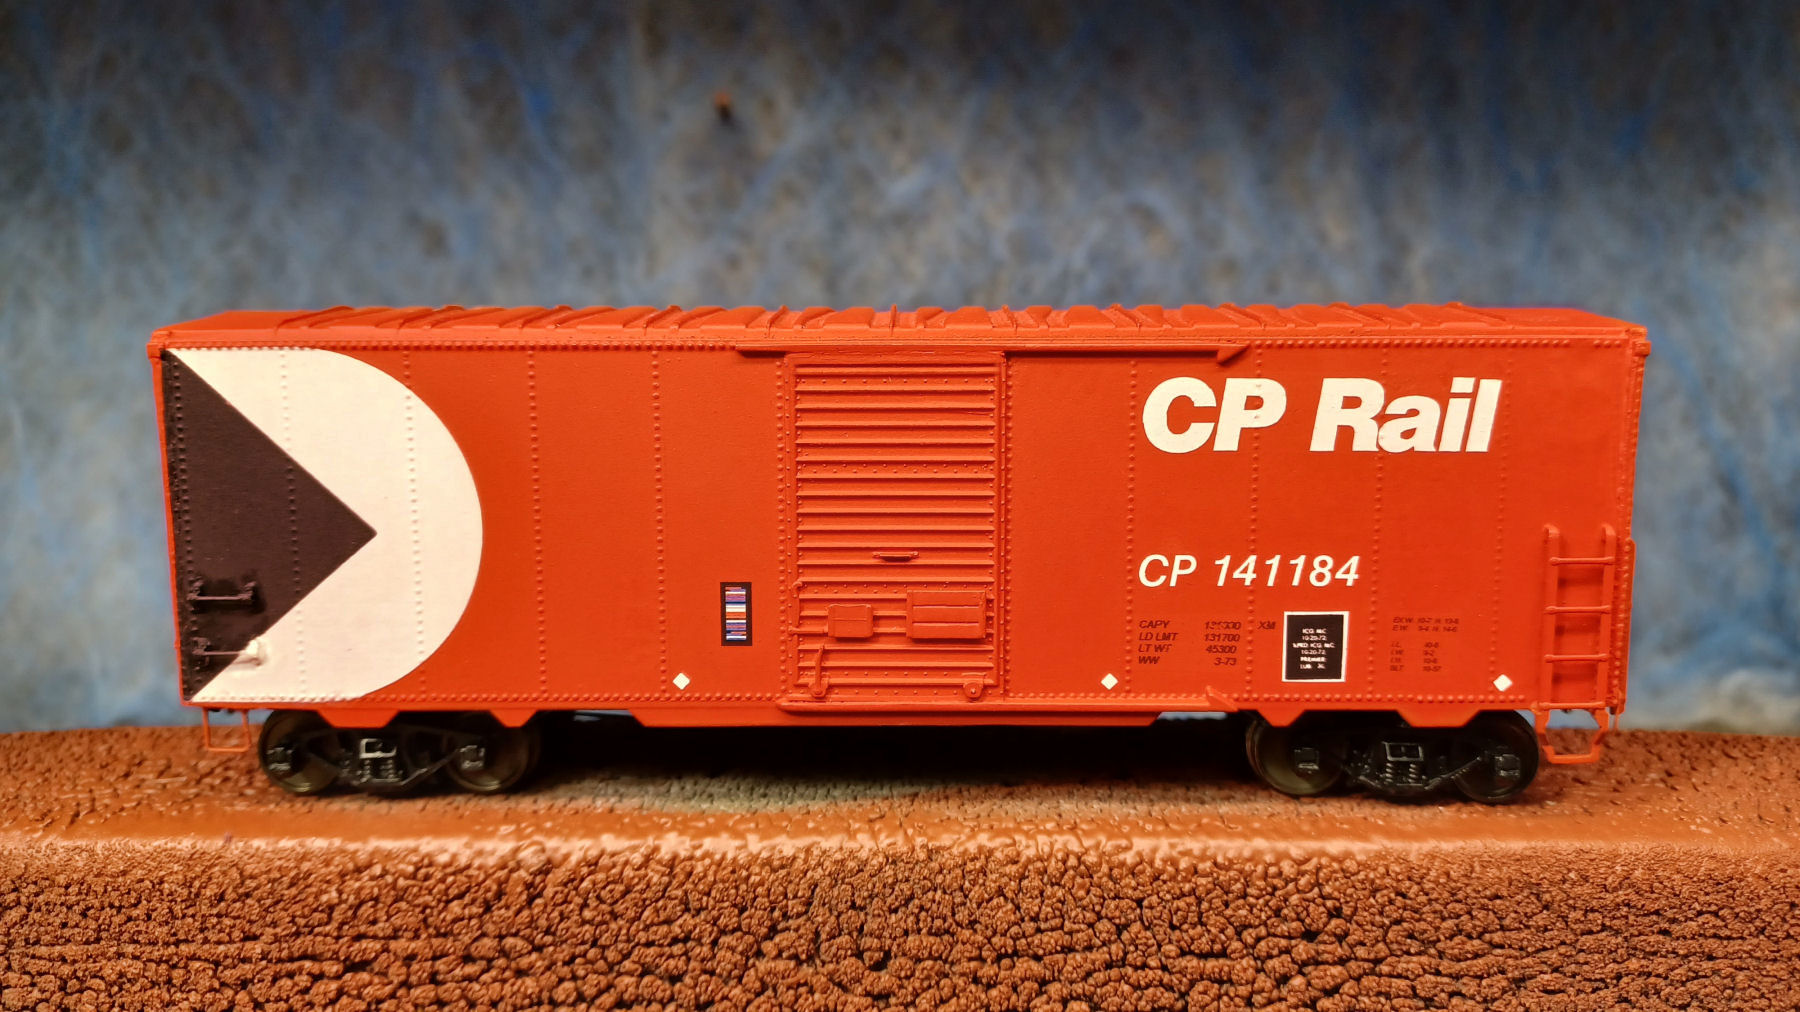
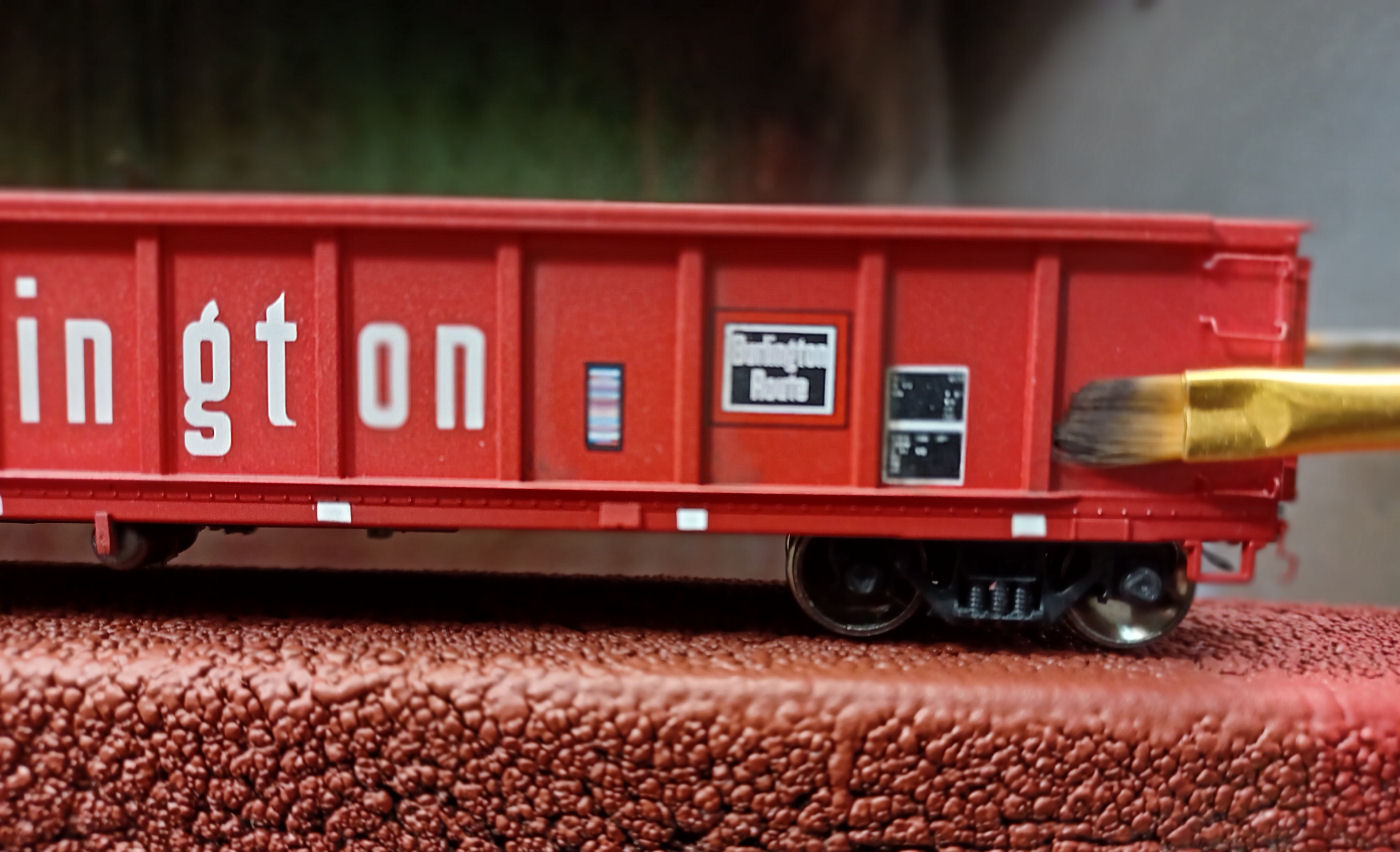
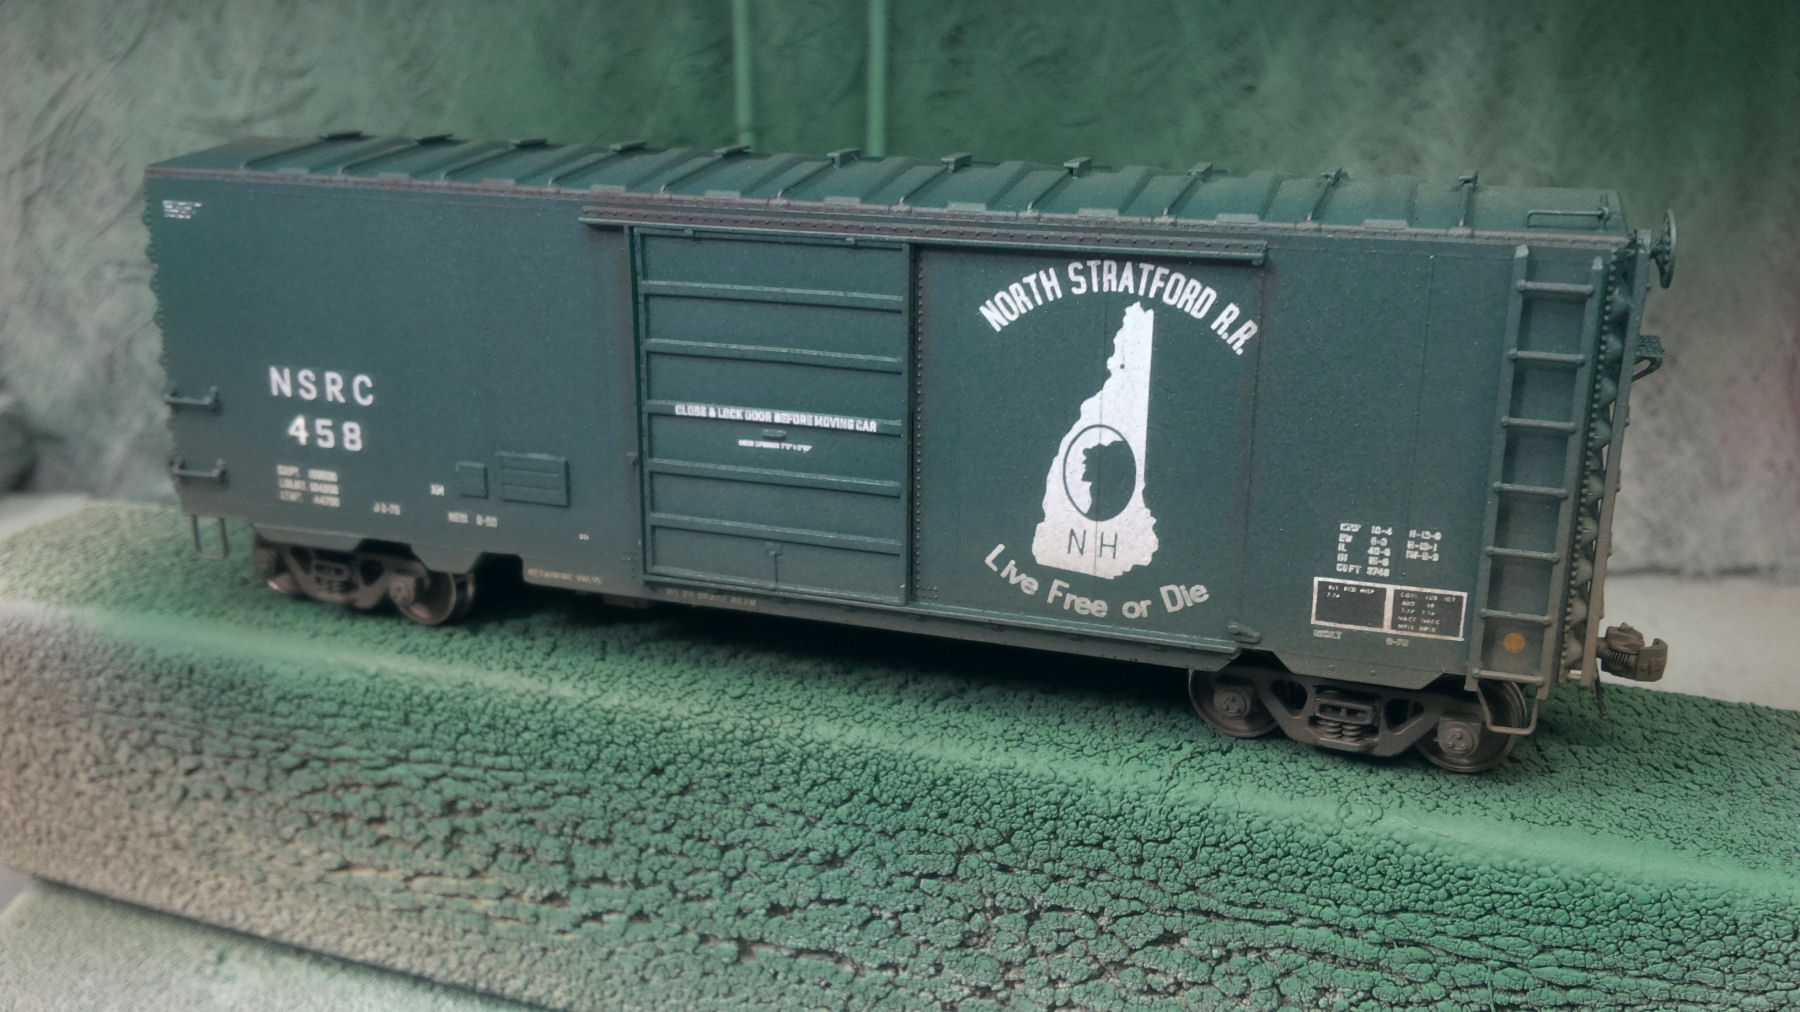
CP 141184 after all decals and grabirons were applied. There is a colour mismatch after brush painting the grabirons to match the Multimark, but that will all disappear after final weathering.

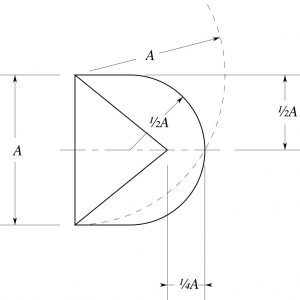
For decals, the CP Rail herald, road numbers, ACI lable and COTS plate are all Microscale products. The black dimensional data lettering is a personal set I printed using inkjet decal paper. The Multimark, diamond-shaped reflector stickers, and end lettering were from a old used Herald King boxcar set. Yes, I pieced together the tiny road numbers decal by decal on the ends. No, it wasn’t fun.

CBT_Kit_006final

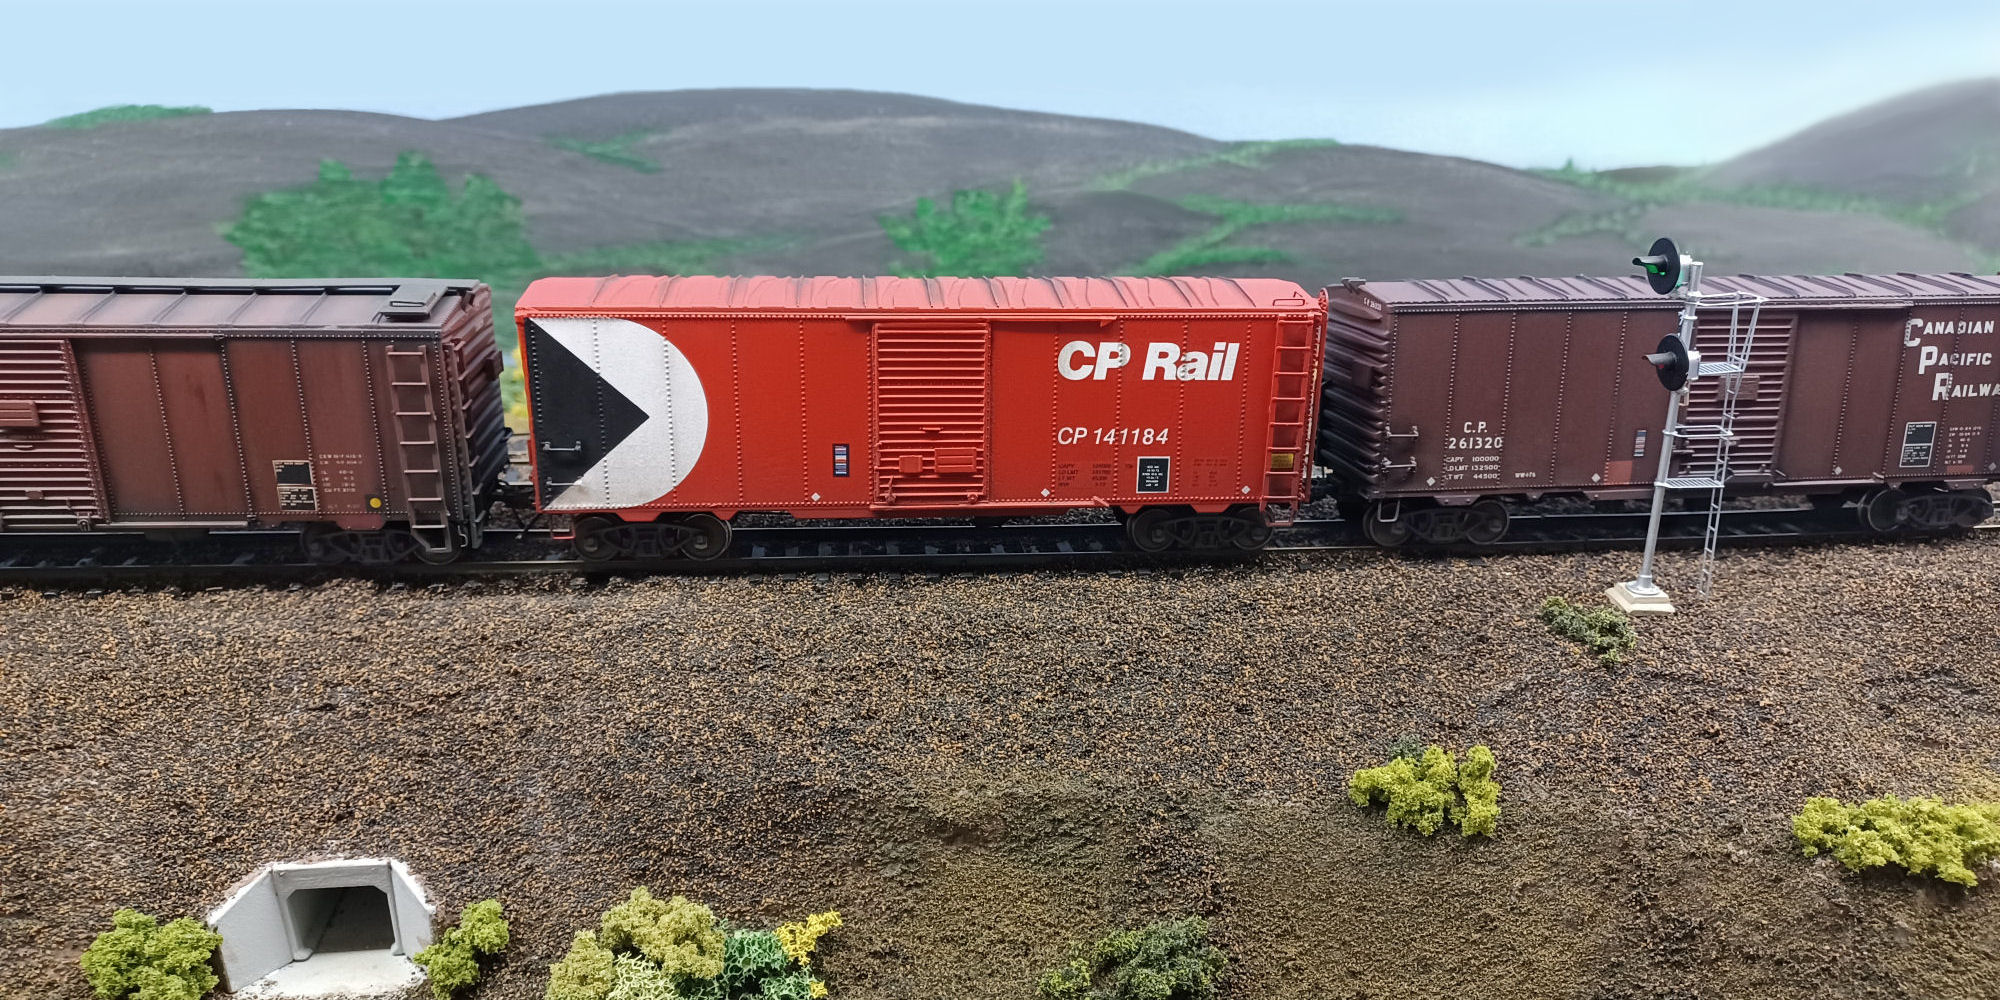
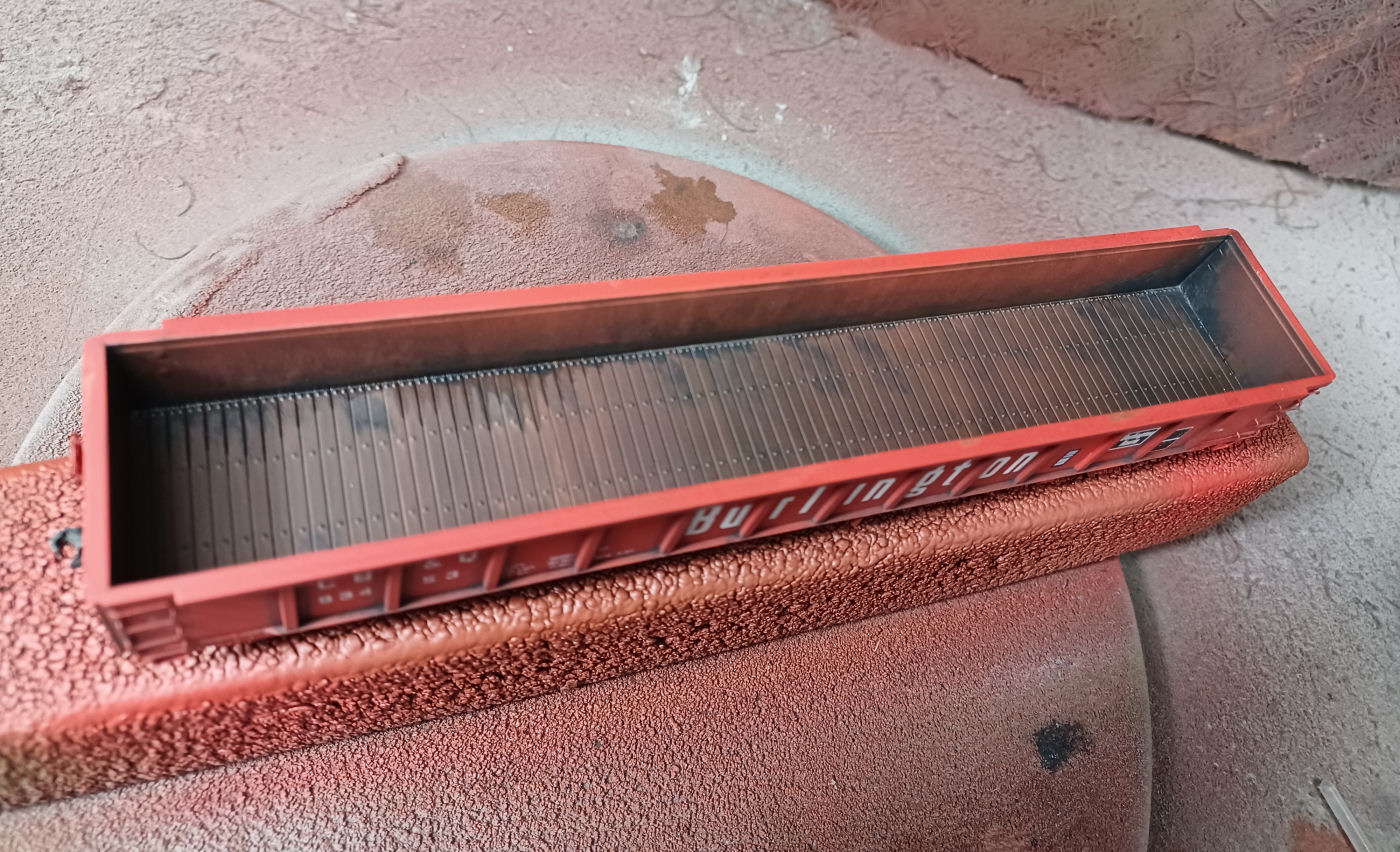
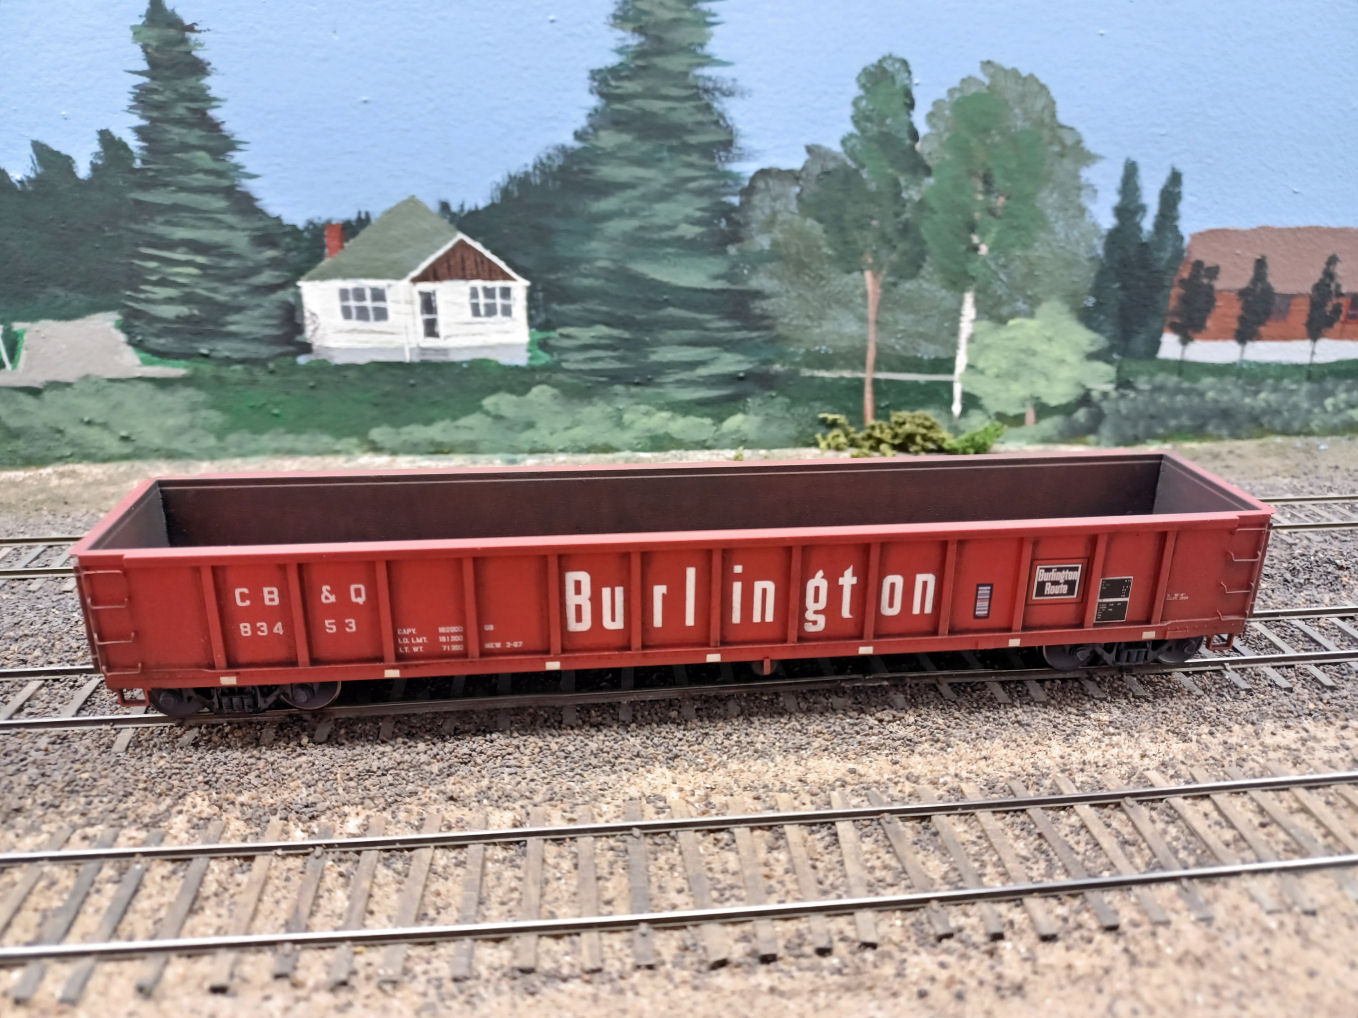
Lightly weathered CP 141184 in revenue service on the CP Sudbury Division.

For weathering, I applied some Pan Pastels ‘raw umber’ along the rivet seams, doors, and roof panels. This would be a 1970s repaint, so it should be lightly weathered for the club’s modelling era. Some dark soot weathering powder was used around the ladder rungs and grabirons, to simulate the grimy gloves and boots of the employees climbing around the equipment. Then a very light coat of Mission Models Rail Tie Brown was sprayed along the bottoms of the model, to simulate dust and dirt kicked up from the tracks. The whole thing was then sealed with a flat coat to protect the decals and weathering.

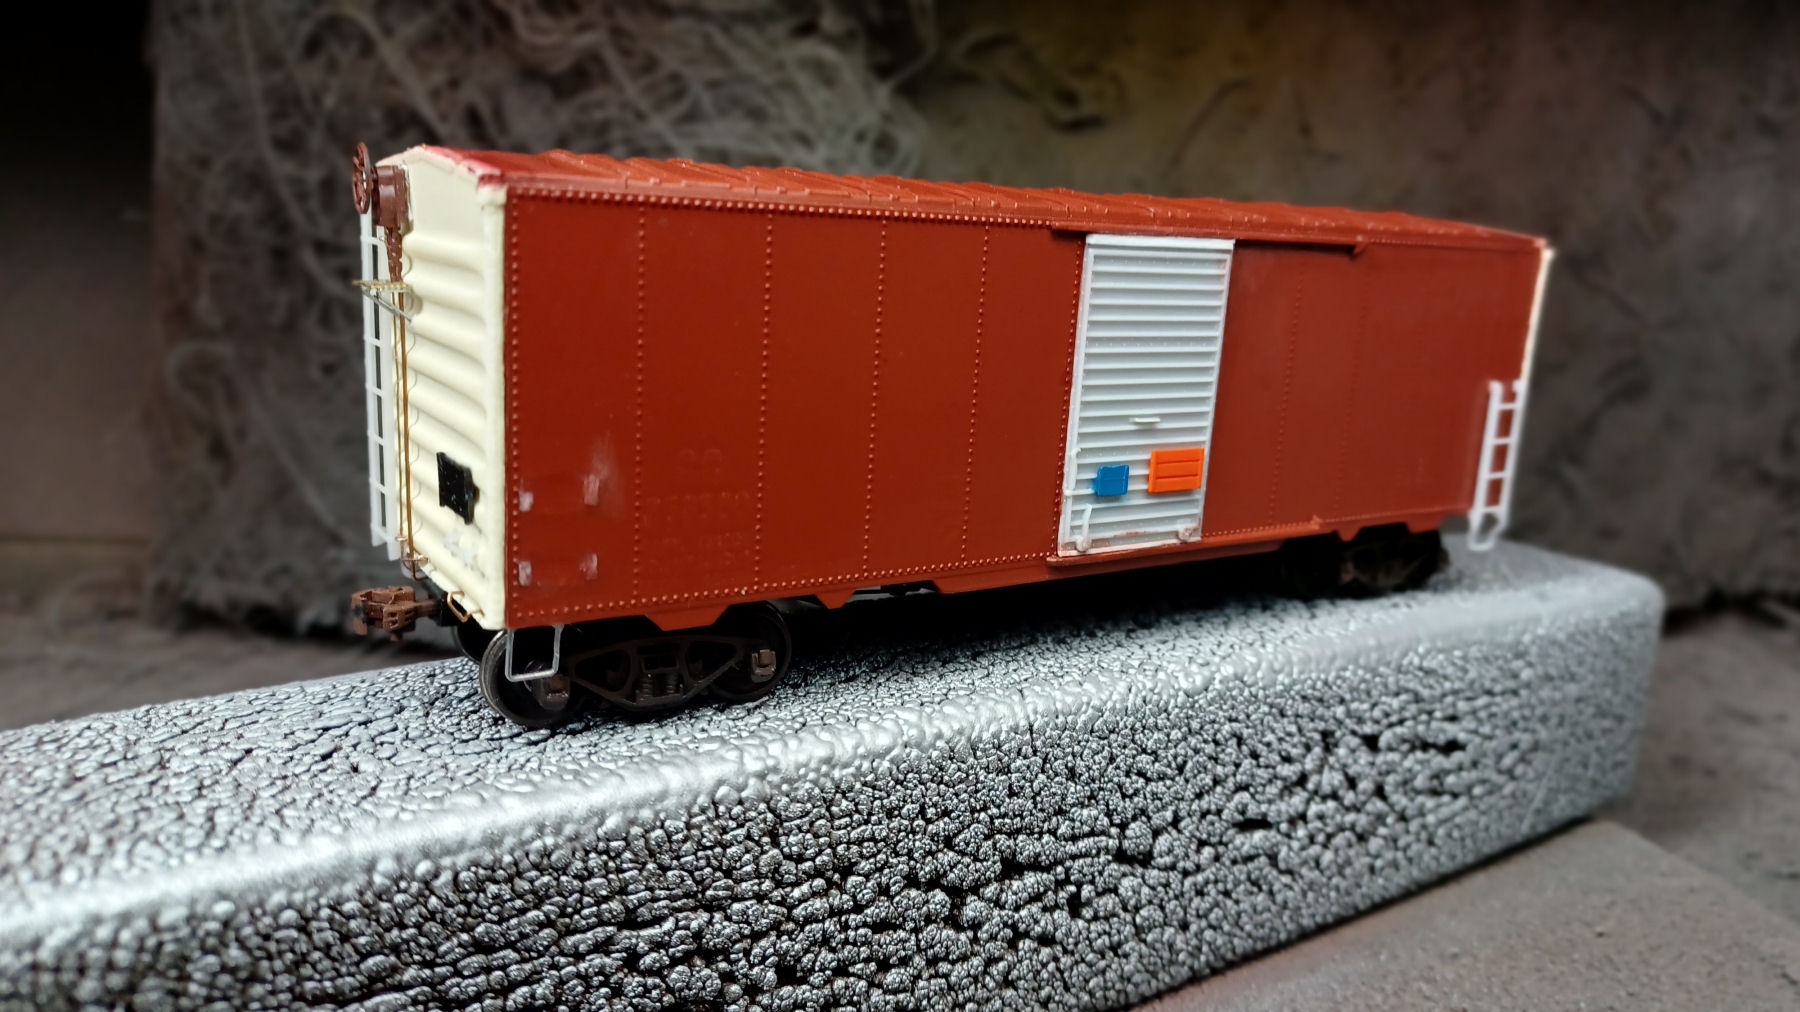
When you look at this final photo of the finished car, you see it compares well to many current production models on the market. Not bad for a 1980’s tooled product. So if you’re at a train show or flea market and spot a grey and maroon C&BT box, maybe stop and take a look inside. If you’re lucky and find an early production model, don’t let the detail parts discourage you. Chances are it’s selling for cheap, and all the replacement details you need are available from Tichy Trains and others. If you still decide against it, as least you know the story behind the C&BT Shops boxcar.


Intermodal Traffic via The Soo

Over twenty years ago when our club began holding its first operating sessions, we had to employ a lot of stand-in equipment to fill up our freights. Accurate HO-scale ready-to-run Canadian prototype models were only just starting to come into existence in the early 2000s. At the time our members understood most of the equipment we required would have to be assembled either from kitbashed US-based models, complicated resin kits, or built completely from scratch. We are very grateful (and relieved) that this didn’t turn out to be the case, as Rapido, Bowser, Atlas, North American Railcar, True Line Trains (RIP), etc, have produced so many wonderful Canadian prototype models over the years to help us emulate the operations of the 1970s-era CP Sudbury Division in miniature.

Despite the state of our early rolling stock fleet there was one operation we were able to model fairly accurately right from the beginning, and that was the intermodal traffic which used to be ferried via the Sault Ste Marie gateway. Canadian Pacific along with their US affiliate the SOO Line (Minneapolis, St Paul and Sault Ste Marie Railroad) had for many decades operated a pair of freights between Côte Saint-Luc QC (Montreal) and Schiller Park IL (Chicago) numbered 911 (westbound) and 912 (eastbound). These symbol freights were routed via the CPR’s transcon route between Montreal and Sudbury, and traversed across the north shore of Lake Huron between there and the USA at Sault Ste Marie. The border crossing was done via the CP/SOO international bridge, and the SOO Line’s network across the Michigan upper peninsula and Wisconsin was used to reach the Chicago area.

Route_911_912

The route of joint CP / SOO trains #911 & 912 shown in the dashed blue line (click to enlarge). Despite the circuitous routing, CP was able to lure New England customers away from Penn Central’s direct ex-NYC ‘Water Level Route’ between Albany NY and Chicago.

Throughout the 1970s, CP Rail was transporting a healthy level of New England – Chicago bridge traffic via their Sudbury-Soo gateway, regardless of its extended length and customs legalities. Despite Penn Central possessing the most direct route between Albany NY and Chicago (the former New York Central ‘Water Level Route’), the fallout from their bankruptcy coupled with the overall degradation of the Northeast US rail network resulted in conditions which allowed CP to offer competitive transit times for New England shippers. Additionally, Canadian Pacific had devoted a lot of capital throughout the 1950s and ’60s in intermodal operations, and that investment had cultivated a respectable level of container-on-flat-car (COFC) traffic rolling between Chicago and the Port of Montreal via trains 911/912.

CP Transfer at SOO MI 05Sept80 Mike Cleary

CP S-4 7099 arrives on a transfer run at Sault Ste Marie, Michigan with a COFC cut for SOO Line train #911 on 05 September 1980. (Mike Cleary photo)

Not only did this 911/912 intermodel service offer an interesting facet to our operating sessions, but as an added bonus this Chicago-Montreal COFC traffic was easy to model as it was carried on US-built Trailer-Train flatcars. It was also serendipitous that Accurail had introduced their Bethlehem 89ft piggyback flat kits just as we were planning our first op sessions. Naturally, we assembled a large pool quickly, and over the years that fleet has been augmented by various newer Atlas, Athearn-Genesis and Walthers intermodal flatcar releases as well.

COFC block off train 911 at Soo 18Jun83

A very healthy COFC block off train 911 at Sault Ste Marie, Ontario on18 June 1983. (Ted Ellis collection)

In direct contrast to these Trailer-Train flats on trains 911/912, all the transcontinental priority freights (901, 902, 949, 951, 952, etc) we need to model all operated with nothing but Canadian-built CP intermodal flat cars, for which no accurate models have even been produced. However, there is some great news here, as Rapido Trains will be producing Canadian piggyback flats as we’ve written about in a previous blog-post. We hope this is just the beginning.

TTAX 990569 flat at Sault Ste Marie on 9 6 80

Pullman-Standard built TTAX 990569 89ft container flat at Sault Ste Marie, Ontario on 06 September 1980. (Ted Ellis collection)

What might have been?

Despite the advent of Conrail and its significant improvement of the northeast US rail network, CP Rail was developing plans in the early 1980s to make trains #911/912 true run-through freights with pooled SOO/CP power and expedited schedules. However this was always held back by the money required to rehabilitate the international bridge and increase its weight limits. Rather than making that investment, instead the CPR negotiated trackage rights with CSX over their C&O / ex-Pere Marquette line across southern Michigan to Detroit. That resulted in the introduction of hot new CP/SOO intermodal trains #500/501 in 1985, operating on a much more direct Chicago-Detroit-Toronto-Montreal routing.

Travelling via the CP’s Galt Subdivision across southernwestern Ontario, the local railfans of the Cambridge / Kitchener-Waterloo area were pretty excited (myself included) seeing SOO/CP run-through power on hot container trains. By the 1990s this had grown to three pairs of joint CP/SOO freights operating daily. But it came at a cost, namely with the withering in importance of trains #911/912 over the Sudbury Division. Eventually the CPR spun off their Sudbury-Soo route (the Webbwood Sub) to the Huron Central shortline. Even more surprising, they sold off most of their Michigan/Wisconsin SOO Line network to the newly reconstituted Wisconsin Central Railroad. Ironically, it was the WC who fixed the bridge so that a 6-axle unit could finally cross it. But it was too late by then.

912_COFC_Nairn

A large cut of COFC intermodal traffic makes up the tail-end of train #912 as it rolls through Nairn siding enroute to the Port of Montreal. Model photo from the CP Sudbury Division layout.

However it is always the 1970s back in the time-warp that is our club’s CP Sudbury Division layout, and trains 911 & 912 roll over our territory daily. As a consequence whenever we hold an operating session and I happen to spot a cut of US-northeast and Chicago-area freight cars rolling by, followed by that oh-so familiar string of Trailer-Train COFC flats punctuated by a bright Action Yellow van; I can’t help but wonder what might have been had CP stuck with their original plan.


The Action Red Era (Part 2) – Locomotive Paint Scheme Variations

Introduction: Genesis of the Action Red Era (Part 1)

The following is a list of CP Rail paint schemes applied to motive power over the course of the Action Red era, with a few photos to help illustrate these variations. A list of references are also included which not only assisted in this research, but come highly recommended as excellent reference materials for all CP Rail modellers.

CP Rail – Action Red Era Variations 1968-1993:


A5L – (Action red / 5” front & rear stripes / Large Multimark)

The original ‘Candy Stripe’ road unit scheme – Sept 1968 to Oct 1975

Entire unit above frame painted Action Red. Frame, and under-frame components painted black. On the front of road switcher and road freight units, the nose, cab and battery box fronts all had 5”-wide alternating red & white stripes, with 5”-wide alternating black and white stripes on back end of unit. Large (full hood height) black & white Multimarks are painted on the rear of any locomotive. Thus the Multimark was direction-dependant, and applied on the long-hoods of locomotives set up for short-hood forward operation, also conversely applied on the short-hoods if set up for long-hood forward operation.

Earliest painted hood diesels (~1968-1971) had the CP Rail logo positioned as far up, and forwards towards the cab as the tall hood access doors allowed. Between 1972 to 1975 the CP Rail was slightly lowered to avoid painting it into the hood access latches. Units lacking rear numberboards had a white number-panel painted on the rear of the unit, with black road numbers applied. Low short-hood units have a black anti-glare panel applied on top of the nose.

Cab units saw red/white striping wrapped around the nose, adjusted for the peculiarities of the curve differences between GM and MLW nose styles. No CLC-built (Fairbanks-Morse) cab units were ever painted Action Red. Multimark heights were lowered to avoid radiator grills. CP Rail placement differed between General Motors and Montreal Locomotive Works cab units, as the portholes and large louvers on GM F-units forced the logos to be placed along the bottom panels. The design of MLW FA- and FB- units allowed for CP Rail logos to be positioned as high and far forward as access doors and radiator grills allowed. Both manufacturer’s B-units had Multimarks painted on the back, but striping on both the front and back were black and white. Logo placement was likewise lowered on GM B-units versus MLW.


A5Mc – (Action red / 5” front & rear stripes / Mid-sized Multimark on cab)

The original ‘Candy Stripe’ switcher scheme – Fall 1968 to Oct 1975

This scheme was applied to all end-cab switchers, along with all SW1200RS and RS-23 road switchers until October 1975. Entire unit above frame painted Action Red. Frame, and under-frame components painted black. Alternating 5″-wide red/white nose stripes, with 5”-wide alternating black/white stripes on entire back end of cab wall. Smaller Multimark (to avoid windows) placed at very rear of cab. Road numbers applied to long hood near cab, with some number height variances which occurred from ‘68 to ‘75. It is best to look at prototype photos if the modeller is painting a particular switcher.


A5M – (Action red / 5” front & rear stripes / Mid-sized Multimark)

The ‘Ogden Multi’ scheme – Late 1974 to Summer 1975

Locomotives in this scheme don’t really stand out when viewed from the front, especially since the smaller height Multimark was eventually adopted by CP in the ‘wide’ 8″-stripe period (the A8M scheme) after February 1979, and hundreds of GM hood units were painted so. However if you spot a photo with any ‘Candy Stripe’ painted loco displaying a small Multimark, you found something special. And if you see an ‘Ogden Multi’ A5M painted unit viewed from the back, you’ll know instantly.

As mentioned, when viewed from the front the A5M scheme appears the same as any late-applied A5L paint job (with CP Rail logos slightly lowered to avoid hood latches) with the exception of a smaller Multimark. When viewed from the back, the scheme is blatantly obvious as the black/white striping was only applied between the area of the lowered Multimarks. The panel above the height of the Multimark, and the small area below (lined up with the hood access doors) were both painted Action Red. This rear application was a stark difference from the standard ‘Candy Stripe’ scheme.

This variation was only applied by CP’s Ogden Shops in Calgary, and only to GM hood units; where admittedly their radiator screens made painting full-height Multimarks somewhat challenging. The A5M scheme was rare as it was only applied to 48 locomotives over this time frame, and it was not an officially approved scheme. The story was when upper management in Montreal eventually found out, they told Ogden to follow official paint specifications.


A8Lf – (Action red / 8” front & rear stripes / Large Multimark with framestripe)

First ‘Wide Stripe’ road unit scheme – Oct 75 to Dec 76

Entire unit painted Action Red. Frame, and under-frame components painted black. This scheme introduced the larger 8″ alternating nose and rear ‘wide stripes’, and only on the front nose (no longer on cab face or battery box fronts). A large Multimark was still applied on the rear of all road units. Also a new white reflective frame stripe was added to the scheme for improved nighttime visibility. Units lacking rear numberboards had black number panels applied with white numbers (reverse of original scheme). CP SD40-2 #5700 was the prototype unit painted (in October 1975) into the A8Lf scheme, followed shortly after by SD40-2’s #5718-5777 delivered direct from GMDD. A number of other older models were also repainted between Oct-75 and Dec-76.


A8L – (Action red / 8” front & rear stripes / Large Multimark)

Second ‘Wide Stripe’ road unit scheme – Jan 77 to Feb 79

Essentially the same as the introductory ‘wide stripe’ A8Lf scheme, but without the frame stripe. This was replaced with white reflective circles now applied along the frame across the length of the locomotive. All new General Motors SD40-2 deliveries from January 1977 though to February 1979 came in this scheme, which includes units #5837-64, 5778-99, and 5900-14. A good number of older units were also repainted in the A8L scheme throughout this period, with many missing the reflective circles along the frame.


A8M – (Action red / 8” front & rear stripes / Mid-sized Multimark)

Third ‘Wide Stripe’ road unit scheme – Feb 79 to Aug 87

Succumbing to the logic of the Ogden shop forces from four years earlier, CP Rail officially began applying smaller Multimarks on all GM hood units system-wide with the introduction of the A8M scheme. However MLW hood units, which didn’t have radiator screens to deal with, continued to receive the full-height A8L Multimark scheme. All new GMDD locomotive deliveries from February 1979 (beginning with SD40-2 #5915) through to August 1987, wore this scheme. This eventually became the longest lasting of all CP Rail paint scheme variations, and was applied to the largest number of units.


A8Mc – (Action red / 8” front & rear stripes / Mid-sized Multimark on cab)

First ‘Wide Stripe’ switcher scheme – Oct 75 to Mid 78

Entire unit painted Action Red. Frame, and under-frame components painted black. 8″ alternating red/white nose stripes and 8” alternating black/white stripes on back of cab wall. Multimark on cab, with road numbers on long hood near cab. This scheme was applied to end-cab switchers, also SW1200RS and RS-23 road switchers.


A8Mh – (Action red / 8” front & rear stripes / Mid-sized Multimark on hood)

Second ‘Wide Stripe’ switcher scheme – Mid 78 to Aug 87

This switcher scheme variation continued the 8″ alternating red/white nose stripes & black/white cab wall stripes, but now the Multimark was placed on the hood immediately in front of the cab. Consequently the road numbers were placed on the cab sides. Likewise the A8Mh scheme was applied to end-cab switchers, also SW1200RS and RS-23 road switchers.


A8NM – (Action red / 8” front & rear stripes / No Multimark)

The ‘No Image’ Multimark-less scheme – Sept 87 to Mar 93

Sadly the Multimark was officially dropped as the CPR’s corporate logo in 1987, thus it was no longer applied past this point. Additionally the 8″ alternating red/white stripes were now placed on both the nose and rear of the unit. Locomotives lacking rear numberboards now had Action Red number-panels with white numbers applied.

At the introduction of this scheme at least 3 units were mistakenly painted with black/white end striping, with the first one so painted being SW1200RS #8162. SD40 #5513 was one of the first to appear in the proper scheme in late 1987. The only new locomotives delivered in this scheme were GMDD SD40-2F’s #9000-9024.

References:


  • 1) Garden, J.F., “Nicholas Morant’s Canadian Pacific”, Footprint Publishing, 1992.
  • 2) Lewis, Donald C., “Rail Canada Vol.3, Diesel Paint Schemes of the CPR”, LPD Publishing, 2nd 1998.
  • 3) Zuters, Gary, “CP Rail 1993 Review”, Hyrail Productions 1994.
  • 4) Dean, Murray and Hanna, David, “Canadian Pacific Diesel Locomotives”, Railfair Publishing, 1981.
  • 5) Russell, Larry G., “CP Rail Diesel Locomotive Roster”, Extra 2200 South magazine: issues 81 – 83 (first two parts are most important), 1984-85.


Genesis of the Action Red Era (Part 1)

This article was originally published in the Canadian Pacific Historical Association’s *CP Tracks* magazine (Vol 10 – No 4). It has been reproduced here to chronicle what was a massive corporate image change for the CPR, and as a guide for hobbyists who wish to model in the Action Red era.

If there were one word that could best describe the year 1968, it would have to be radical. This of course was the year which saw the assassinations of Martin Luther King and Robert Kennedy, the fabled ‘Prague Spring’ and resulting crackdown by the USSR, the rioting at the Democratic National Convention, the full horror of Vietnam was in everyone’s living room, and the resulting demonstrations which culminated in the shootings at Kent State. On a lighter note, it was also the height of the ‘British Invasion’ of popular music, a dramatic year for NASA’s moonshot ‘Apollo’ program, and the beginning of ‘Trudeau-mania’; undeniably all radical events in their own ways.

Those feelings of radical change even seemed to spill into the railway industry as this was the year of the mega-mergers, and saw the beginnings of Seaboard Coast Line, Penn Central and Burlington Northern. On top of this, there were several proposed mergers including; Chesapeake & Ohio with N&W, Illinois Central with the Gulf Mobile & Ohio, UP versus CNW for the Rock Island, and CNW with the Milwaukee Road. Fortunately the collapse of PC put all mergers into question and only the IC-GM&O proposal went through.

With all these radical events unfolding throughout 1968, it’s easy to forget that the management within Canadian Pacific decided to undergo a radical change of corporate identity themselves. Whether it was due to the attitudes of the times, or just to counter Canadian National’s dramatic image change of 1960, the decision to scrap the ages old CP beaver shield along with the traditional maroon and grey colours was final. The only question was what to replace it with?

1024px-CP_Multimark_geometry

Geometric layout of the CP Multimark logo.

It should be noted that this was a change of corporate image, not simply a new paint scheme for the railway’s locomotives. The new image would be applied to all aspects of Canadian Pacific Limited, from airplanes, to ships, to trucks, to hotels, to real estate, and to the railway. For this purpose, CP turned to the noted New York advertising agency of Lippincott & Margulies, known in the railway circles for coming up with the ‘Big Sky Blue’ imagery of the Great Northern, and later the corporate logo and colours of the new Burlington Northern. The final product was a drastic departure from CP’s traditionally conservative imagery.

To begin, the name Canadian Pacific was discarded, and new CP acronyms were created for each corporate division; CP Air, CP Ships, CP Express, CP Transport, CP Hotels, and of course CP Rail. The lettering style chosen for these new acronyms was that modernistic ’60s font; Helvetica. Holding company Canadian Pacific Limited was represented in plain Helvetica font, but all CP divisions featured it bolded and italicized. Also, the old beaver shield was shed and replaced by a new corporate logo, coined the Multimark. This geometric symbol was a simple rectangle overshadowed by a white half-circle, with a triangle on-edge piercing the ensemble.

CP_Corporatenewlook

The image may seem simplistic and almost childlike to many railway buffs, but it was meant to convey a variety of universal connotations to the casual viewer. The rectangle denoted stability and longevity, while the circle represented the globe and CP’s multinational nature. Officially the triangle signified the companies progressiveness and motion, however it also instilled the imagery that it was about to encircle the globe, a reminder of CP’s old corporate slogan “Spans the World”.

Each division of Canadian Pacific in turn received their own colours for their equipment to wear; green for CP Ships, orange for CP Air, blue for CP Express and CP Transport, and red for CP Rail. The red chosen for the railway was a vibrant shade mixing orange and red (similar to vermilion), and was coined ‘Action Red’ by Lippincott & Margulies.

CP_Corporatenewlookmodels

Though ‘Action Red’ was chosen for the railway division, not all equipment was to be painted red. Lippincott & Margulies envisioned that different car types would each have their own colour, and painted a number of O-scale models to demonstrate the concept.

Though red was chosen as the dominant colour for the railway, not all equipment was to be painted red, and various car types would feature their own colours. Red would be used for general service cars, green for newsprint service, yellow for insulated cars, silver for mechanical refrigeration, black for bulk commodities, and yellow for the caboose. Indeed, an almost forgotten fact was that the original recommendation from Lippincott & Margulies was to paint CP Rail’s locomotives black, with a white and red multimark – yes the same way their hoppers were painted. An O-scale GP35 locomotive was even so painted by the ad agency to demonstrate the scheme.

CP_Corporatenewlookmodels02

Ad agency Lippincott & Margulies painted this O-scale GP35 as part of their advertising pitch for the new CP Rail image. The original idea was black locomotives, with a white and red Multimark. Thankfully the CPR president wasn’t impressed, and ordered they change it to red.

Apparently CP president Norris R. Crump was not happy with their choice of colours, and was reported to have mumbled something to the effect of ‘paying thousands of dollars for these units, so we’re not going to paint them black’ (reportedly profanity was also involved). Upon his insistence, the scheme was quickly changed to red, with a white and black Multimark, matching the colours chosen for boxcars. On a personal note, I thank Mr. Crump to this day for his attention to imagery and his choice of red. Can anyone envision what CP’s locomotives would have looked like if they stuck with black, especially after they dropped the Multimark in the late ’80s? It would have made Norfolk Southern’s diesels look elaborate.

While the thought, creativity and marketing behind this imagery was certainly ingenious and innovative, it must also be viewed in a historical context as a failure. Despite its use on the sides of everything from boxcars, containers, aircraft and hotel entrances around the world, most people off the street would identify the symbol as ‘Pacman’. Indeed many railfans now incorrectly identify CP’s 1968 adopted Multimark, as this Atari video game character created in 1979. Contrast this with CN’s effective yet simple ‘Wet Noodle’, voted recently as one of the top-50 international corporate logos of all time. Show that CN noodle to anyone from Gander to Prince Rupert and they will correctly think of Canadian National and trains. Could the same be said of the CPR if you showed them the Multimark? Sadly, the only surprise from CP dropping the ‘Multi’ as their logo in 1987, was that it was not done sooner.

CP_Corporatenewlook02

The Multimark appeared on everything Canadian Pacific owned; on trains, airplanes, ships, trucks, overseas containers, hotels, and resorts. You could even buy a lunchbox with new CP Rail trains and airplanes featured on them. Sadly, when shown the logo now, most Canadians would probably identify it as Atari’s video game character ‘Pacman’.

The first locomotive painted in the new Action Red CP Rail scheme was C-424 #4242, with sister #4239 following right behind in September of 1968. They were soon accompanied by nine different freight cars, each painted in their appropriate action colours; a green 50’ newsprint boxcar, a silver mechanical reefer, a black cylindrical hopper, a yellow insulated-heated boxcar, a 50-foot 202000-series double door boxcar, a 40’ NSC boxcar, a 53’ mill gondola, and 53’ flatcar all painted in general-service action red. There was also a yellow caboose numbered CP 438850, which was former streamlined cupola van #437450, freshly rebuilt by Angus with a new wide-vision cupola. This was the first of a long line of new ‘saddle-back’ vans constructed by the CPR.

The new colours were officially unveiled in Montreal on 03 October, 1968. Shortly thereafter the 4242 and 4239 were enlisted to pull this diminutive nine-car train across the system to display the new image to the nation. Most readers have probably seen the famous Nicholas Morant publicity shot of 4242 and 4239 pulling this train through the spiral tunnels in Yoho, BC. This picture was posed, and the train was split to give the appearance that the freight was coiled inside the tunnel and crossing underneath itself, but there were in fact only nine cars.

CP_CorporatenewlookDisplayTrain

CP new image display train posed at the spiral tunnels in Yoho, BC. Despite it appearing to loop around itself, the display train was only nine cars long.

The initial CP Rail locomotive scheme is exemplified by Nicholas Morant’s publicity shots of 4242 and 4239. From the frame down, the locomotive was black, while the entire hood and cab sections were action red. The Multimark was positioned on the extreme rear of the engine, and was painted the full height of the unit. In this way the new action red scheme shared a similar trait as the old maroon and grey, both were direction dependant. For example, on locomotives that were set for long-hood forward operation such as an RS-3 or RS-10, the Multi was painted on the short-hood.

The CP Rail logo and cab numbers were painted white, in italicized bold Helvetica font. The CP Rail name was placed over the engine access doors, as forward as they possibly allowed towards the cab. They were also placed as high as the hood doors allowed. These features identified all early painted units, as over time it was found that lettering over hinges, louvers and handles was a pain. The CP Rail logo was soon lowered or moved over to avoid obstructions depending on the locomotive type.

ArialvHelvetica

Anyone operating with MS Windows and wanting to create their own CP Rail heralds or decals may be tempted to use Arial font. Microsoft developed this as a Helvetica-based font to avoid paying royalties. It is close, but in a side-by-side comparison you can see the differences.

On the front of the unit, alternating 5” wide white and red angled stripes were placed over the entire nose, cab face and battery box fronts. When viewed head-on the striping lined up to give them a continuous flow. Painting the entire face of the unit in this narrow striping gave the locomotive a busy look, and it was quickly coined the ‘candy-stripe’ scheme by modellers and railfans alike.

On the rear of the unit, alternating 5” white and black (continuing the black from the triangle of the Multimark) striping was applied, and strictly to the hood section. On “DRF” class units (road freight) lacking numberboards on the rear hood, a white letter panel was painted near the centre with black road numbers applied inside.

All handrail stanchions were painted red, while the handrails themselves and all grabirons around the unit were black. On 4242 and 4239 the handrail runners up the access stairs of the units were red below the frame, and black above it. Later for safety reasons these runners were simply re-painted white, and all additional locomotives received this same treatment.

CP 4242-3

The first locomotive to be painted Action Red was MLW C-424 #4242, released from Angus shops in September 1968. Sister C-424 #4239 followed immediately after, and both powered the official CP Rail display train across Canada though October 1968. Photo courtesy cprdieselroster.

Over the course of the action red era, many of these features changed. Not only the position of the CP Rail, but Multimark sizes, striping thickness and application, rear number panel colours all changed. Finally, the Multimark was dropped in 1987, and action red was abandoned altogether in 1993; replaced by the deeper SOO Line instituted ‘System Red’ and the unimaginative dual-flag CP Rail System logo. By 1996, CP came to their senses and renamed the railway back to Canadian Pacific, and resurrected a new golden beaver shield. You can say what you want about the application of this scheme, but few would argue that Canadian Pacific currently has the classiest railroad logo in the industry.

Part two continues here: The Action Red Era (Part 2) – Locomotive Paint Scheme Variations


Kitbashing Basics – Upgrade a ScaleTrains ‘Kit Classics’ Havelock Shops Gondola

We published a blog post a number of years ago about resuscitating old kits, in the hope it would inspire more hobbyists to kitbash and upgrade older models. However it wasn’t really a representative ‘how-to’ guide as the core kit came with separate detail parts, so that upgrade was just a case of adding finer details, matching the paint, and weathering to finish. So this article was written to assist any new modellers who might be apprehensive about taking a hobby knife to a plastic model.

Aside from showing some basic techniques, this article is also an attempt to answer the griping that happens on a lot of model railroad forums about the prices of today’s exquisite ready-to-run (R-T-R) pre-assembled models. If you are a newcomer to the hobby and/or on a budget, there are some manufacturers who are trying to help you by producing classic ‘shake-the-box’ model kits. The big one a good number of rail modellers seem to forget about is Accurail, who’ve been producing an extensive line of easy to build freight car kits for over 30 years now.

Now recently ScaleTrains have entered the field, (yes, the same company who are better known for producing those museum-quality R-T-R models that the price-gripers like complaining about) by introducing their more affordable ‘Kit Classics’ line of easy-to-build rolling stock kits. The following is a step-by-step guide to updating their Havelock Shops gondola.

CBQ_002

Here is the base body of the Scale Trains Havelock Shops gondola as it comes out of the box. Paint and lettering is crisp, and the moulding is fine too. If you simply assemble and weather the model as is, it would look good. But by replacing the moulded-on details, adding a few extra parts and decals, and then finishing with a good weathering job, you will create a model that really pops.

Before we begin, an explanation may be in order as to why the CP Sudbury Division would require a Chicago Burlington & Quincy gondola. Well, we do model a portion of the CPR transcon line across Canada, and though the majority of the traffic we’d see is domestic, there are always a few interlopers from south of the border in any manifest freight. Of those US companies, the Burlington Northern (the 1970 merger that swallowed the CB&Q along with three other railroads) was a large and friendly interchange partner. To top it off, the WRMRC has two photos in our archive which show BN gondolas in Sudbury yard. We have not figured out why, but clearly having some BN and predecessor company gondolas on the club roster was warranted. Furthermore, this particular gondola is a good one, as these were signature BN cars home-built by the Burlington’s Havelock Shops (located outside Lincoln, Nebraska), so kits painted for BN and original CB&Q were acquired for the Sudbury Division roster.

CBQ_003

The first step is to carefully scrape away the moulded-on grab irons. Though most modellers use X-Acto knives for this, the author was a former biology student and prefers scalpels.

The kitbashing begins with the removal of all moulded-on grab irons from the gondola sides. X-Acto knives are the traditional tools for this in model railroading, but I highly recommend scalpels. I learned to use them many years ago as a biology undergrad, and just like the feel of them when doing precision cutting. Frankly, nothing beats a fresh #10 scalpel blade for cutting styrene plastic, however I urge basic caution. These blades were obviously designed for cutting flesh, so always cut away from your hand. Also you should wear eye protection. Plastic is tougher than flesh, and you can break the blade if you force and bend it too much, causing the business-end to go flying. Nevertheless you may want to give them a try, and most better hobby shops carry the handles and various sized blades. You can actually sense the undulations and unevenness in the plastic with each pass, which helps as you scrape away the offending moulded-on details from your models.

CBQ_004

On the gondola ends, a smaller #15 scalpel blade was used to carve out the ladder rungs while keeping the upright side-rails intact. This photo shows what a difference this makes between the left and (as yet) unmodified right ladders.

To help the appearance of the car ends, the ladder rungs were cut away using a smaller number 15 scalpel blade. The method is to cut on small diagonals in each direction, and eventually chip away each ladder rung while maintaining the ‘rolling pin’ pattern of the Dreadnought ends. Be advised that even after sanding with a small sanding block, you will never achieve a perfect ‘unhacked’ finish. But that doesn’t matter as weathering done to the car will help hide any imperfections the cutting leaves behind.

I had considered removing all traces of the ladders by cutting out the side-rails as well. However that would be almost as much work as cutting off the ends entirely, and rebuilding with old boxcar Dreadnought-ends I have laying around in my spare parts collection (yes, I considered that too). The later option would provide a clean car end, and would be the way to go if building a contest model. I quickly realized that either option would require a lot more effort than I was willing to spend on this project, and replacing the rungs alone was enough to help give the ladder depth and greatly improve the appearance.

CBQ_005

After scraping away as much as possible, drill #79 holes for the new grab irons by using the shadows of the old moulded-on details. Sanding is done afterwards to remove any scratching or imperfections left behind. Sanding first would make positioning the drill locations more difficult.

The next step is to use a pin vice to drill #79 holes for the new wire grab irons, using the shadows of the old ones as your placement guide. It is easier doing this now, before any sanding that will widen those shadows. You can shave and sand away any remaining imperfections once all the holes are drilled.

I utilized Tichy Train 18″ phosphor bronze drop grab irons for my car, but any manufacturer’s scale 18″ wire grab irons (Detail Associates, A-Line, etc) will work just the same. Tichy calls for drilling #80 holes for their product, but I prefer a slightly larger hole to take into account the cyanoacrylate superglue that the grabs will be dipped in prior to positioning. Aside from making it easier to slide the wire in, I also have a habit of breaking #80 bits with little effort on my part. So I stand a much better chance at drilling all 32 holes required using a #79 without breaking another drill bit.

CBQ_006

New scale-18″ grab irons are installed by cutting back the wire ends to about 6 scale inches (to keep them from protruding inside the gondola) and then dipping each end in a puddle of cyanoacrylate (otherwise known as CA ‘superglue’) prior to installation. Note that the very top grabiron is positioned upside-down in relation to the other three.

I also cut down each grab iron end to about 6 scale inches, and with Tichy using phosphor bronze wire, cutting them back is easy. This way the grab irons will stick out about three scale inches from the carbody (as they should) without the wires protruding inside the gondola body. After installation, sand the gondola insides around those holes to remove the imperfections as best you can. Between the sanding, gap-filling CA superglue, and rust painting/weathering that will be done later, those grab iron holes should pretty much disappear by the end.

Now for the gondola ends the process is much easier. I simply glued pieces of 0.1″ styrene rod across the side-rails to replace each ladder rung. You can use either CA superglue or any MEK-based plastic weld for this. Once the glue is dry, you can trim and sand down any rod sticking out past the side-rails. Admittedly, I employed a quick and ad hoc method of ladder replacement, but it’s easy and effective. This is a big improvement in appearance with minimal effort, and after painting and weathering it will be difficult for the layout observer to tell that the end-ladders are not a separate detail part.

CBQ_007

Ladder rung replacement was done simply by gluing lengths of 0.1″ styrene rod. It’s a quick and ad hoc method, but it accomplishes the task with minimal effort.

After all the grab irons and ladder rungs are replaced, the next step is to add some super-detail parts to the gondola, specifically coupler cut-levers and brake-line hoses to the gondola ends. Since all the new details still need to be painted, I leave the already coloured black brake hoses to the very end before I weather the car. There are many different pre-bent coupler cut-levers offered by many manufacturers, but I had none in my collection that worked. So being a cheap frugal modeller, I elected to simply bend my own using 0.1″ phosphor bronze wire with a fine pair of needle-nose pliers. To attach them, a #79 hole was drilled into the bottom-left side sill of each gondola end, and eye bolts glued in place (see photo below). Then slide the cut-lever in through the eye bolt, and fasten the wire against the bottom of the coupler with CA superglue. If you ever need to service the car in the future it’s easy enough to break this bond, and then just re-glue the cut-lever and touch-up the paint.

CBQ_008

Coupler cut-levers were fabricated by bending 0.1″ phosphor bronze wire, and attached using brass eye bolts fixed to the bottom-left side sills of the gondola ends.

The next step is to repaint all the detail parts, and the resulting damage caused from kitbashing the gondola. I use an airbrush for this, but the number of great quality acrylic hobby paints available these days makes it easy to brush paint too. The only hard part is picking a red that’s a close match to the original gondola colour. ScaleTrains recommends Tru-Color TCP-086 Burlington Red, but this is a solvent-based paint and I’ve long ago switched to airbrushing with water-based acrylics.

The CB&Q was famous for their Chinese Red painted equipment, which was a very vibrant shade of red. Now being a 1970s CP Rail modeller, I have lots of CP Action Red in stock, but there is too much orange in that shade of red. So I tried my luck by opening a bottle of TrueLine Trains (long out of production) post-’90s CP ‘Bright’ Red, which is the same colour as 1970-80s era Soo Line ‘Full Signal’ Red. Looking inside the bottle it looked pretty close to me, so I loaded it up in my airbrush and was pleasantly surprised that I could not see any difference. I got lucky here. If you also prefer a current production acrylic paint, all I can suggest is try to find a Chinese Red shade as close as possible. Also, maybe reach out to CB&Q modellers on-line as to what they recommend.

CBQ_P_001

After masking the end reporting marks with small pieces of green painters tape, and wrapping some tape around the couplers, all the worked-on areas of the car were airbrushed to match the original CB&Q Red. I got lucky that old TrueLine Trains CP/SOO ‘Bright’ Red was an exact match. A piece of paper was simply held while airbrushing to protect the lettering along the gondola sides.

Turning to the inside of the gondola, the top was masked to protect from overspray, then airbrushed with a coat of Mission Models ‘Standard Rust’ as a base. If the name is new to you, they are a US company that make wonderful acrylic hobby paints. They are well known to military modellers, but they do have a weathering line that rail modellers should learn about. Getting back to painting, this rust coat is just a base as weathering will be completed with various powders and stains. If you don’t own an airbrush, then Mission Models paints can also be brush painted. So with both the exterior paint repaired and interior now given a rust coat, the gondola is ready for weathering.

CBQ_P_002

The inside of the gondola was airbrushed with Mission Models MMW-005 ‘Standard Rust’ as a base. This will be further weathered with various stains and powders.

It should be noted that before you begin any upgrades or kitbashing, it is highly recommended that you try to find some photographs of the prototype to assist you. Not only does it help you with detailing, but they will also show if any extra decals need to be applied, and they also aid with weathering. In my case, I was lucky enough to find a photo on RRPictureArchives.net of the exact gondola; CB&Q 83453.

cbq_proto_gon

When kitbashing, finding prototype photos beforehand is always highly recommended. A 1980s photo of the real CB&Q 83453 showed where additional COTS stencil, ACI label, and white frame stripe decals needed to be applied. For weathering, it also shows where dirt tends to accumulate.

This was a photo taken in the 1980s by Chuck Zeiler, and it shows the gondola with new ladders added on the car sides, versus the as-built separate grab irons. I have come to learn that Burlington Northern was gradually replacing these on all the old Havelock shops gondolas over time. However in our modelling period of the 1970s this gondola would be under 10 years old, and probably still had the separate grab irons. As mentioned earlier, I purchased a BN painted model too, and I will probably add ladders to that gondola when the time comes. This actually makes it easier to kitbash, as a ladder is much easier to glue on versus installing all those wire grabs. A final note about the proto-photo, you will notice there are also some very recently spray-bombed grey lines painted along the tops of the car. However for my purposes, that’s a fairly recent detail I didn’t need to duplicate.

Another thing this photo helped determine was where the COTS stencil and the ACI label were located (this differs from car to car) so I could duplicate this exactly by adding decals (Microscale, if anyone was wondering) in the appropriate locations. There were also white frame stripes which the CB&Q applied to the gon as built, but which ScaleTrains failed to add. These were also applied to my model by using scraps of white decal remnants I hold on to for just such an occasion. After the addition decals were added the gondola was sprayed with a flat coat to protect and seal everything, and was now ready for weathering.

Though gondolas are among the most abused pieces of freight equipment in the industry, these Havelock gons would have still been in decent shape in our club’s modelling period. In their first years they were initially equipped with covers and used to haul concentrate ores, which is a fancy term for sand. It was not until the mid-70s that BN began using these cars in general service, which is when these gondolas could potentially begin showing up on the Sudbury Division. So my weathering treatment was limited to just adding grime and rust.

CBQ_P_003

Photos showed the majority of the dirt tended to collect along the exterior posts of the gondola. That heavy reinforcement bottom sill plate also collected dirt too, along with the area around the grab irons. The gondola ends also collect serious road grime. All of this can be reproduced with hobby weathering powders and a good angled paint brush.

Studying prototype photos, I concluded that the majority of the grime would collect along the sides of the exterior posts. Interestingly the posts themselves stay relatively clean, and it’s the area around them that mainly collects dirt. Road grime would also collect around the heavy reinforcement sill plate that runs between the bolsters, and of course some serious filth would also build up on the gondola ends. The area around the grab irons would get grimy too, thanks to employee’s greasy gloves. All of this can be reproduced with weathering powders. There are plenty of great products out there to try; AIM weathering powders, Vallejo effects, AK Interactive pigments, or PanPastel artists pastels are just a few of the wonderful brands that can help you age your models. Don’t be afraid of mixing various pigments, because dirt isn’t all the same colour and texture in reality.

CBQ_P_004

After spreading multiple rust powders and general soot to the interior, Tamiya panel line accent (shown here drying) was applied to highlight the separate boards of the gondola floor. A little more rust powder was then added to blend any irregularities, and all was sealed with flat finish.

Turning to the gondola interior, the first step was to apply multiple grades of rust and general soot coloured weathering pigments. Afterwards, I applied black Tamiya panel line accent to bring out the detail of the separate boards on the gondola floor. To finish, some more rust powder was added here and there to blend any irregularities, and then everything was sealed with a spray of flat coat to protect the weathering.

It should be noted some modellers supplement their interior weathering even further by gluing small piles of real crushed rust flakes inside their gondolas. While I encourage this, I avoided doing it myself as this gondola will be hauling multiple inserted loads on our club layout, and these rust piles have a habit of interfering with how the loads sit. But otherwise, it is an excellent way to further enhance the realism of your weathering.

CBQ_P_006

Weathering around the gondola ends was also done with powders. The grime usually accumulates around ladders, in between protruding ribs, and on top of the crossover platform. Aside from enhancing realism, adding dirt really brings out the ladder rung replacement efforts too.

Turning to the gondola ends these get particularly filthy, for that matter this is true for most rail cars. The reason is that dirt is kicked up from the trucks, in addition to employees causing grime to accumulate around the end-ladders and on the crossover platforms. Also, much like the exterior posts on the sides, the areas between any protruding ribs seem to collect more road grime. Again, all of this was duplicated using weathering pigments. As a bonus, and with the efforts from the earlier ladder rung replacement, the weathering pigments collecting around the end-ladders help give the appearance they are separate from the carbody. And as mentioned earlier, the weathering also help conceal any scrapes or scratches left over after sanding.

CBQ_P_005

Photo showing the finished weathering on the main body, but with the trucks yet to be completed. This helps illustrate that even the best weathering efforts are unconvincing if the trucks are left in their kit-supplied shiny plastic and metal state.

With the main weathering completed, I then airbrushed a light spray of Mission Models MMP-123 ‘Rail Tie Brown’ to the underbody to help highlight the brake details. The beauty of this being a ScaleTrains kit, the underbody brake details are a one-piece separate detail complete with brake rods and levers. All the weathering efforts were then protected by spraying the gondola body with Tamiya flat coat, right from a rattle can. If you’re still using Dullcoat, give Tamiya a try. You’re welcome!

CBQ_P_007

Wheel treads were masked with green painters tape, then airbrushed with MMP-105 ‘Worn Black’.

Aside from the brake detail, ScaleTrains also supply these kits with their excellent 100-ton trucks, including their high-quality free-rolling metal wheelsets. Which brings up a pet peeve of mine; going to the trouble of aging and weathering a model, then leaving the trucks unweathered. Even the best weathering efforts are thoroughly unconvincing if the trucks are left in their kit-supplied shiny plastic and metal state. And it’s relatively easy to do, I just masked off the wheel treads and airbrushed the trucks with Mission Models MMP-105 ‘Worn Black,’ though any dark grey-camouflage colour will work. You can go further by painting the wheel faces and insides a rusty colour, but with trucks being in the shadows anyhow, I find these extra efforts are lost on most casual layout observers. As long as the trucks are grimy, that’s good enough for a layout model. And with the trucks weathered, the gondola is ready to enter revenue service.

CBQ_P_008

The finished gondola, ready to enter revenue service on the CP Sudbury Division layout.

In conclusion, the techniques high-lighted here were once common practices in the hobby, before all the expensive R-T-R models arrived. So I encourage anyone new to the hobby, or those sitting on an armchair for years, to invest a bit in the tools required and to begin hacking up any inexpensive, shake-the-box kits that tickle your fancy. Yes, there’s a trial and error period at the beginning, but you learn more by messing up and fixing your mistakes. There is also the satisfaction of upgrading and owning a unique model for your layout. So if you’re inspired to try, these inexpensive ScaleTrains ‘Kit Classics’ are a great place to start. Then try an Accurail model. Personally, I find upgrading kits to be one of the most satisfying aspects of the hobby, and I hope more modellers will discover this too.


B&O F-Units in Twilight

Part 3 of That ’70s Rent-a-Wreck Fleet

Introduction was: That ’70s Rent-a-Wreck Fleet
Part 2 was: The Saga of the Bellequip Geeps

By the time Canadian Pacific had fully dieselized their system in the early spring of 1960, a recession had hit the North American markets. Additionally, the CPR was realizing all the efficiencies that a 100% diesel roster provided, and was beginning to unlock their fleet’s full potential. These factors caused the CPR to cancelled purchase orders with General Motors Diesel for more GP9 and SW1200RS locos which were scheduled for delivery later in 1960-61, and it doomed all remaining stored steam power for good. It also created a stable four-year period between 1960-64 for the CPR’s motive power needs, where they rostered sufficient locomotives to meet all traffic demands. From 1964 right up to the present day, the Canadian Pacific Railway would never again have such a time.

B&O 4517 at Soo 18March73

A great illustration of what a colourful time the 1970s were for CP Rail. Here we see script-lettered GP9 8676 coupled with B&O F7A 4517 (one of few leasers to wear the early ’60s *Sunburst* scheme) as they assemble freight #912 at S.S.Marie ON on 18 March 1973. (Ted Ellis photo)

Over the winter of 1964 the CPR entered the wonderful world of locomotive leasing. Forced into it by a sharp traffic upturn, their short-term solution was to lease several A-B-A sets of Union Pacific Alco-built FA-1 and FB-1 locomotives. These 1600hp cab units were early diesels built after the war in the late 1940s, and they were never a favourite of the UP who tended to run them hard with deferred maintenance. In fact the UP had tied-up this fleet earlier in 1963, and then re-activated them specifically for the CPR to lease. When they were returned later in 1964, the UP promptly retired them all and used them for trade-in for credits on new EMD locomotives. They literally ran their last miles over the CPR.

After dipping their toes into leasing with the cantankerous UP FA-1/FB-1 fleet, Canadian Pacific refined their rental practices throughout the late 1960s into a useful and effective strategy. Future leases included diesels from such diverse owners as the Bessemer and Lake Erie, Boston and Maine, Bangor and Aroostock, and the Chicago Great Western. All of these leasers proved to be of much greater reliability, and held a number of assignments over this time. Though they operated mainly in the CP Eastern Region, it was not unheard of for leasers to reach as far west as Calgary. Leasing numbers were highest over the winter months when traffic levels hit their peak, and coincidentally when CP’s own locomotive reliability stats suffered from the legendary cold Canadian climate.

Locomotive leasing really peaked in the early 1970s, as CP Rail began running robot coal trains to the new Roberts Bank Superport, and the Canadian government had inked large grain export contracts with both the Soviet Union and China. By January 1972, CP Rail already had over 75 leased units in service, primarily from locomotive leasing pioneer Precision National Corp. But by February the motive power crunch hit a critical point, and CP was forced to take anything that was available. Enter the Baltimore & Ohio F-unit lease fleet.

B&O 4487

Travelling between Sudbury and Smiths Falls over the Chalk River line, B&O 4487 leads GP9 8493, M-636 4731 and FA-1 4015 on train #974 through Carleton Place ON on 27 February 1973. This photo helps illustrate two points; that B&O F7As could and did lead while leased to the CPR, and that the motive power bureau wasn’t too picky about diesel arrangements when lashing locomotives together during the 1970s. (Bruce Chapman photo)

The once mighty B&O F-unit fleet had become a shadow of its former self by the early 1970s. Back in the day they were a staple of mainline operations, featuring 155 F7A and 104 F7B units. There were also older F3 models (some upgraded to F7 standards) along with second-hand F7’s purchased from the Bessemer & Lake Erie, and a number of 7000-series F7A’s transferred from the Chesapeake & Ohio (C&O had acquired controlling interest in the B&O in 1962). However by 1972 the B&O F7-fleet was significantly diminished through attrition, and were being used as trade-in bate towards new EMD GP38 and GP40 locomotives. The surviving F-units were holding down secondary freight and local coal mine shunting assignments. To put it bluntly, they were in rough shape.

B&O 5529

Entering its second winter season on lease to CP Rail, venerable B&O F7B 5529 is seen here sandwiched between sister B&O F7A 4587 and CP C-424 4243 at Smiths Falls ON on 26Dec72. (Bruce Chapman photo)

The B&O began transferring the F-units from Detroit MI on 08 February 1972, and all the leasers were initially inspected at CP’s Windsor Yard before entering service. In a foreshadowing of their decayed state of maintenance, five of the first leaser locomotives to arrive were judged to be mechanically unsound and were returned to the B&O. Another five units would arrive later to comply with the lease contract. (See roster below for details.)

The CPR was in such desperate shape for power that the first three units accepted for lease (F7A 4622 & 4646, F7B 5498) were almost immediately placed on local manifest freight #74, and left Windsor ON for CP’s Agincourt Yard in Toronto on February 10th, 1972. After arrival the trio were promptly placed on train #955 to travel north up the MacTier Sub to Sudbury ON, and eventually wound up in Chapleau ON the following day.

Ultimately a total of 28 F7A, F7B and even a pair of FP7 diesels would be leased to the CPR over the 1972 traffic crunch. Most wore the spartan post-B&O/C&O merger Enchantment Blue scheme, but at least two F7A locos (4487 & 4499) and an F7B (5477) were still sporting the classic late-50s B&O double blue / yellow pinstripe scheme. Another trio of F7A units (4517, 4622 and 4645) wore the remains of B&O’s famous, albeit short-lived early 1960s ‘Sunburst’ scheme, though all their noses had been repainted and lost their attractive sun rays in the process. As if that wasn’t enough variety, all the 7000-series F7A locos transferred from parent Chesapeake & Ohio were wearing hastily patched C&O paint in various states of degradation.

B&O 7054

The former identity of B&O F7A 7054 is hard to miss as she leads CP RS-3 8431 and SW1200RS 8161 on an eastbound at Smiths Falls ON on 18 February 1972. All the B&O’s ex-C&O cab units on lease to CP were in various states of paint decay as such. (Bruce Chapman photo)

As one would expect, this combination of B&O paint variations coupled with CP’s own radical corporate image change, plus the riot of colours available in the leased ‘rent-a-wreck’ fleet, resulted in a particularly vibrant period of CPR motive power lash-ups. Possibly the wildest incident involving B&O leasers (recounted by a credible source) was of a CPR employee (and closet railfan) who proceeded to chase northbound train 955 from Toronto up the MacTier Sub into a blinding snowstorm. The reason? On the point was a perfect A-B-A consist of B&O 4487, 5477 and 4499, all adorned in the old late-’50s double blue / yellow pinstripe scheme.

B&O_5498_Nairn

B&O 5498 is the trailing unit on train #911 at Nairn ON on the WRMRC’s CP Sudbury Division layout. Model was completed by the author from a powered Intermountain F7B, with Polyscale paints and Microscale decals. The unique B&O spark arrestors were scratchbuilt from styrene.

Whether it came down to duct-tape, bailing wire and ball-peen hammers to keep these weary beasts rolling, the CPR shop crews faithfully maintained these F-units until the initial lease ended in August of 1972. But only four short months later a number of these original leased units would return again, along with a few new numbers, to help out with the ’72-’73 winter season. All B&O F-units went off lease and were returned to home rails by the end of April 1973.

However it would not be the end of spotting leased ‘Chessie’ power on the CPR, as they and successor Chessie System (the official merger of B&O / C&O and Western Maryland) seemed to have forged a rental relationship that resulted in leased C&O GP30 and GP35 units operating through 1979-1980, and again between 1984-1989 with B&O GP38 and GP40 locos. But as Canadian Pacific began amassing their own large fleet of SD40-2 locomotives throughout the 1970s, that signalled the end of a particularly evocative and polychromatic era of locomotive leasing, and the B&O F’s were operating right in the middle of it all.

On a final note, the Baltimore & Ohio F-unit rental experience did somewhat emulate the Union Pacific’s FA-/FB-1 fleet from almost a decade earlier, as many of these F’s were placed into storage after their return to home rails. A good number also soldiered on for a while, but eventually all would be used for trade-in credits towards new Chessie System GP38-2 and GP40-2 diesels from General Motors. Just as before, there were rent-a-wrecks operating their last revenue miles on the CPR.


All-time Roster of B&O F-Units Leased to CP Rail Between 1972-73

Road No. Model Paint Scheme Notes
4472 F3A B&O Solid blue Replacement unit from B&O – Feb 72
4477 F7A B&O Solid blue Failed inspection & returned – Feb 72
4487 F7A ’50s Double blue
4499 F7A ’50s Double blue
4502 F7A B&O Solid blue
4503 F7A B&O Solid blue Replacement unit from B&O – Feb 72
4517 F7A B&O ‘Sunburst’
4575 F7A B&O Solid blue
4576 F7A Not confirmed
4577 F7A B&O Solid blue
4580 F7A B&O Solid blue
4586 F7A B&O Solid blue
4587 F7A B&O Solid blue
4589 F7A B&O Solid blue Replacement unit from B&O – Feb 72
4622 F7A B&O ‘Sunburst’
4630 F7A B&O Solid blue Failed inspection & returned – Feb 72
4645 F7A B&O ‘Sunburst’ ex-B&LE acquired 1962
4646 F7A B&O Solid blue ex-B&LE acquired 1962
4648 F7A B&O Solid blue ex-B&LE acquired 1962
5420 F7B B&O Solid blue
5424 F7B Not confirmed
5429 F7B B&O Solid blue
5447 F7B B&O Solid blue Replacement unit from B&O – Feb 72
5448 F7B B&O Solid blue
5477 F7B ’50s Double blue
5495 F7B B&O Solid blue Failed inspection & returned – Feb 72
5498 F7B B&O Solid blue
5515 F7B B&O Solid blue
5529 F7B B&O Solid blue ex-B&LE acquired 1962
5533 F7B B&O Solid blue Failed inspection & returned – Feb 72 / ex-B&LE acquired 1962
7039 F7A Patched C&O ex-C&O, transferred to B&O 1962
7052 F7A Patched C&O Failed inspection & returned – Feb 72 / ex-C&O, transferred to B&O 1962
7054 F7A Patched C&O ex-C&O, transferred to B&O 1962
7081 F7A Patched C&O ex-C&O, transferred to B&O 1962
8009 FP7 B&O Solid blue
8011 FP7 B&O Solid blue Replacement unit from B&O – Feb 72
Additional notes:-
  1. Units were leased Feb 1972 to July 1972, and from Dec 1972 to April 1973.
  2. All units received by CP at Windsor ON via C&O’s Rougemere Yard / Detroit MI.
  3. Initially 28 units were listed by Extra2200South magazine – March 1972.
  4. The fleet was down to 10 units by end of Feb ’73 (X2200S, no numbers listed).
  5. All returned by May 1973, a number were stored after return. All retired by parent Chessie System by 1975.

References: Extra2200South, Bruce Chapman, Bruce Mercer and Greg McDonnell.


Kitbash Free Or Die

or: How to Salvage a McKean PS-1 Kit and Create a Cool New England Boxcar

NSRC458_01

NSRC 481, a typical North Stratford Rail Corp 40ft PS-1 boxcar, was photographed rolling through Pomona, California on 07 June 1982. – Tim Brooks photo (courtesy canadianfreightcargallery.ca)

This latest project originated from an evening bout of model train show withdrawal symptoms, as the lack of flea markets and swap meets during the pandemic restrictions caused me to review my boxes of surplus models. There I re-discovered all the old McKean and Front Range rolling stock kits that I’ve been offering for sale over several years worth of Kitchener Train Shows.

NSRC_logo1Looking over these kits my mind began to meander and imagineer various modelling possibilities, somehow wandering back to the late 1980s where I recalled seeing North Stratford RR boxcars rolling though southern Ontario. They were curiosities back then, not only because they were probably the last 40-foot boxcars still in interchange service, but from their bold logo and distinctive ‘Live Free or Die’ slogans (the state motto of New Hampshire). But then I remembered the kitbashing involved to get these kits up to modern modelling standards, and reasoned there must be some manufacturer out there that produced a good ready-to-run North Stratford RR boxcar.

Well a quick internet search found there were none, but there were decals available for the project. That caused more research on the real North Stratford Railroad, and whether the WRMRC’s CP Sudbury Division layout could see any of their boxcars. The short answer was yes, which caused me to pull an 8-foot door undec McKean kit from the surplus box, followed by an online decal purchase. The kitbash was on.

NSRC458_02

Left-hand (tall-ladder side) view of the kitbashed McKean model, ready for primer. You pretty much have to toss all the manufacturer-supplied details when bashing these old 1980s kits.

A brief history of the North Stratford Railroad can be found on their Wikipedia entry, and a Google search will provide you with plenty of information if you wish to learn more. From this research, for the purposes of club operating sessions, it was plausible that NSRC boxcars could be hauling furniture from the former Ethan Allen furniture factory in Beecher Falls VT to the greater Chicago area over the CP Sudbury Division. CP trains 911/912 captured a lot of New England – Chicago bridge traffic through the 1970s, as shippers used whatever means possible to avoid the lengthy transit times caused by the Penn Central merger mess.

I’ve written before about my old kit salvage jobs, specifically here and here. Basically my goal is not to create a contest model, but to make a reasonable representation utilizing the many boxes of spare parts I’ve accumulated over the years. The challenge is to create a boxcar that will not melt if coupled between a Kadee and Tangent model, and not to spend any extra money aside from decals and maybe paint.

NSRC458_04

Right-hand (shortened-ladder side) view of the model. The various detail parts used came from the author’s spare parts collection. Roof-walk and ladder supports were fabricated from styrene.

Before you copy my work, please note there was a mistake made because I began kitbashing the car before thoroughly researching the prototype. Bashing enough of their kits over the years, I habitually began by adding the roof walk supports that McKean inadvertently missed on their model. This was done using .060” styrene angle, chopped to the appropriate length, and glued on the roof rib peaks. After doing this I came across a good roof-view photo of an NSRC boxcar, and discovered the roof had been completely rebuilt with no roof-walk supports. It turns out their entire fleet of 100 reconditioned 40-foot boxcars had rebuilt roofs. So I actually went out of my way to goof this boxcar up. Oh well, good thing this isn’t a contest model.

As for the other details utilized, most came from my collection of left-over parts from old Intermountain, Branchline and Proto-2000 models purchased over the years. The ladders, grab irons, and tack boards were all surplus left-overs from those kits. The 8-foot Superior doors were excess parts from a Sylvan Scale Models double-door boxcar kit. I never throw any good spare detail parts away. Additionally there were some wire 18” drop grab irons on the car ends, and a a wire corner-grab on the roof utilized also. I often re-bend staples to create new metal stirrups on my kitbash projects, but went the easy route and used A Line Products stirrups on this one.

NSRC458_03

‘B’-end view. The McKean brake housing was salvaged, but with a Kadee brake wheel and metal wire used for the brake and air lines. A couple of re-bent staples support a Details Associates photo-etched brake platform. That jade green tack-board must have come from an old NYC kit.

They might have been good for their time, but the underbody on these McKean kits needs a lot of work too. First I body-mount scale #158 Kadee couplers in their own boxes (nothing works better than a Kadee in it’s own box), which requires you to remove the molded-on McKean coupler housings. Doing so will expose a square hole which needs to be filled with styrene. After that’s plugged you can drill and tap a #2-56 screw to mount the replacement Kadee coupler boxes.

NSRC458_05

Underbody view. Most of the original details were cut away, and a new Accurail 1-piece underframe brake rod set was installed. Kadee #158 scale couplers were also added.

Though the underframe brake rods look complicated, they are actually very easy to add. The hard work was cutting away most of the old McKean details in order to add them. Once that was all done and cleaned, I installed an Accurail one-piece underframe brake rod set which gives your model the appearance of having a super-detailed underbody with minimal effort. To finish, I installed a set of 50-ton roller bearing trucks equipped with Intermountain 33” wheels. All the NSRC 40-foot PS-1 boxcars rode on these style trucks.

In order to blend together all the different coloured detail parts before paining, the model was first primed with light grey Tamiya Fine Surface Primer.  Yes, right from a rattle can, and you get a wonderful finish. I then looked for whatever green the WRMRC paint collection had that best matched these NSRC boxcars. Photos show a dark green / bluish colour when new, fading to a lighter, truer green as they aged. Needing to replicate a nearly new car I chose PolyScale F414188 CNW Green, unfortunately now long out of production. If you need help, I’m certain the CNW modellers know of a good replacement paint match. I then sprayed Tamiya clear gloss coat, as PolyScale paint is flat and a gloss finish helps with decal adherence.

NSRC458_06g

In progress photo of the decal application. K4 Decals go on well, but you should always read the manufacturer’s instructions beforehand, and apply on a glossy finish to maximize adherence.

As noted earlier, an online search turned up the appropriate NSRC decals from K4 Decals. They are well-printed, good quality decals, fairly easy to work with, and yield excellent results as you can see from the photos. K4 were a new supplier for me, but I’ll definitely buy again from them when the need arises.

However there were some minor miscellaneous odds and ends I needed to add that were not supplied by the K4 sheet. Specifically the near-microscopic bank trust stencil lettering found on the top left of the car, along with the tiny ‘Retaining Valve’ and ‘Defect Card Holder’ stencils along the bottom side-sill of the boxcar. For that I used some Microscale decals I had in my collection to replicate those. For the bank trust lettering I used some N-scale tank car decals I purchased specifically for cases like this. If anyone is able to read them directly off my model with the unaided eye, I’ll buy you a coffee.

NSRC458_07

Completed model. Some light weathering was added, mainly road grime around the underbody, and some grunge coming from the roof eaves. A clear flat finish was then sprayed to protect it.

I probably over-weathered this model considering it should still be shiny after it’s rebuilding in 1979, but it just didn’t look right mixed with all the other really grunged-up rolling stock on the club layout. So I airbrushed a light coat of grime along the underbody, and added some dark grungy weathering powder along the roof eaves along with some running down from the door guides. A clear flat coat was then applied to protect the weathering. Combined with the original base gloss finish the model still has a bit of a shine to it, so I’m happy with the over-all result.

In closing, I just wish to reiterate that this kit was up for sale for $5 at the WRMRC table over several Kitchener Train Shows, along with a lot of other surplus ‘fleas.’ For all the complaints on model train forums about the high cost of our hobby, here is proof that if you have the time and are low on cash, you can create quality models while on a budget. You also get the added satisfaction of owning something unique. Personally, I get a kick out of re-creating something I’ve seen in the past, and the research and efforts towards that goal are what make the hobby rewarding. I hope this story inspires others to dig around in future train shows, and look beyond the latest ready-to-run models.

When a Plan Comes Together

It has taken a long time to collect all the information we have about CP operations over the Sudbury Division. Most of it has been acquired through dedicated research, photo studies, and conversations with former employees. Even though the WRMRC has been at this for, literally, decades now. there will always be new things to learn. Research and education are lifelong pursuits after all.

A case in point; within our photo archives we have discovered three separate instances of CB&Q 2-bay Center-Flow hoppers travelling over the Sudbury Division. As the WRMRC’s chief operations guru, I’ve developed some plausible waybill information for mid-western US covered hoppers to run over our layout (note – we will be publishing a series of club operations posts in the future). However, finding out the prototype shipping information for why these specific CB&Q railcars were showing up in Sudbury would be our desired goal.

Despite the hardships one should normally expect with prototype research, sometimes good stuff just falls into your hands when you’re not even looking. Recently, Mike Confalone‎ posted a model photo on his Allagash RR Facebook page of Minnesota Dakota & Western (MD&W) boxcars being loaded on his layout. He had seen these being used in Maine in real-life back in the 1980s, and had always wanted models of them for his own layout. The problem was that despite these FMC-built combo-door boxcars being available in HO-scale for years now, they were never offered in this particular ’80s re-paint scheme. So he painted and decalled his own.

mdwboxes

Mike Confalone’s MD&W boxcars on his Allagash RR layout.

Mr. Confalone is an incredibly skilled modeller, as you can see, so it is no surprise his efforts would be top notch. The surprise for us was; why the heck are Minnesota Dakota and Western boxcars being used to load paper in Maine? The answer is forestry giant Boise Cascade (parent company of the tiny MD&W RR) owned a paper mill in Rumford ME. Apparently some of these boxcars even had “Return to Rumford ME” stencilling applied to them.

This one model photo along with the real-world information about Boise Cascade’s Maine paper production helped to resolve a number of CP Sudbury Division puzzles, ones we didn’t quite remember even existed. This explained occurrences of Boise Cascade MDW boxcars on prototype photos of CP train 911, a manifest freight that had rolled daily through Sudbury ON. This train operated from St Luc Yard in Montreal to Sault Ste Marie ON; then continued via CP’s US-affiliate SOO Line to their Schiller Park IL Yard within the greater Chicagoland area. CP #911 carried a lot of New England paper traffic bound for Chicago during our 1970s modelling era, as many shippers were avoiding the transit-time mess created by the Penn Central merger. Service was so good in fact that CP Rail continued to ship a decent amount of New England rail traffic well into the 1980s.

4232 leads train at Sault Ste Marie 09 05 1981

MLW C-424 #4232 leads train 911 at Sault Ste Marie ON on 05 Sept. 1981. Note the four MD&W boxcars behind the CP steel-coil service gondola trailing 911’s locomotives.

Our original assumption was that these MD&W boxcars were lumber empties being returned to the US mid-west, with no idea of their true origins. The truth was they were hauling newsprint bound for the Chicago area, and for all intents and purposes are as New Englandy as any paper-service boxcars painted for the Maine Central or Bangor & Aroostock.

Topping this off, one of our club members had purchased two recently released Athearn HO-scale models of FMC-built combo-door boxcars painted in the 1970s as-delivered MD&W white scheme to operate on the WRMRC layout. Being uninformed at the time, they were placed within our “Pool 733 – US mid-western misc boxcars” category (more information about our pools when we publish operations articles) and tried to stretch excuses for why some lumber might be rolling through Sudbury from International Falls MN (where the actual MD&W RR is located). Knowing the real story about why these boxcars were rolling though Sudbury, they have since been re-classed into our New England newsprint service boxcar pool. In fact our layout could now use a few more models.

MDW_10009

Produced by Athearn, MD&W 10009 wears the as-delivered 1970s white Boise Cascade corporate scheme. This car is now in New England paper-service on the WRMRC layout.

This information comes at a great time, as the Coronavirus break from operating sessions has given our club a chance to update and fix a number of older waybill shipping inaccuracies. But this MD&W boxcar mystery has to be one of the easiest puzzles we’ve had solved. When something just falls together like this, one is reminded of that old catch-phrase that Lt Col Hannibal Smith used to say on the old ’80s television series ‘The A-Team’ – “I love it when a plan comes together.”

Signalling the Sudbury Division

Since our club’s initial decision to model the CP Sudbury Division in the 1970s era, it was understood by the membership that at some point railway signals would need to be installed on the layout. Not only did we want our layout scenes to look close to their real place counterparts despite having to selectively compress them, or operate equipment that appeared just like what really ran through northern Ontario in the ’70s, but we also wished to operate the layout in a realistic manner too.

The CP Cartier Subdivision between North Bay and Cartier was all CTC (Centralized Traffic Control) territory during the 1970s, with the exception of the six mile double-track section between Romford and Sudbury yard which was ABS (Automatic Block Signal System) signalled in one direction for current of traffic. Regardless of the two signalling methods it meant the club’s entire east-west mainline was protected by signals, and therefore we would need to duplicate this if we wished to achieve our goals of both looking right, and running right.

That said, we can report that signalling a model railway is very much more easier said than done. However after 20 years of planning, and of delaying a lot of scenery work from being started due to the wiring and complexity of the project, the 1/87 scale Sudbury Division is seeing its first signals begin to sprout around the layout.

RomfordSignals01

Temporary dual-head and permanent dwarf signals installed at Romford. Once fully programmed they will protect this busy junction just like their real-life counterparts.

Though much of the hobby has progressed quite dramatically over the past 40 years, sadly the process of signalling a layout has lagged behind despite the pioneering efforts of Allen MccLelland’s V&O, or Bruce Chubb’s Sunset Valley back in the 1970s. Yes, there are multiple sources of hardware available, and JMRI (Java Model Railroad Interface) software is free, however none of this is really plug and play. You need to program signal scripts and modify JMRI for any of this to work. Between knowing where the signals need to be installed, planning and wiring the signal blocks accordingly, selecting the detectors, switch and signal controllers and then programming it all to work, there is one other big problem for us. No one out there offers ready-to-run Canadian-style searchlight signals.

Romford, ON in October 6, 1971

From the cab of ‘The Canadian’ at Romford, ON – 06 October 1971. Photo by Roger Puta, from Marty Bernard’s Flickr album.

Though searchlight signal kits do exist in HO scale, they are US-based and need to be disassembled and pretty much scratch-build to have them appear like the real deal did. This and both CP and CN did have some differences in their ladder assemblies. For this reason, the WRMRC has decided to build their own, and to use temporary signals in the meantime. But it sure would be nice if a Canadian model manufacturer considered reproducing them for HO modellers at some point. Hello Rapido; wink, wink, nudge, nudge!

RomfordSignals02

Westbound signals guarding Romford. The mainline is on the right. The wye tracks to the left connect with the Parry Sound Sub to Toronto. The track in the middle is a set-off siding.

There is also the little wrinkle of the dispatcher needing a CTC panel for this all to work. However the good news for the WRMRC is the CP Cartier Sub was signalled in the 1960s, and thus never used one of the ‘classic’ CTC panels that railfans usually imagine. CP had their own hybrid system housed on the second floor of the Sudbury Division HQ building, featuring a large white wall panel with a black trackage schematic, and yellow lights displaying track occupancy. The dispatcher set switches and direction of traffic with a keypad assembly. Frankly, this sounds a lot like something you can duplicate on a computer screen and controlled with a keyboard, and so that’s exactly what we will be doing.

RomfordSignals03

Temporary dual-head signals protect the CP Cartier Sub diamond crossing with the CN Bala Sub at Coniston, Ontario. The diamond, much like our signals, is a work in progress.

Regardless of all these difficulties, the WRMRC has a small team working on the project and they’ve been making great strides recently. As you can tell from the photographs, the layout is already looking dramatically different. We look forward to the day we can ‘un-bag’ these signals for a future operating session, and have our engineers operate their trains as per signal indication. This also means scenery can progress in these areas too. The WRMRC’s goals of ‘looking right’ and ‘running right’ are slowly being achieved.


Rescuing Old Kits

A while back I wrote a blog post on the Model Railroad Hobbyist forum about resurrecting old rolling stock kits developed in the ‘80s, back when the hobby finally began to move past the ‘blue-box’ era. Over the course of that decade, companies like Robin’s Rails, McKean, C&BT, Front Range and Innovative Model Works had sprung up to challenge Athearn and MDC. This was a big leap forward for HO modellers; as these kits were based on specific prototypes, were well researched, and offered a core model with all details applied separately.

Since those times we’ve moved into a model railway world of ready-to-run (RTR) pre-assembled models of exquisite quality. New manufacturers like Tangent, ExactRail, Scale Trains and Moloco (just to name a few) now offer 1:87 rolling stock replicas that truly are museum-quality models. However for those who crave the days when we used to build our models, and paid less than $10 for a freight car in the process, there is something to be said for resurrecting these old kits.

My latest example is this old McKean 40ft PS-1 boxcar painted for the Louisville & Nashville RR.

Louisville-Nashville-40-PS-1-Box-Car-No

A good friend and fellow WRMRC member had this kit for sale amongst a pile of surplus model train stuff at a previous Kitchener Train Show. It went through two shows without anyone showing interest. What struck me was its 1960s paint scheme, a relative minority in a model railroad world where the popularity of the ‘40s-‘50s transition era dominates how manufacturers paint their products. However it was dismissed at the time due to it being a southeastern US boxcar, which I assumed would be a rare traffic event over the CP Sudbury Division in the 1970s.

My thoughts changed recently in my continuing efforts to update the club’s traffic/waybill system. It turns out the southeast US offers northern Ontario a lot more than just orange juice and kaolin. Using the OPSIG Industry Database I’ve found a long list of products that one could see routed through the Sudbury Division which are mainly supplied by the southern states. Cotton, rice, peanuts, casting sand and even mining equipment are just a few of the commodities that were uncovered over a couple of hours of research and coffee consumption. So it turns out the WRMRC had been neglecting a traffic source, and  this L&N boxcar was resurrected from the flea market table.

This photo shows it fresh from the ‘grunge factory’ (a.k.a. – the spray booth) after all paint, extra decals and final weathering had been applied; along with one of the prototype photos used to aid in its kitbashing.

L&Nbox_paintshop

As described in the MRH blog, you pretty much have to throw away all the kit-supplied detail parts. I used better ones which are stuffed away in my surplus parts boxes. The underbody was completely gutted, and replaced with Intermountain underbody details – yes, they sell their detail parts separately. The brake detail on the ‘B’ end was fabricated from brass wire, a brake wheel and housing I had lying around, a bit of photo-etched roofwalk material, and a couple of staples I re-bent to hold the brake platform. Likewise I used staples as stirrups to replace the crude ones supplied by McKean.

It should also be noted I used the internet to research these cars, in order to find as many prototype photos as possible. Turns out the L&N 11xxx-12xxx series cars were 1960s rebuilds, with DF loaders, moveable bulkheads and other features added for specified commodities. However with more modern 50-foot cars being purchased, I’m certain that by the 1970s these cars were already relegated back to general service by the L&N.

Though it took a few evenings worth of kit-bashing and research, these efforts are what make the hobby rewarding for me. As the price of RTR models continue to climb, I hope more modellers come to discover these old kits from the ‘80s. There is real value to be found here, and you don’t need to dig too deep to uncover them at any train show.