We published a blog post a number of years ago about resuscitating old kits, in the hope it would inspire more hobbyists to kitbash and upgrade older models. However it wasn’t really a representative ‘how-to’ guide as the core kit came with separate detail parts, so that upgrade was just a case of adding finer details, matching the paint, and weathering to finish. So this article was written to assist any new modellers who might be apprehensive about taking a hobby knife to a plastic model.
Aside from showing some basic techniques, this article is also an attempt to answer the griping that happens on a lot of model railroad forums about the prices of today’s exquisite ready-to-run (R-T-R) pre-assembled models. If you are a newcomer to the hobby and/or on a budget, there are some manufacturers who are trying to help you by producing classic ‘shake-the-box’ model kits. The big one a good number of rail modellers seem to forget about is Accurail, who’ve been producing an extensive line of easy to build freight car kits for over 30 years now.
Now recently ScaleTrains have entered the field, (yes, the same company who are better known for producing those museum-quality R-T-R models that the price-gripers like complaining about) by introducing their more affordable ‘Kit Classics’ line of easy-to-build rolling stock kits. The following is a step-by-step guide to updating their Havelock Shops gondola.
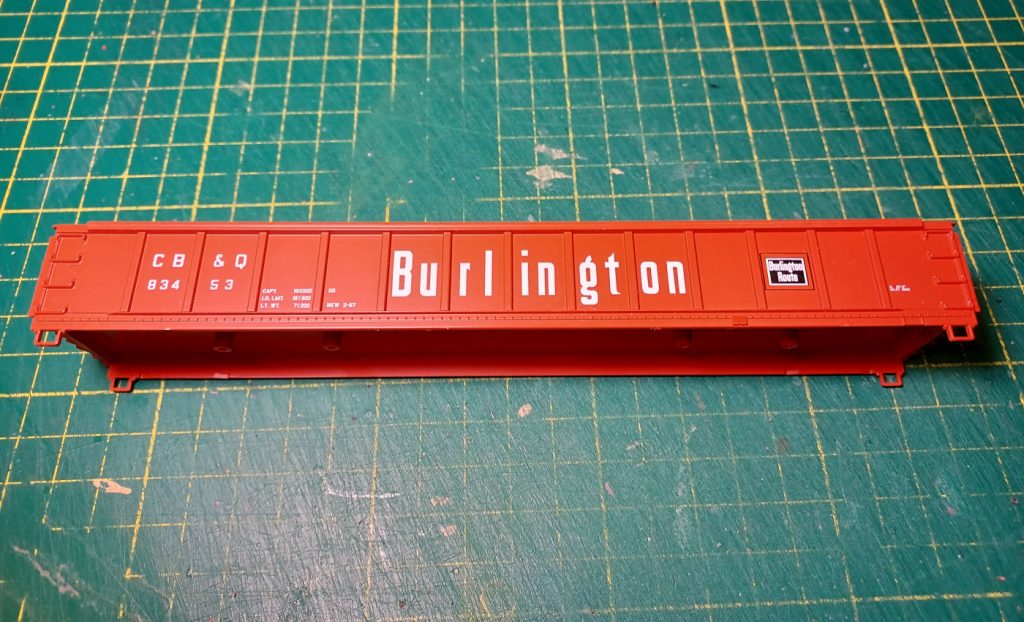
Here is the base body of the Scale Trains Havelock Shops gondola as it comes out of the box. Paint and lettering is crisp, and the moulding is fine too. If you simply assemble and weather the model as is, it would look good. But by replacing the moulded-on details, adding a few extra parts and decals, and then finishing with a good weathering job, you will create a model that really pops.
Before we begin, an explanation may be in order as to why the CP Sudbury Division would require a Chicago Burlington & Quincy gondola. Well, we do model a portion of the CPR transcon line across Canada, and though the majority of the traffic we’d see is domestic, there are always a few interlopers from south of the border in any manifest freight. Of those US companies, the Burlington Northern (the 1970 merger that swallowed the CB&Q along with three other railroads) was a large and friendly interchange partner. To top it off, the WRMRC has two photos in our archive which show BN gondolas in Sudbury yard. We have not figured out why, but clearly having some BN and predecessor company gondolas on the club roster was warranted. Furthermore, this particular gondola is a good one, as these were signature BN cars home-built by the Burlington’s Havelock Shops (located outside Lincoln, Nebraska), so kits painted for BN and original CB&Q were acquired for the Sudbury Division roster.
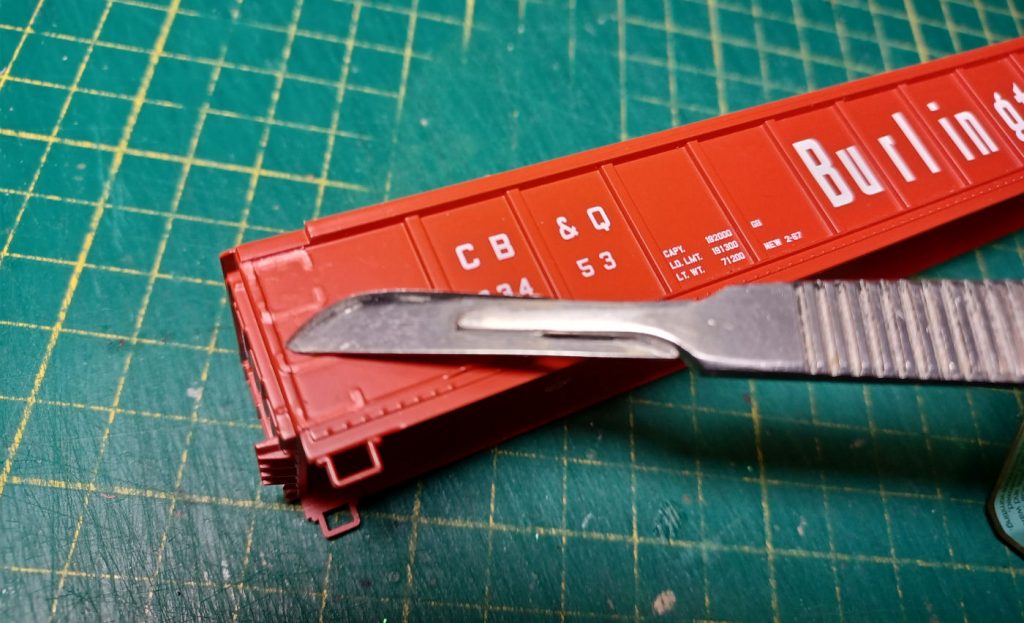
The first step is to carefully scrape away the moulded-on grab irons. Though most modellers use X-Acto knives for this, the author was a former biology student and prefers scalpels.
The kitbashing begins with the removal of all moulded-on grab irons from the gondola sides. X-Acto knives are the traditional tools for this in model railroading, but I highly recommend scalpels. I learned to use them many years ago as a biology undergrad, and just like the feel of them when doing precision cutting. Frankly, nothing beats a fresh #10 scalpel blade for cutting styrene plastic, however I urge basic caution. These blades were obviously designed for cutting flesh, so always cut away from your hand. Also you should wear eye protection. Plastic is tougher than flesh, and you can break the blade if you force and bend it too much, causing the business-end to go flying. Nevertheless you may want to give them a try, and most better hobby shops carry the handles and various sized blades. You can actually sense the undulations and unevenness in the plastic with each pass, which helps as you scrape away the offending moulded-on details from your models.
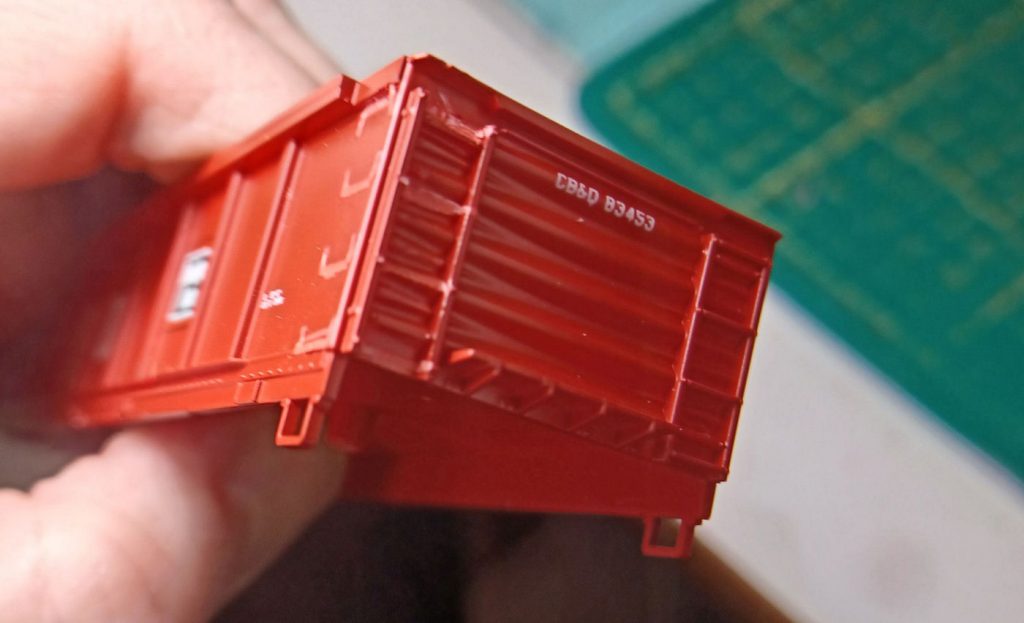
On the gondola ends, a smaller #15 scalpel blade was used to carve out the ladder rungs while keeping the upright side-rails intact. This photo shows what a difference this makes between the left and (as yet) unmodified right ladders.
To help the appearance of the car ends, the ladder rungs were cut away using a smaller number 15 scalpel blade. The method is to cut on small diagonals in each direction, and eventually chip away each ladder rung while maintaining the ‘rolling pin’ pattern of the Dreadnought ends. Be advised that even after sanding with a small sanding block, you will never achieve a perfect ‘unhacked’ finish. But that doesn’t matter as weathering done to the car will help hide any imperfections the cutting leaves behind.
I had considered removing all traces of the ladders by cutting out the side-rails as well. However that would be almost as much work as cutting off the ends entirely, and rebuilding with old boxcar Dreadnought-ends I have laying around in my spare parts collection (yes, I considered that too). The later option would provide a clean car end, and would be the way to go if building a contest model. I quickly realized that either option would require a lot more effort than I was willing to spend on this project, and replacing the rungs alone was enough to help give the ladder depth and greatly improve the appearance.
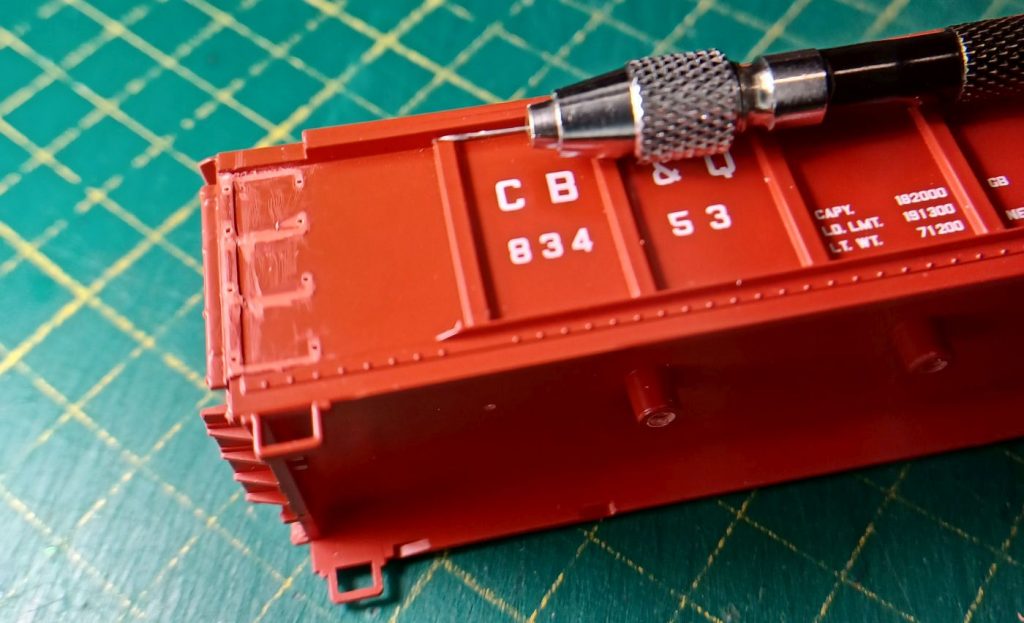
After scraping away as much as possible, drill #79 holes for the new grab irons by using the shadows of the old moulded-on details. Sanding is done afterwards to remove any scratching or imperfections left behind. Sanding first would make positioning the drill locations more difficult.
The next step is to use a pin vice to drill #79 holes for the new wire grab irons, using the shadows of the old ones as your placement guide. It is easier doing this now, before any sanding that will widen those shadows. You can shave and sand away any remaining imperfections once all the holes are drilled.
I utilized Tichy Train 18″ phosphor bronze drop grab irons for my car, but any manufacturer’s scale 18″ wire grab irons (Detail Associates, A-Line, etc) will work just the same. Tichy calls for drilling #80 holes for their product, but I prefer a slightly larger hole to take into account the cyanoacrylate superglue that the grabs will be dipped in prior to positioning. Aside from making it easier to slide the wire in, I also have a habit of breaking #80 bits with little effort on my part. So I stand a much better chance at drilling all 32 holes required using a #79 without breaking another drill bit.
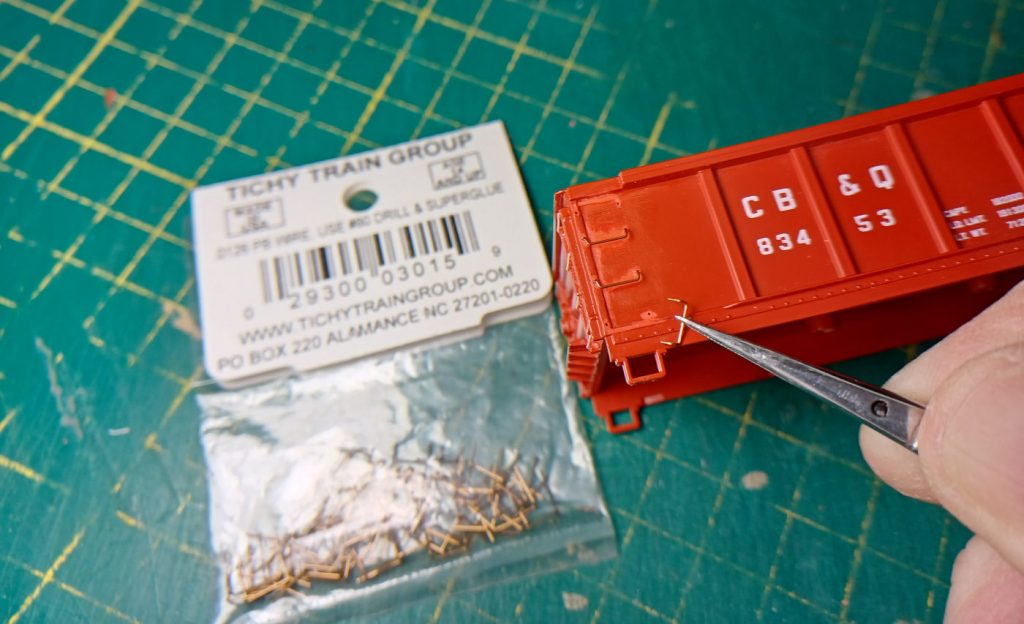
New scale-18″ grab irons are installed by cutting back the wire ends to about 6 scale inches (to keep them from protruding inside the gondola) and then dipping each end in a puddle of cyanoacrylate (otherwise known as CA ‘superglue’) prior to installation. Note that the very top grabiron is positioned upside-down in relation to the other three.
I also cut down each grab iron end to about 6 scale inches, and with Tichy using phosphor bronze wire, cutting them back is easy. This way the grab irons will stick out about three scale inches from the carbody (as they should) without the wires protruding inside the gondola body. After installation, sand the gondola insides around those holes to remove the imperfections as best you can. Between the sanding, gap-filling CA superglue, and rust painting/weathering that will be done later, those grab iron holes should pretty much disappear by the end.
Now for the gondola ends the process is much easier. I simply glued pieces of 0.1″ styrene rod across the side-rails to replace each ladder rung. You can use either CA superglue or any MEK-based plastic weld for this. Once the glue is dry, you can trim and sand down any rod sticking out past the side-rails. Admittedly, I employed a quick and ad hoc method of ladder replacement, but it’s easy and effective. This is a big improvement in appearance with minimal effort, and after painting and weathering it will be difficult for the layout observer to tell that the end-ladders are not a separate detail part.
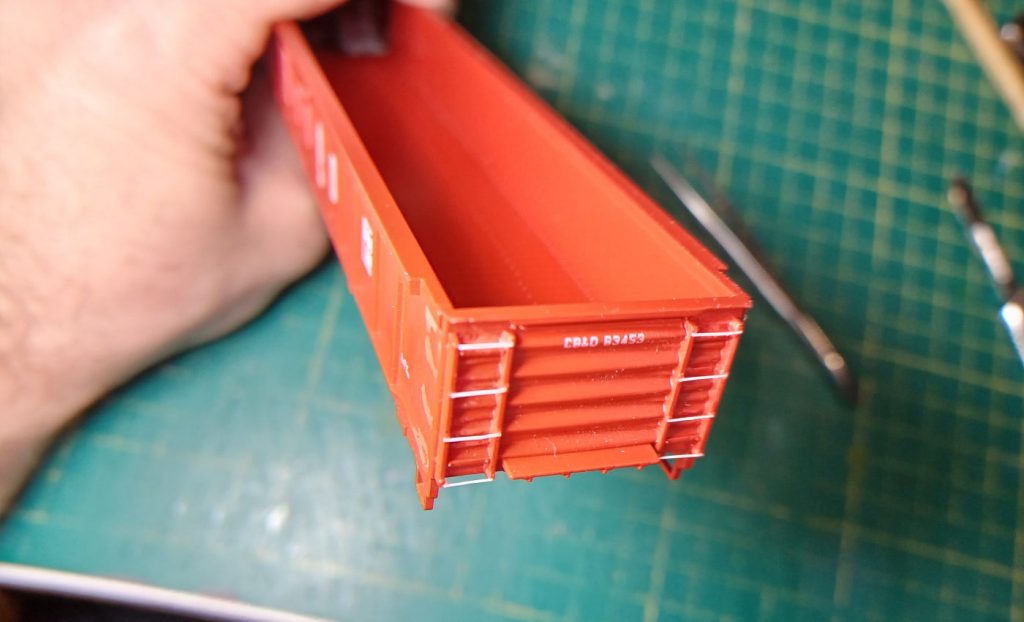
Ladder rung replacement was done simply by gluing lengths of 0.1″ styrene rod. It’s a quick and ad hoc method, but it accomplishes the task with minimal effort.
After all the grab irons and ladder rungs are replaced, the next step is to add some super-detail parts to the gondola, specifically coupler cut-levers and brake-line hoses to the gondola ends. Since all the new details still need to be painted, I leave the already coloured black brake hoses to the very end before I weather the car. There are many different pre-bent coupler cut-levers offered by many manufacturers, but I had none in my collection that worked. So being a cheap frugal modeller, I elected to simply bend my own using 0.1″ phosphor bronze wire with a fine pair of needle-nose pliers. To attach them, a #79 hole was drilled into the bottom-left side sill of each gondola end, and eye bolts glued in place (see photo below). Then slide the cut-lever in through the eye bolt, and fasten the wire against the bottom of the coupler with CA superglue. If you ever need to service the car in the future it’s easy enough to break this bond, and then just re-glue the cut-lever and touch-up the paint.
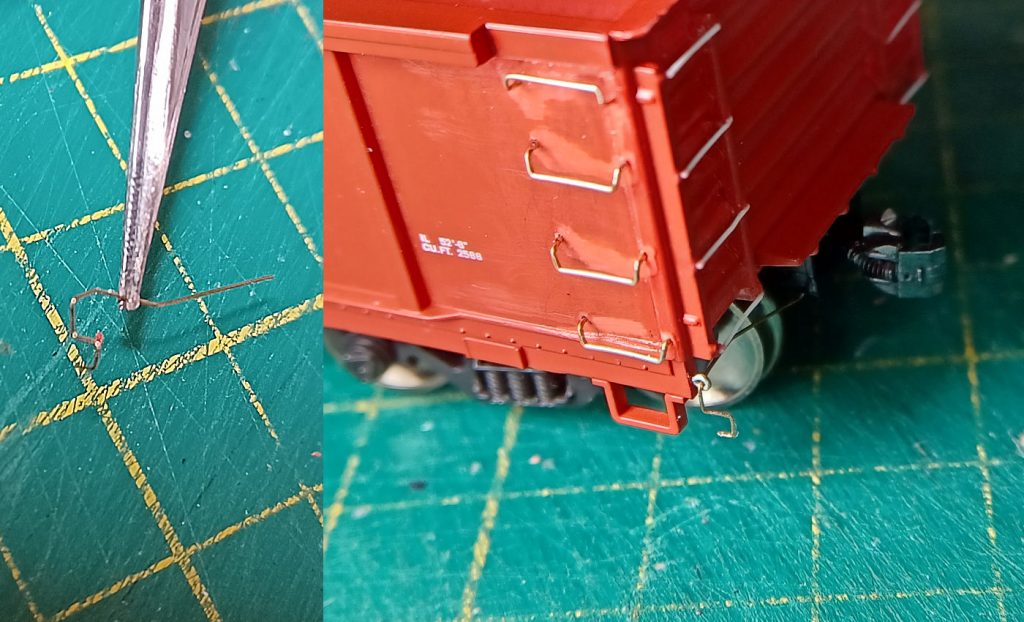
Coupler cut-levers were fabricated by bending 0.1″ phosphor bronze wire, and attached using brass eye bolts fixed to the bottom-left side sills of the gondola ends.
The next step is to repaint all the detail parts, and the resulting damage caused from kitbashing the gondola. I use an airbrush for this, but the number of great quality acrylic hobby paints available these days makes it easy to brush paint too. The only hard part is picking a red that’s a close match to the original gondola colour. ScaleTrains recommends Tru-Color TCP-086 Burlington Red, but this is a solvent-based paint and I’ve long ago switched to airbrushing with water-based acrylics.
The CB&Q was famous for their Chinese Red painted equipment, which was a very vibrant shade of red. Now being a 1970s CP Rail modeller, I have lots of CP Action Red in stock, but there is too much orange in that shade of red. So I tried my luck by opening a bottle of TrueLine Trains (long out of production) post-’90s CP ‘Bright’ Red, which is the same colour as 1970-80s era Soo Line ‘Full Signal’ Red. Looking inside the bottle it looked pretty close to me, so I loaded it up in my airbrush and was pleasantly surprised that I could not see any difference. I got lucky here. If you also prefer a current production acrylic paint, all I can suggest is try to find a Chinese Red shade as close as possible. Also, maybe reach out to CB&Q modellers on-line as to what they recommend.
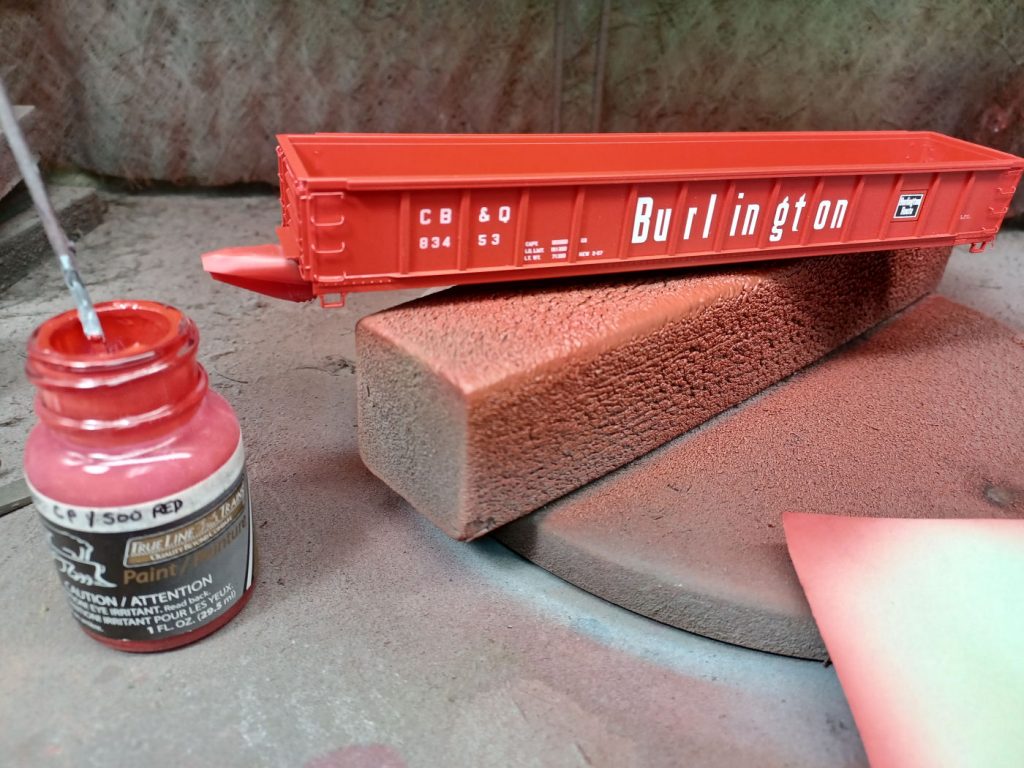
After masking the end reporting marks with small pieces of green painters tape, and wrapping some tape around the couplers, all the worked-on areas of the car were airbrushed to match the original CB&Q Red. I got lucky that old TrueLine Trains CP/SOO ‘Bright’ Red was an exact match. A piece of paper was simply held while airbrushing to protect the lettering along the gondola sides.
Turning to the inside of the gondola, the top was masked to protect from overspray, then airbrushed with a coat of Mission Models ‘Standard Rust’ as a base. If the name is new to you, they are a US company that make wonderful acrylic hobby paints. They are well known to military modellers, but they do have a weathering line that rail modellers should learn about. Getting back to painting, this rust coat is just a base as weathering will be completed with various powders and stains. If you don’t own an airbrush, then Mission Models paints can also be brush painted. So with both the exterior paint repaired and interior now given a rust coat, the gondola is ready for weathering.
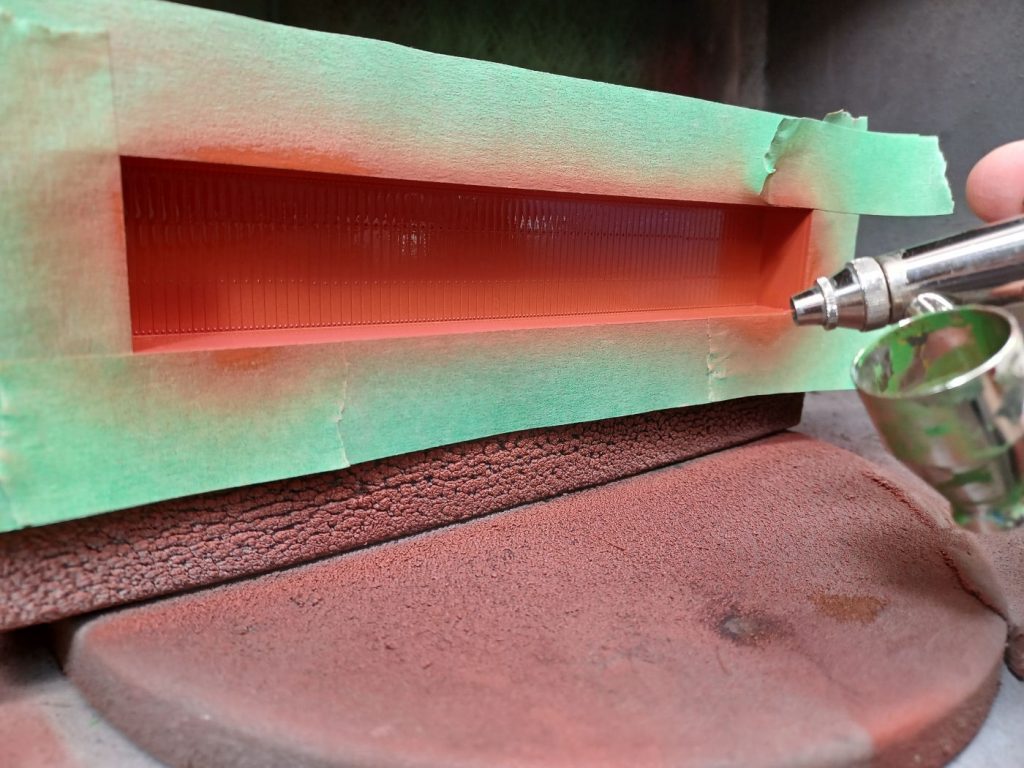
The inside of the gondola was airbrushed with Mission Models MMW-005 ‘Standard Rust’ as a base. This will be further weathered with various stains and powders.
It should be noted that before you begin any upgrades or kitbashing, it is highly recommended that you try to find some photographs of the prototype to assist you. Not only does it help you with detailing, but they will also show if any extra decals need to be applied, and they also aid with weathering. In my case, I was lucky enough to find a photo on RRPictureArchives.net of the exact gondola; CB&Q 83453.
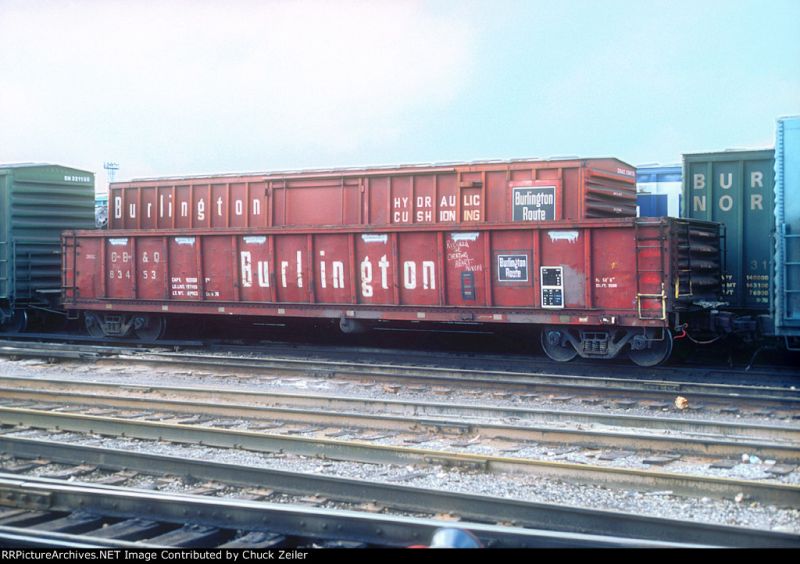
When kitbashing, finding prototype photos beforehand is always highly recommended. A 1980s photo of the real CB&Q 83453 showed where additional COTS stencil, ACI label, and white frame stripe decals needed to be applied. For weathering, it also shows where dirt tends to accumulate.
This was a photo taken in the 1980s by Chuck Zeiler, and it shows the gondola with new ladders added on the car sides, versus the as-built separate grab irons. I have come to learn that Burlington Northern was gradually replacing these on all the old Havelock shops gondolas over time. However in our modelling period of the 1970s this gondola would be under 10 years old, and probably still had the separate grab irons. As mentioned earlier, I purchased a BN painted model too, and I will probably add ladders to that gondola when the time comes. This actually makes it easier to kitbash, as a ladder is much easier to glue on versus installing all those wire grabs. A final note about the proto-photo, you will notice there are also some very recently spray-bombed grey lines painted along the tops of the car. However for my purposes, that’s a fairly recent detail I didn’t need to duplicate.
Another thing this photo helped determine was where the COTS stencil and the ACI label were located (this differs from car to car) so I could duplicate this exactly by adding decals (Microscale, if anyone was wondering) in the appropriate locations. There were also white frame stripes which the CB&Q applied to the gon as built, but which ScaleTrains failed to add. These were also applied to my model by using scraps of white decal remnants I hold on to for just such an occasion. After the addition decals were added the gondola was sprayed with a flat coat to protect and seal everything, and was now ready for weathering.
Though gondolas are among the most abused pieces of freight equipment in the industry, these Havelock gons would have still been in decent shape in our club’s modelling period. In their first years they were initially equipped with covers and used to haul concentrate ores, which is a fancy term for sand. It was not until the mid-70s that BN began using these cars in general service, which is when these gondolas could potentially begin showing up on the Sudbury Division. So my weathering treatment was limited to just adding grime and rust.
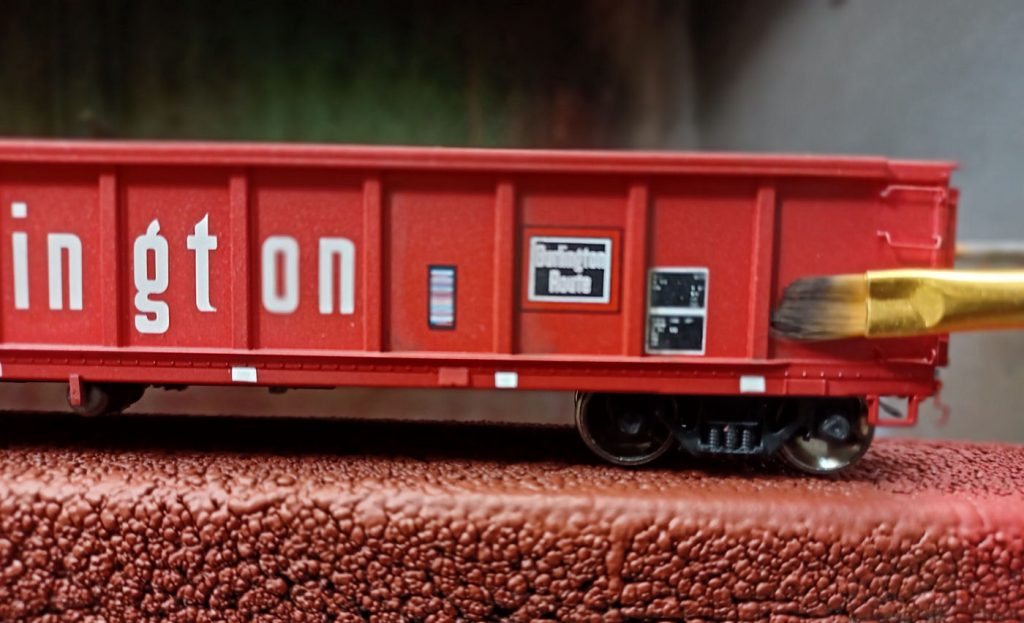
Photos showed the majority of the dirt tended to collect along the exterior posts of the gondola. That heavy reinforcement bottom sill plate also collected dirt too, along with the area around the grab irons. The gondola ends also collect serious road grime. All of this can be reproduced with hobby weathering powders and a good angled paint brush.
Studying prototype photos, I concluded that the majority of the grime would collect along the sides of the exterior posts. Interestingly the posts themselves stay relatively clean, and it’s the area around them that mainly collects dirt. Road grime would also collect around the heavy reinforcement sill plate that runs between the bolsters, and of course some serious filth would also build up on the gondola ends. The area around the grab irons would get grimy too, thanks to employee’s greasy gloves. All of this can be reproduced with weathering powders. There are plenty of great products out there to try; AIM weathering powders, Vallejo effects, AK Interactive pigments, or PanPastel artists pastels are just a few of the wonderful brands that can help you age your models. Don’t be afraid of mixing various pigments, because dirt isn’t all the same colour and texture in reality.
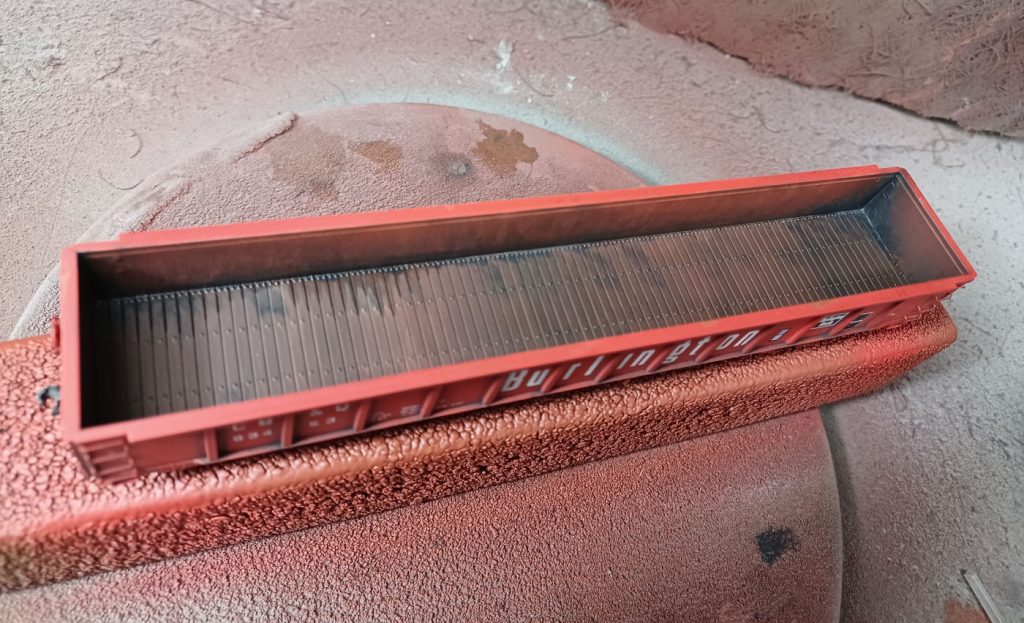
After spreading multiple rust powders and general soot to the interior, Tamiya panel line accent (shown here drying) was applied to highlight the separate boards of the gondola floor. A little more rust powder was then added to blend any irregularities, and all was sealed with flat finish.
Turning to the gondola interior, the first step was to apply multiple grades of rust and general soot coloured weathering pigments. Afterwards, I applied black Tamiya panel line accent to bring out the detail of the separate boards on the gondola floor. To finish, some more rust powder was added here and there to blend any irregularities, and then everything was sealed with a spray of flat coat to protect the weathering.
It should be noted some modellers supplement their interior weathering even further by gluing small piles of real crushed rust flakes inside their gondolas. While I encourage this, I avoided doing it myself as this gondola will be hauling multiple inserted loads on our club layout, and these rust piles have a habit of interfering with how the loads sit. But otherwise, it is an excellent way to further enhance the realism of your weathering.
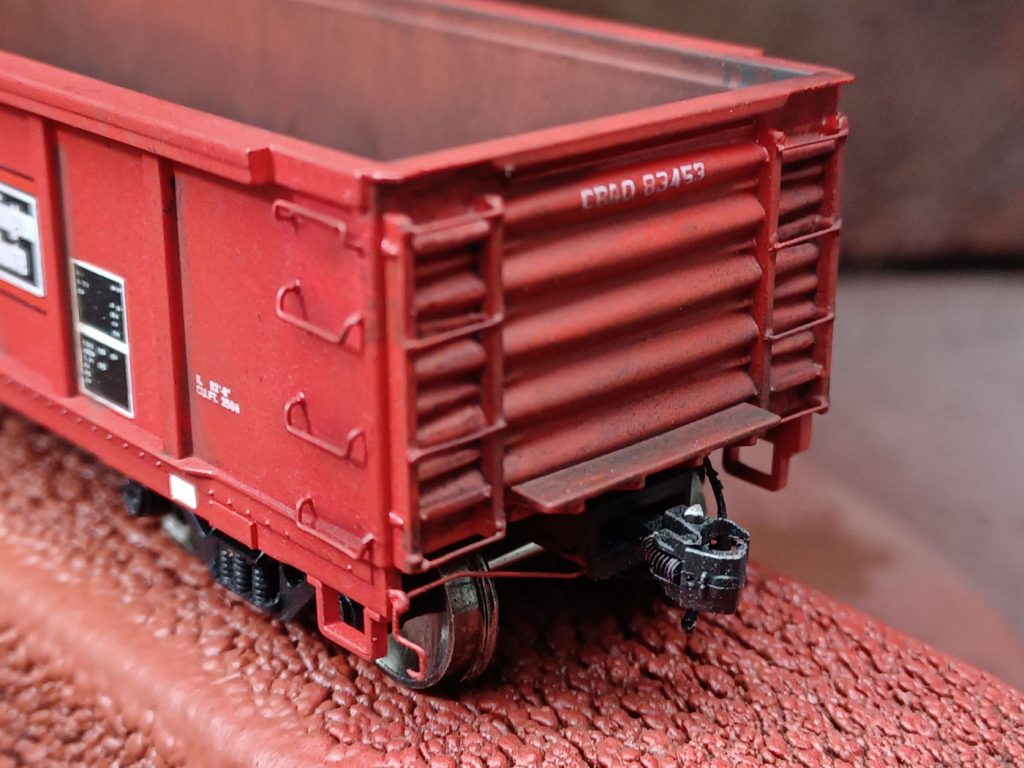
Weathering around the gondola ends was also done with powders. The grime usually accumulates around ladders, in between protruding ribs, and on top of the crossover platform. Aside from enhancing realism, adding dirt really brings out the ladder rung replacement efforts too.
Turning to the gondola ends these get particularly filthy, for that matter this is true for most rail cars. The reason is that dirt is kicked up from the trucks, in addition to employees causing grime to accumulate around the end-ladders and on the crossover platforms. Also, much like the exterior posts on the sides, the areas between any protruding ribs seem to collect more road grime. Again, all of this was duplicated using weathering pigments. As a bonus, and with the efforts from the earlier ladder rung replacement, the weathering pigments collecting around the end-ladders help give the appearance they are separate from the carbody. And as mentioned earlier, the weathering also help conceal any scrapes or scratches left over after sanding.
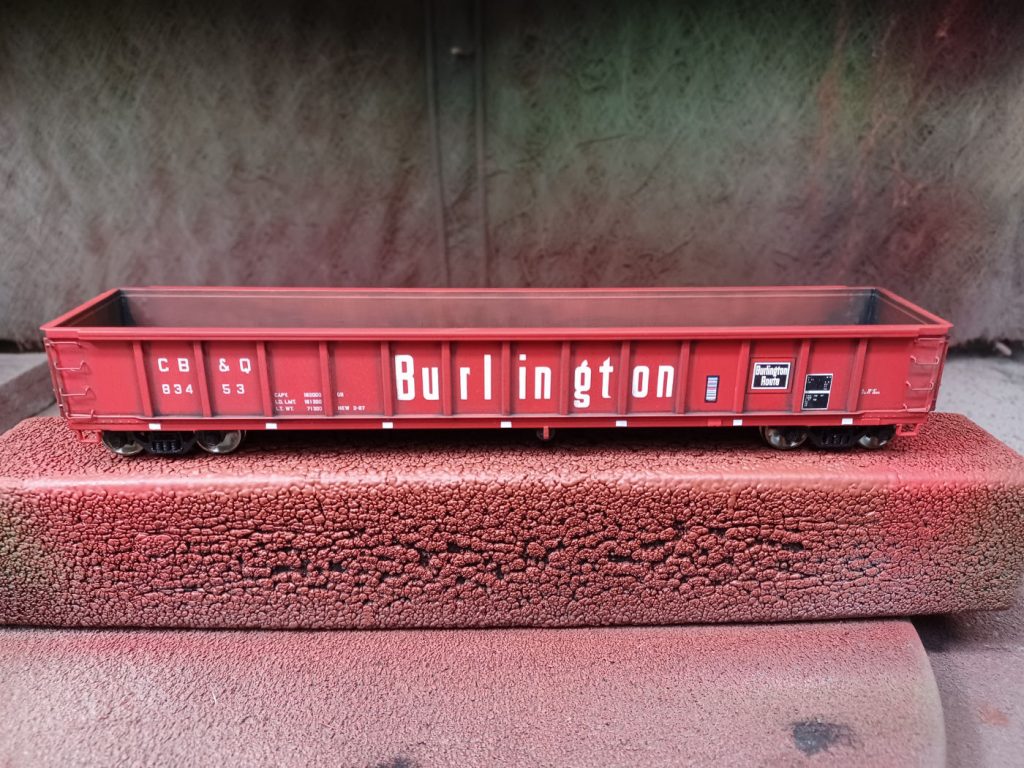
Photo showing the finished weathering on the main body, but with the trucks yet to be completed. This helps illustrate that even the best weathering efforts are unconvincing if the trucks are left in their kit-supplied shiny plastic and metal state.
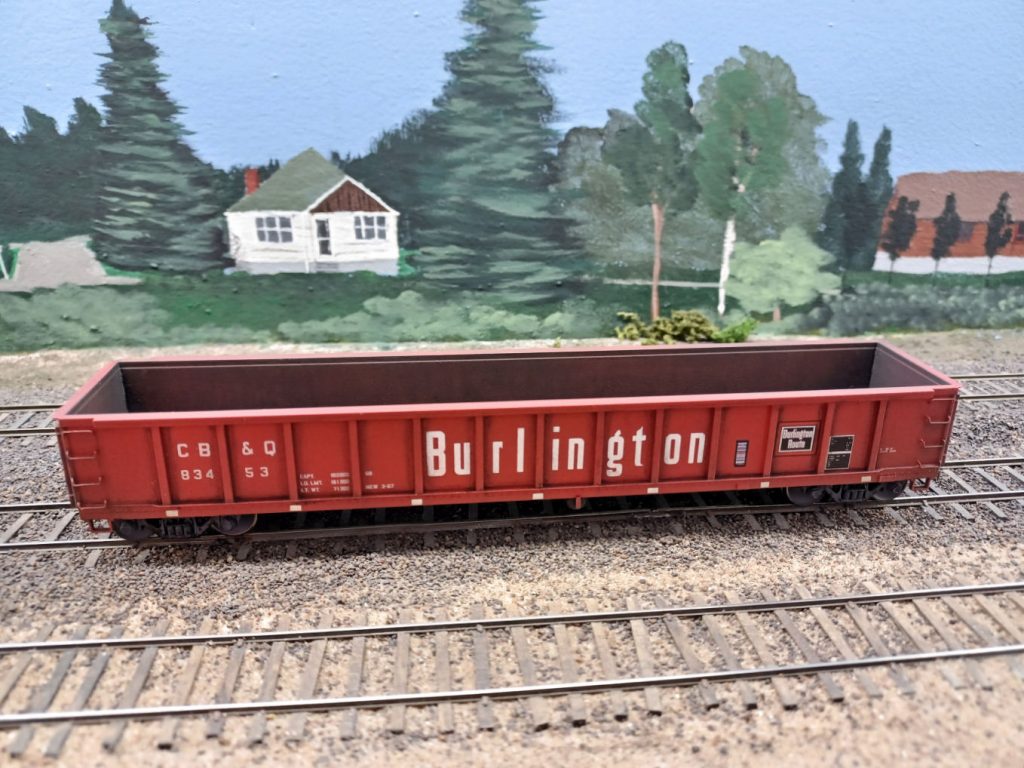
With the main weathering completed, I then airbrushed a light spray of Mission Models MMP-123 ‘Rail Tie Brown’ to the underbody to help highlight the brake details. The beauty of this being a ScaleTrains kit, the underbody brake details are a one-piece separate detail complete with brake rods and levers. All the weathering efforts were then protected by spraying the gondola body with Tamiya flat coat, right from a rattle can. If you’re still using Dullcoat, give Tamiya a try. You’re welcome!
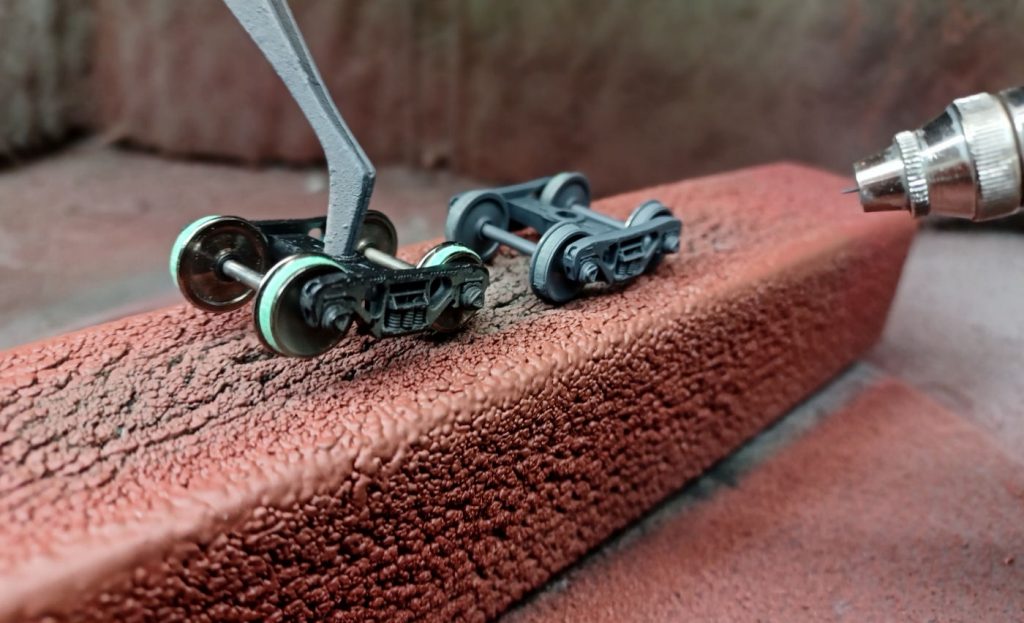
Aside from the brake detail, ScaleTrains also supply these kits with their excellent 100-ton trucks, including their high-quality free-rolling metal wheelsets. Which brings up a pet peeve of mine; going to the trouble of aging and weathering a model, then leaving the trucks unweathered. Even the best weathering efforts are thoroughly unconvincing if the trucks are left in their kit-supplied shiny plastic and metal state. And it’s relatively easy to do, I just masked off the wheel treads and airbrushed the trucks with Mission Models MMP-105 ‘Worn Black,’ though any dark grey-camouflage colour will work. You can go further by painting the wheel faces and insides a rusty colour, but with trucks being in the shadows anyhow, I find these extra efforts are lost on most casual layout observers. As long as the trucks are grimy, that’s good enough for a layout model. And with the trucks weathered, the gondola is ready to enter revenue service.
In conclusion, the techniques high-lighted here were once common practices in the hobby, before all the expensive R-T-R models arrived. So I encourage anyone new to the hobby, or those sitting on an armchair for years, to invest a bit in the tools required and to begin hacking up any inexpensive, shake-the-box kits that tickle your fancy. Yes, there’s a trial and error period at the beginning, but you learn more by messing up and fixing your mistakes. There is also the satisfaction of upgrading and owning a unique model for your layout. So if you’re inspired to try, these inexpensive ScaleTrains ‘Kit Classics’ are a great place to start. Then try an Accurail model. Personally, I find upgrading kits to be one of the most satisfying aspects of the hobby, and I hope more modellers will discover this too.

The end ladder trick you used is top notch love it!