Kitbash Free Or Die

or: How to Salvage a McKean PS-1 Kit and Create a Cool New England Boxcar

NSRC458_01

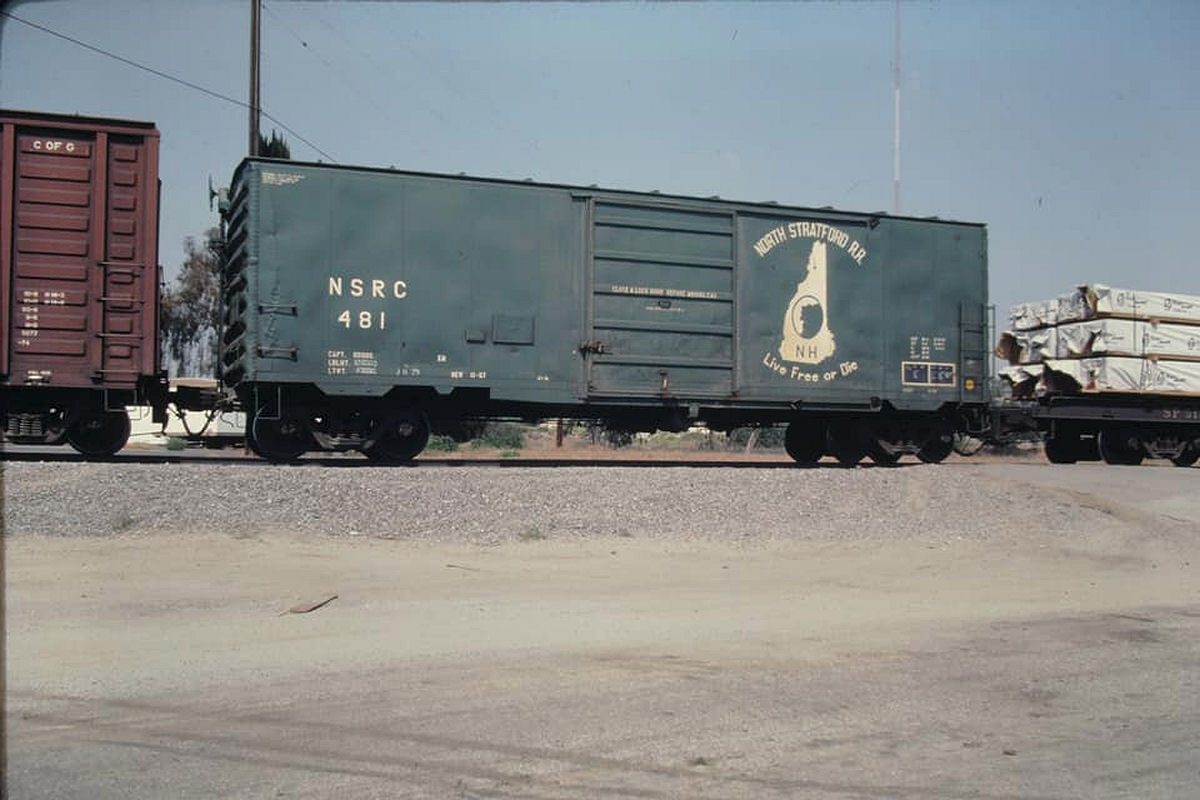
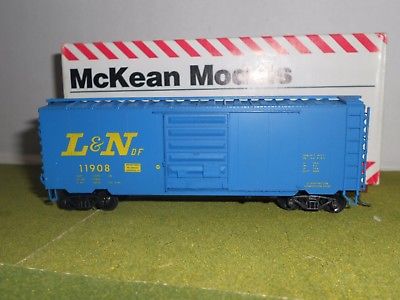
NSRC 481, a typical North Stratford Rail Corp 40ft PS-1 boxcar, was photographed rolling through Pomona, California on 07 June 1982. – Tim Brooks photo (courtesy canadianfreightcargallery.ca)

This latest project originated from an evening bout of model train show withdrawal symptoms, as the lack of flea markets and swap meets during the pandemic restrictions caused me to review my boxes of surplus models. There I re-discovered all the old McKean and Front Range rolling stock kits that I’ve been offering for sale over several years worth of Kitchener Train Shows.

NSRC_logo1Looking over these kits my mind began to meander and imagineer various modelling possibilities, somehow wandering back to the late 1980s where I recalled seeing North Stratford RR boxcars rolling though southern Ontario. They were curiosities back then, not only because they were probably the last 40-foot boxcars still in interchange service, but from their bold logo and distinctive ‘Live Free or Die’ slogans (the state motto of New Hampshire). But then I remembered the kitbashing involved to get these kits up to modern modelling standards, and reasoned there must be some manufacturer out there that produced a good ready-to-run North Stratford RR boxcar.

Well a quick internet search found there were none, but there were decals available for the project. That caused more research on the real North Stratford Railroad, and whether the WRMRC’s CP Sudbury Division layout could see any of their boxcars. The short answer was yes, which caused me to pull an 8-foot door undec McKean kit from the surplus box, followed by an online decal purchase. The kitbash was on.

NSRC458_02

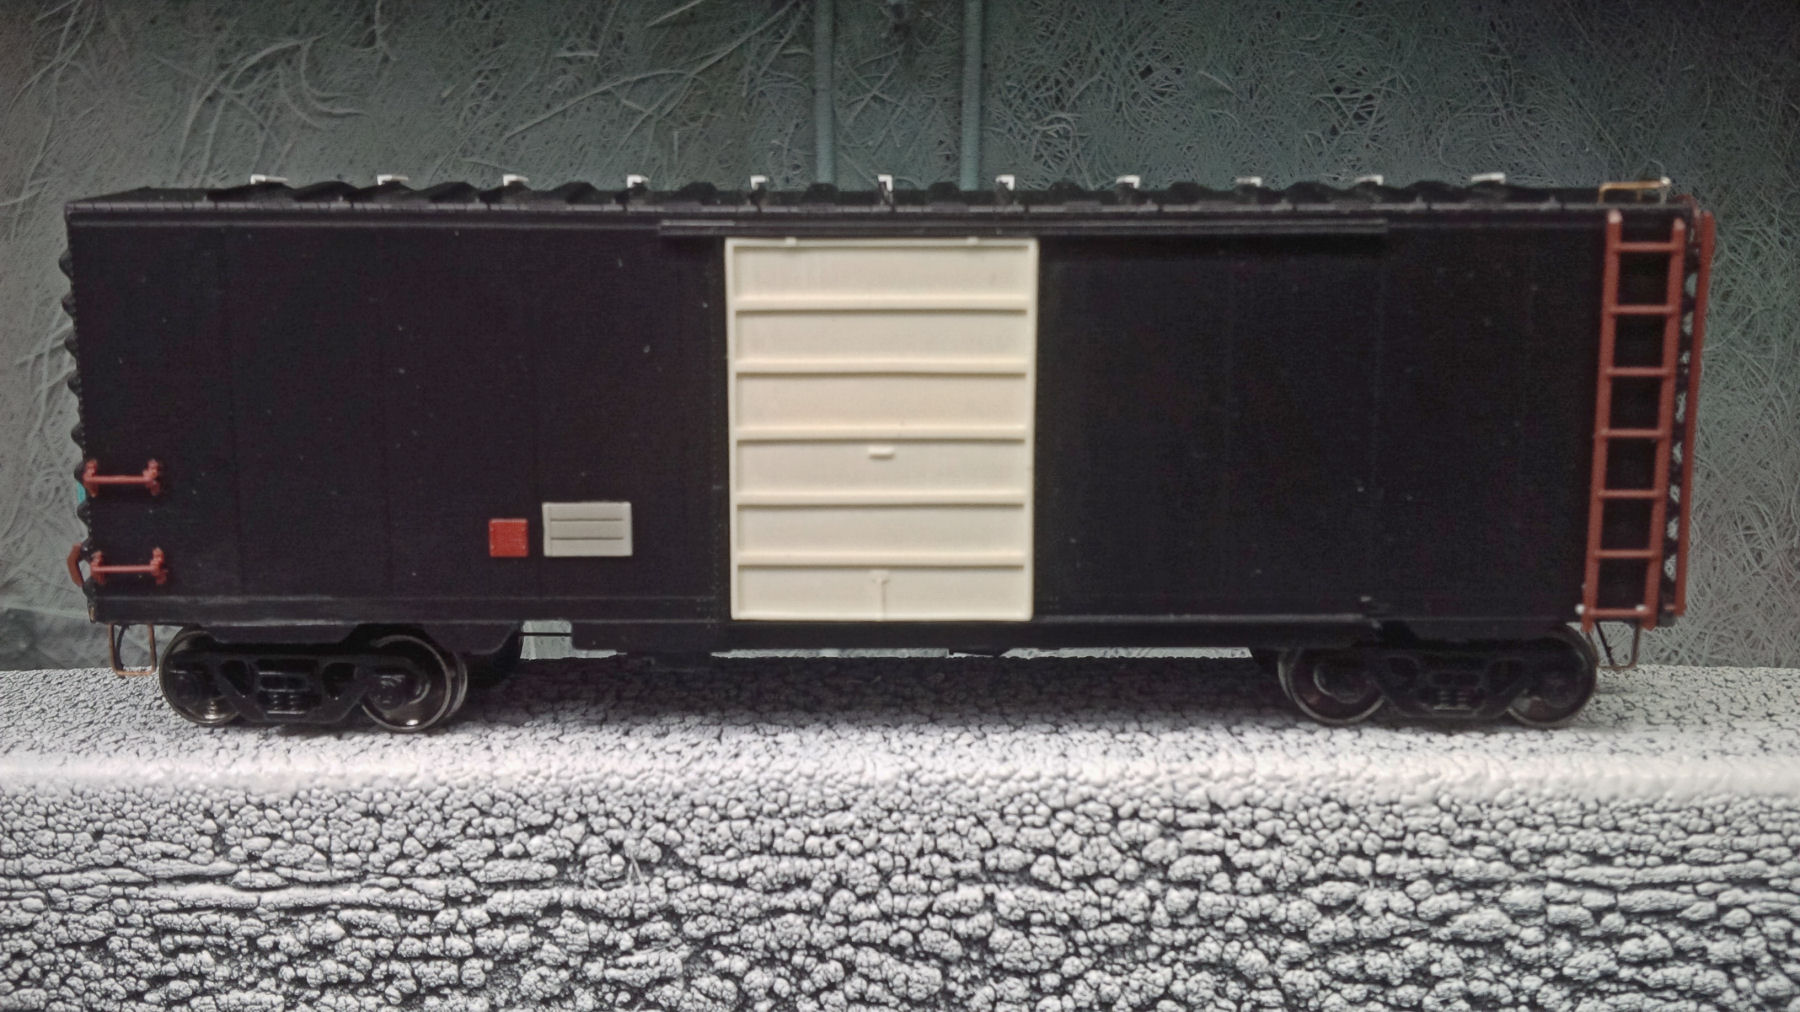
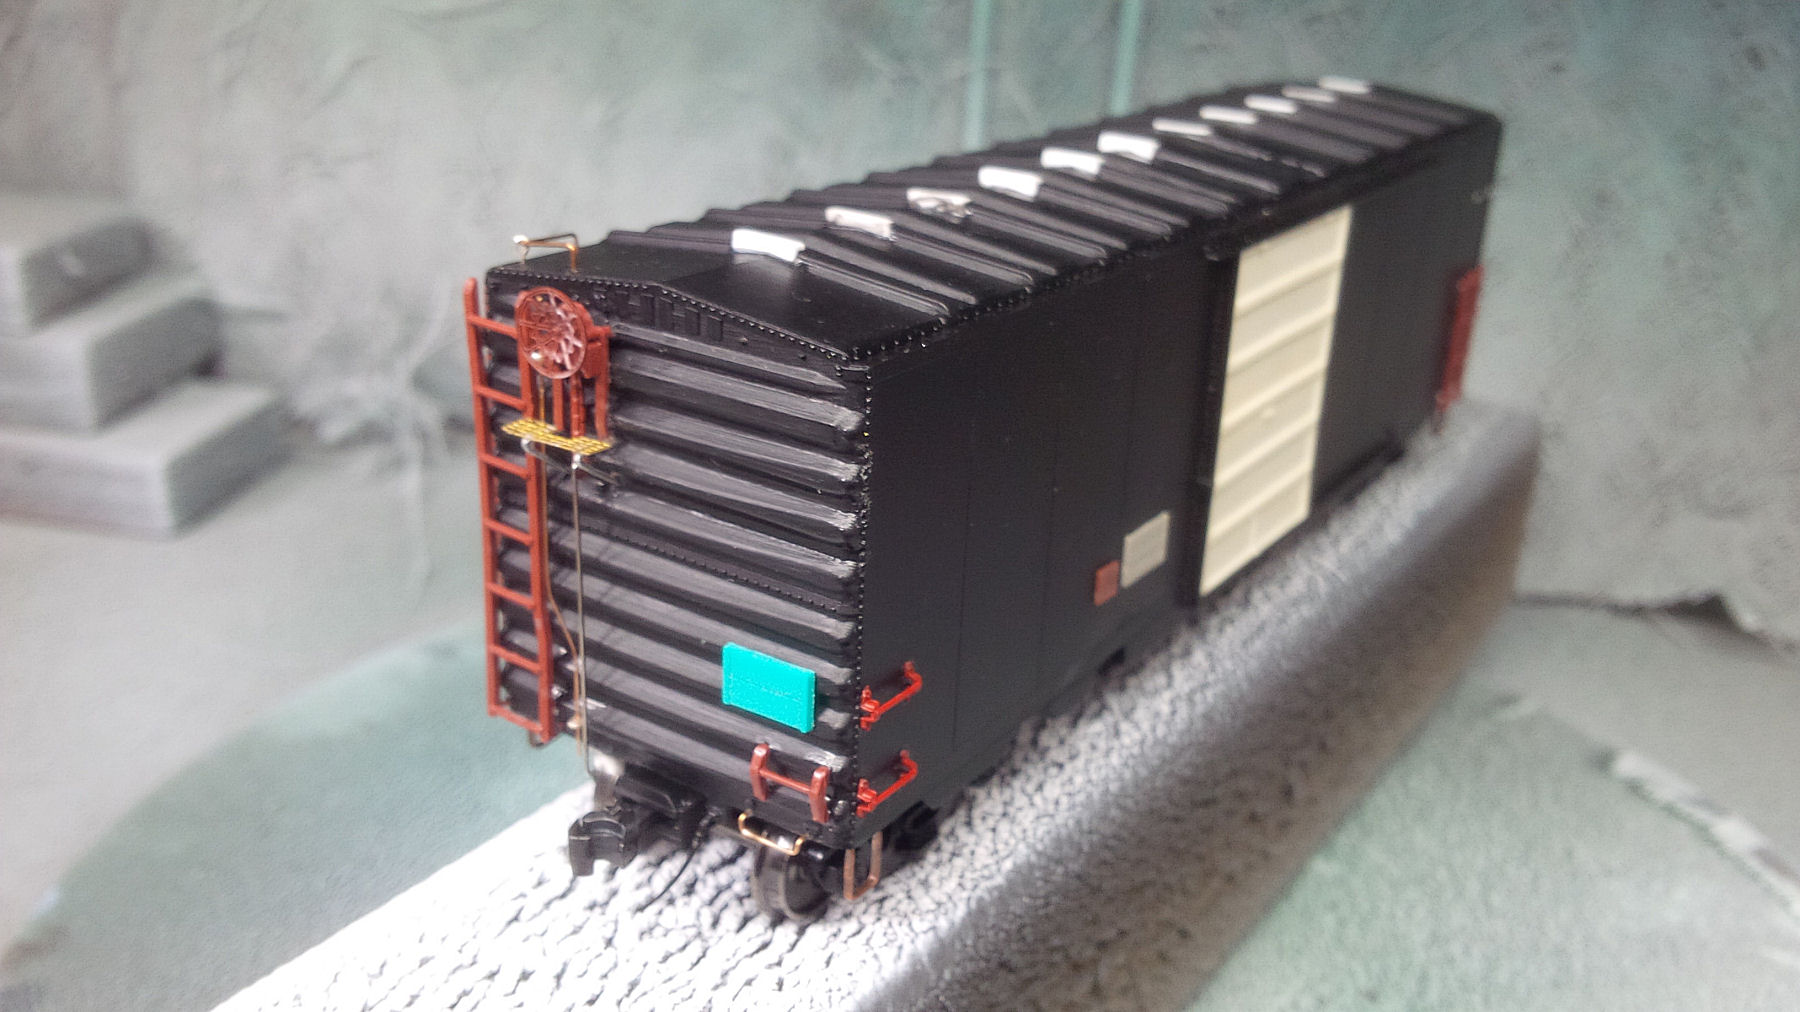
Left-hand (tall-ladder side) view of the kitbashed McKean model, ready for primer. You pretty much have to toss all the manufacturer-supplied details when bashing these old 1980s kits.

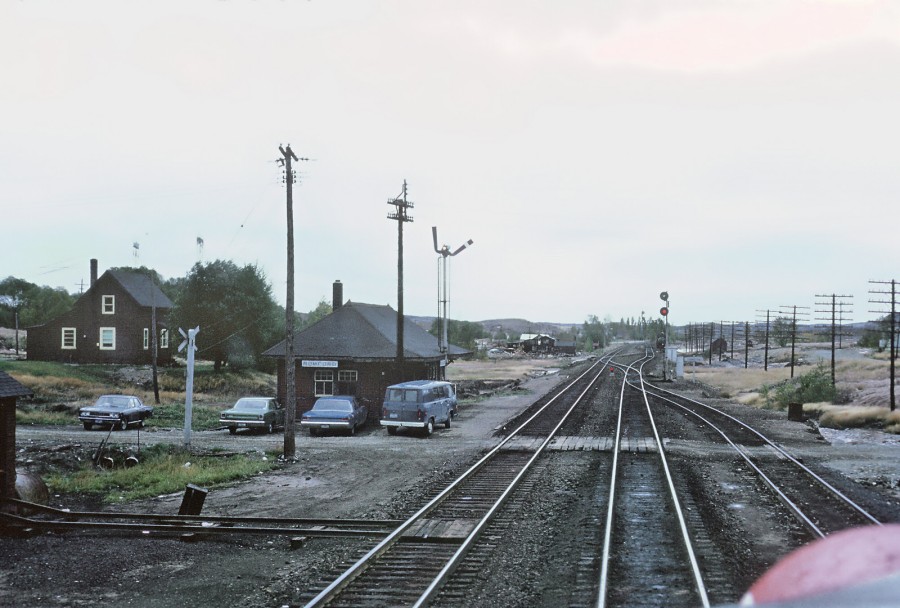
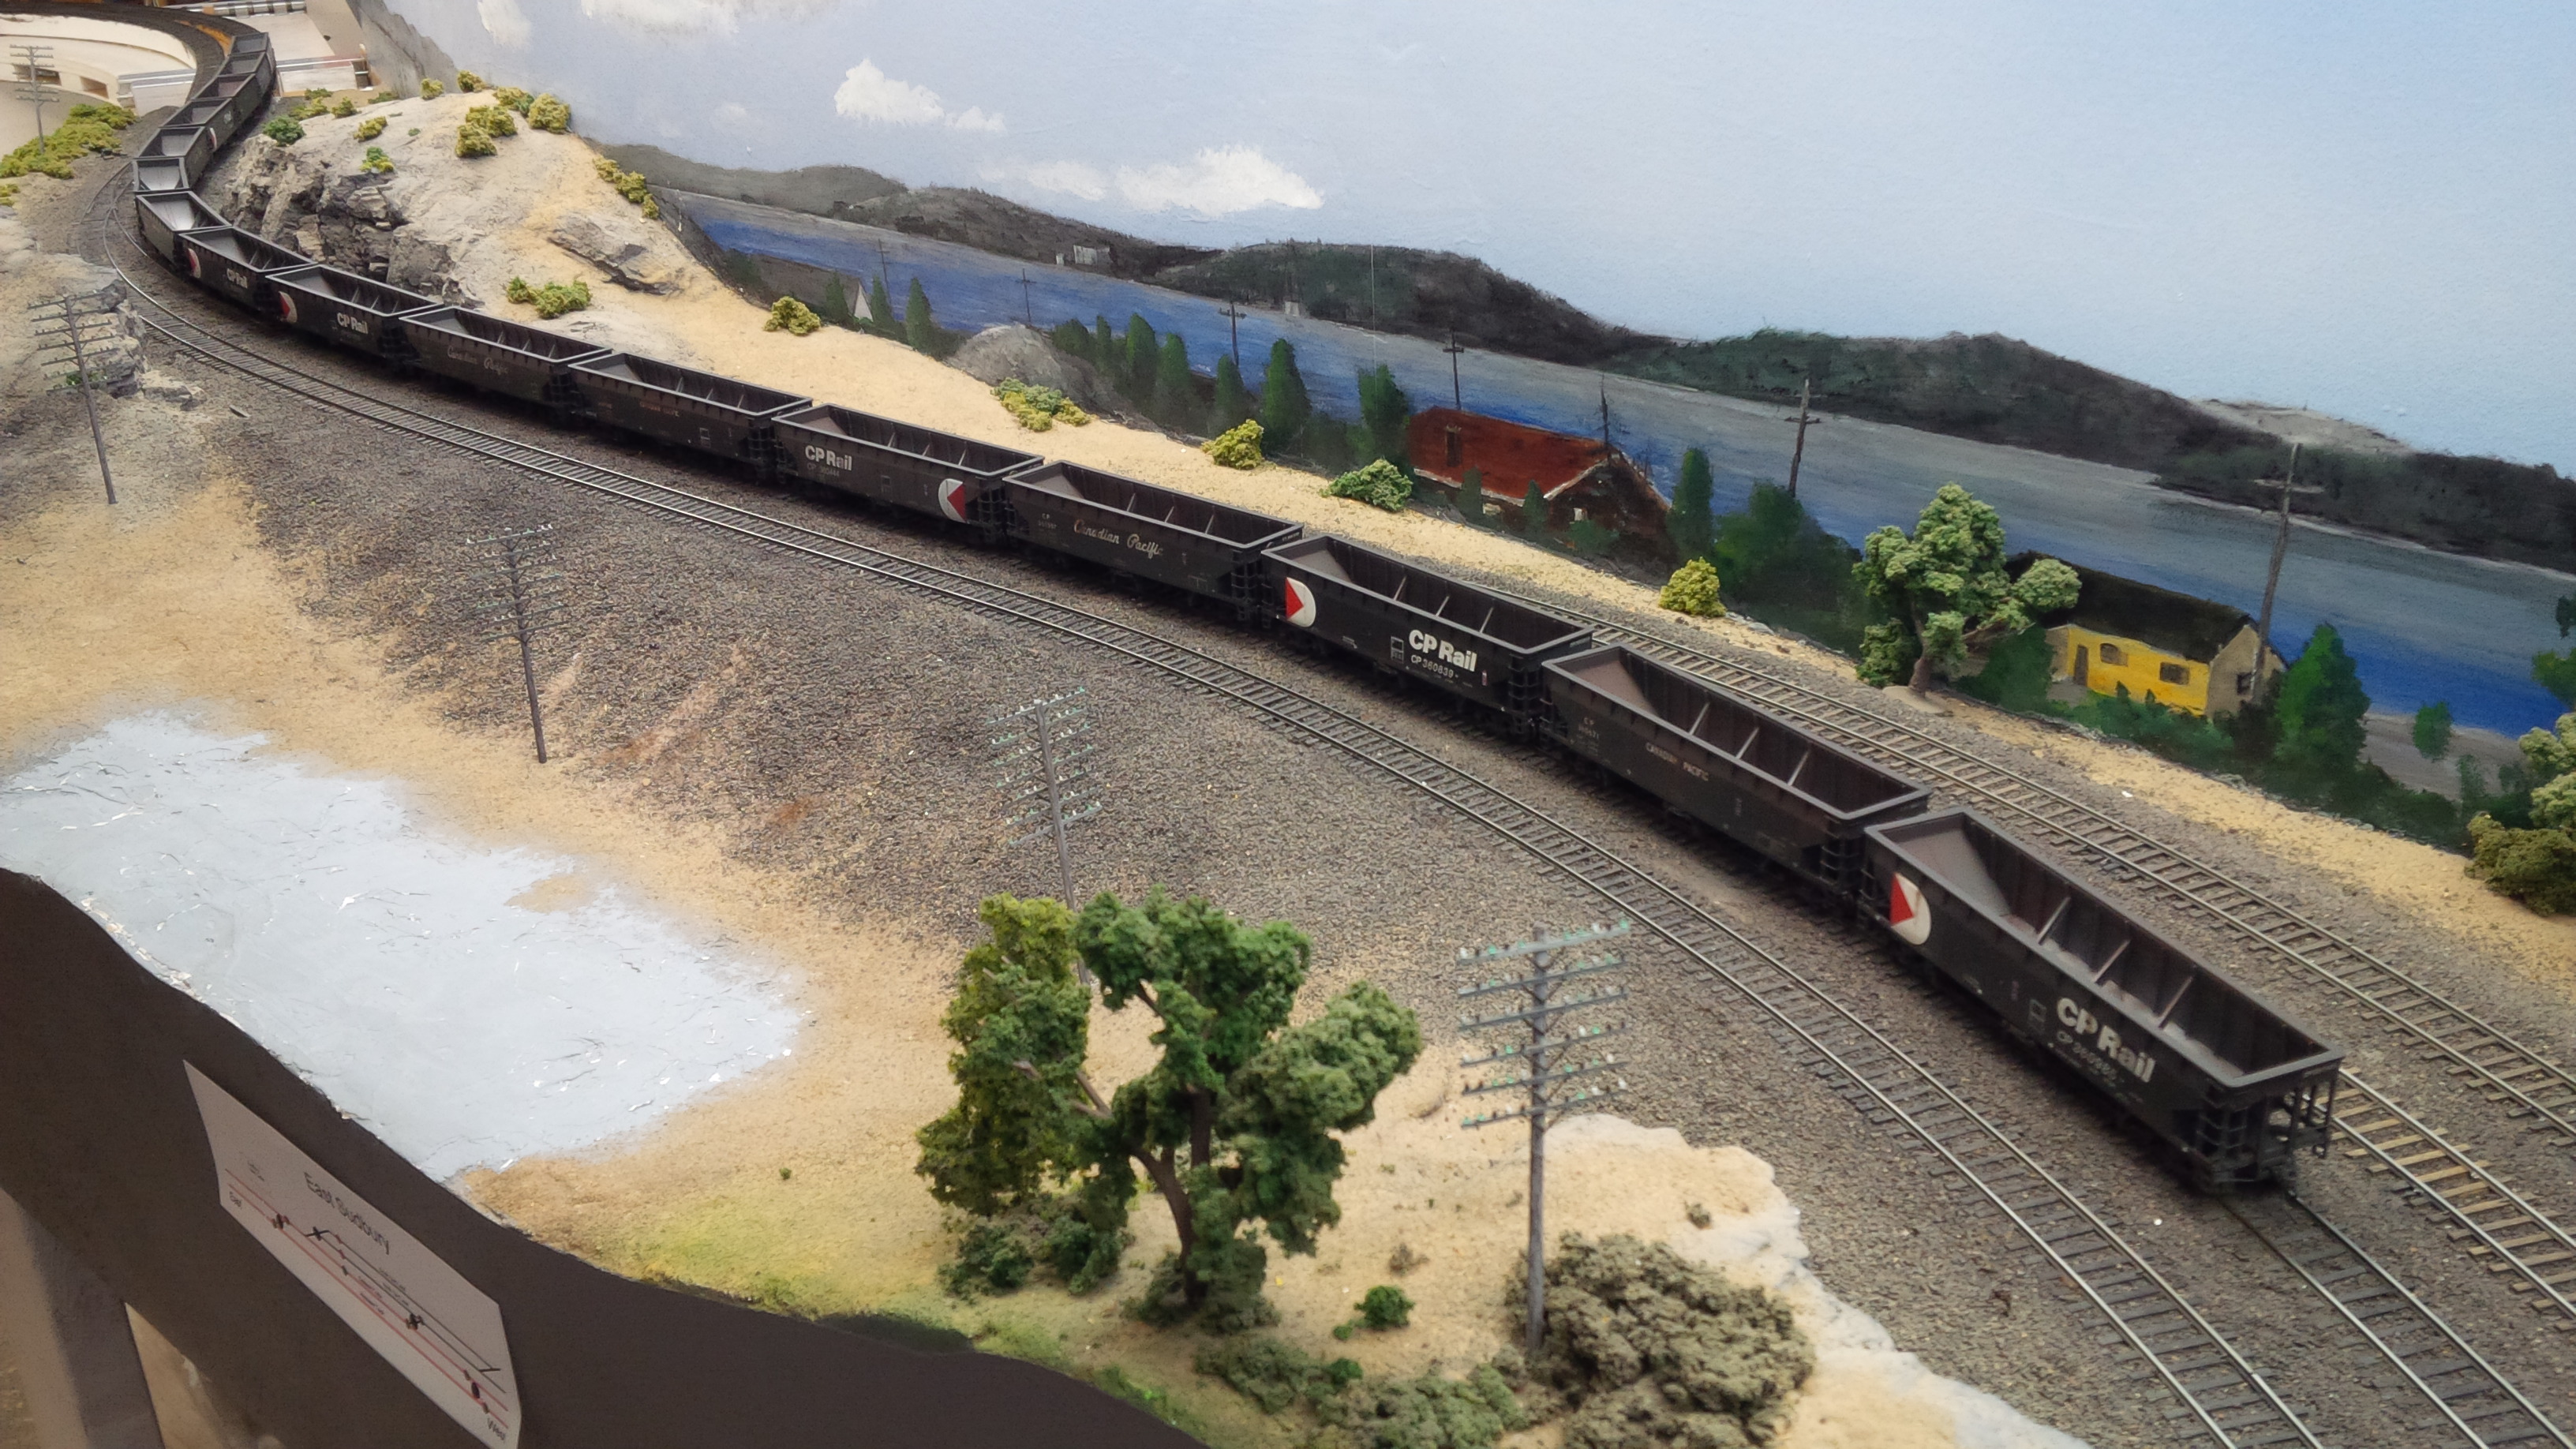
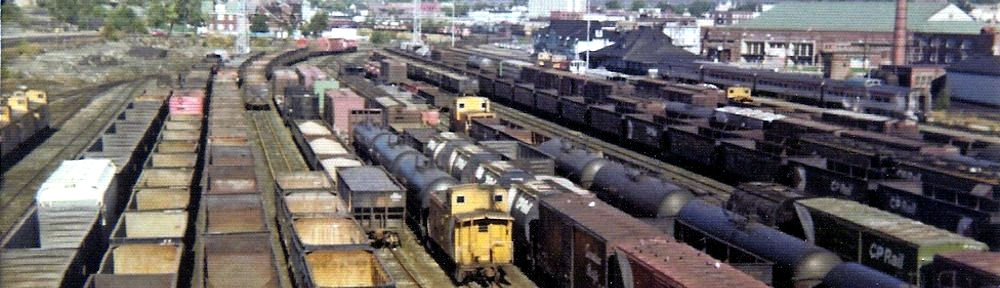
A brief history of the North Stratford Railroad can be found on their Wikipedia entry, and a Google search will provide you with plenty of information if you wish to learn more. From this research, for the purposes of club operating sessions, it was plausible that NSRC boxcars could be hauling furniture from the former Ethan Allen furniture factory in Beecher Falls VT to the greater Chicago area over the CP Sudbury Division. CP trains 911/912 captured a lot of New England – Chicago bridge traffic through the 1970s, as shippers used whatever means possible to avoid the lengthy transit times caused by the Penn Central merger mess.

I’ve written before about my old kit salvage jobs, specifically here and here. Basically my goal is not to create a contest model, but to make a reasonable representation utilizing the many boxes of spare parts I’ve accumulated over the years. The challenge is to create a boxcar that will not melt if coupled between a Kadee and Tangent model, and not to spend any extra money aside from decals and maybe paint.

NSRC458_04

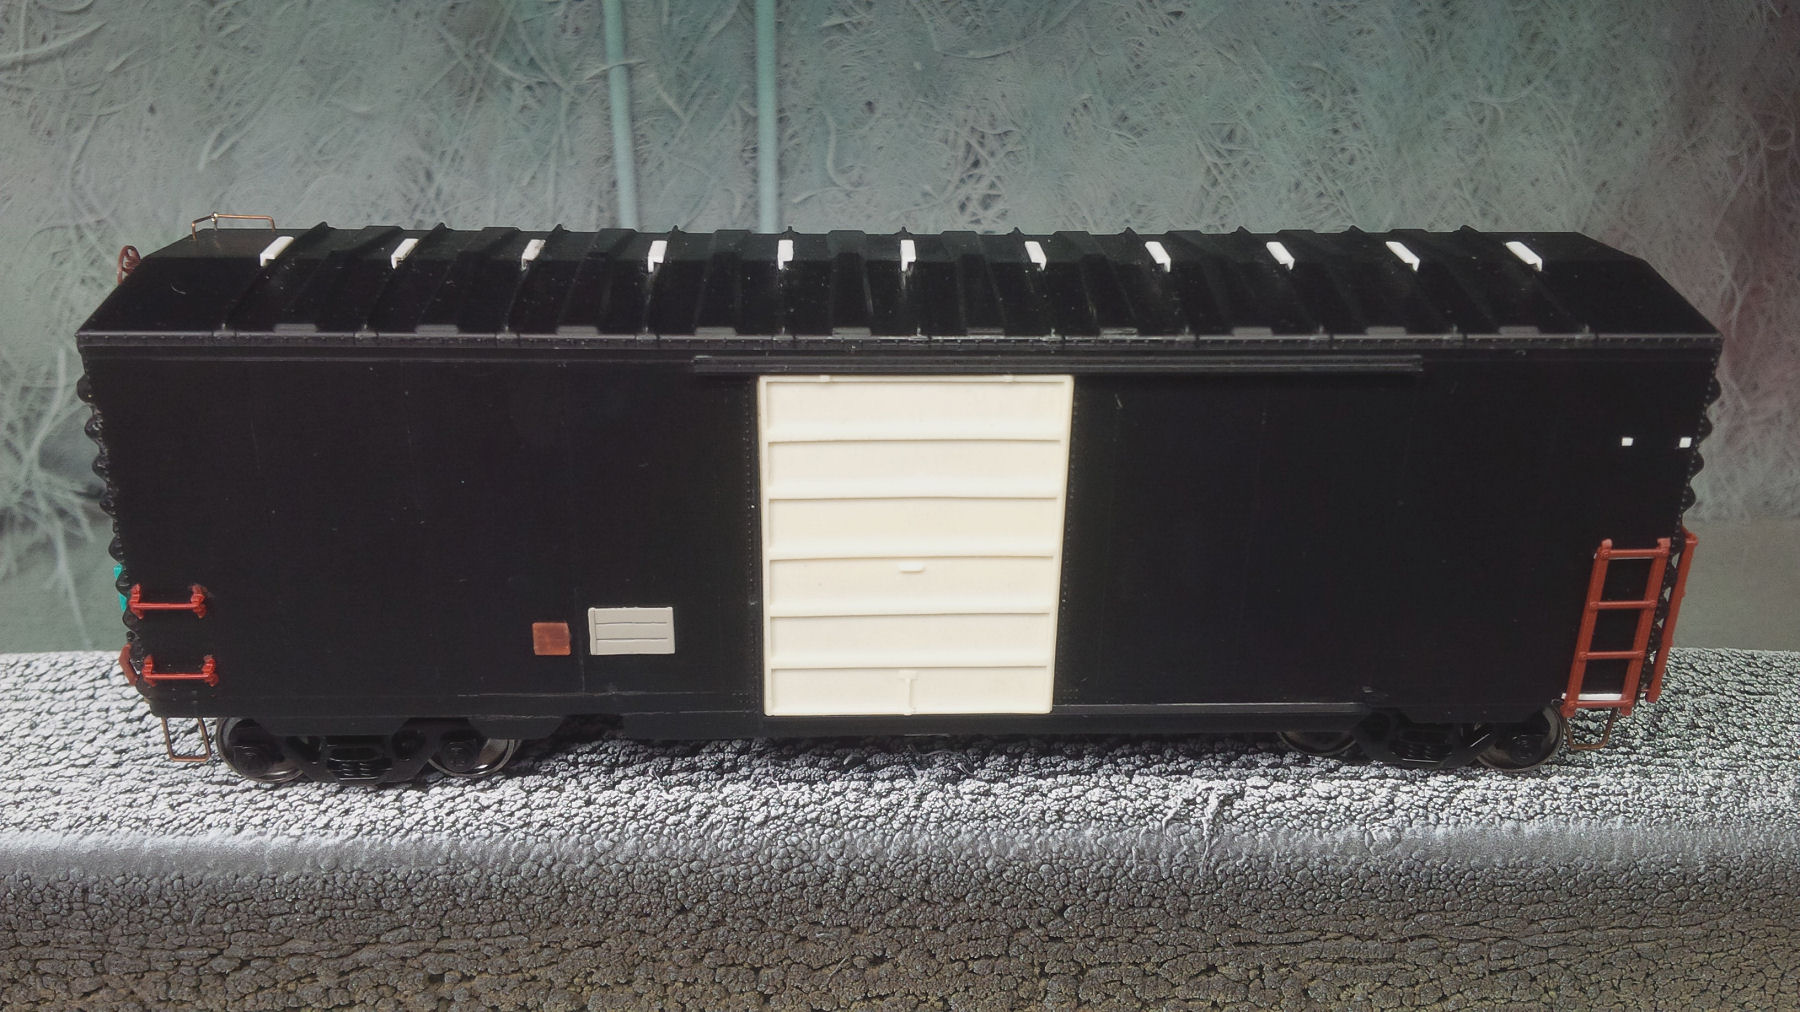
Right-hand (shortened-ladder side) view of the model. The various detail parts used came from the author’s spare parts collection. Roof-walk and ladder supports were fabricated from styrene.

Before you copy my work, please note there was a mistake made because I began kitbashing the car before thoroughly researching the prototype. Bashing enough of their kits over the years, I habitually began by adding the roof walk supports that McKean inadvertently missed on their model. This was done using .060” styrene angle, chopped to the appropriate length, and glued on the roof rib peaks. After doing this I came across a good roof-view photo of an NSRC boxcar, and discovered the roof had been completely rebuilt with no roof-walk supports. It turns out their entire fleet of 100 reconditioned 40-foot boxcars had rebuilt roofs. So I actually went out of my way to goof this boxcar up. Oh well, good thing this isn’t a contest model.

As for the other details utilized, most came from my collection of left-over parts from old Intermountain, Branchline and Proto-2000 models purchased over the years. The ladders, grab irons, and tack boards were all surplus left-overs from those kits. The 8-foot Superior doors were excess parts from a Sylvan Scale Models double-door boxcar kit. I never throw any good spare detail parts away. Additionally there were some wire 18” drop grab irons on the car ends, and a a wire corner-grab on the roof utilized also. I often re-bend staples to create new metal stirrups on my kitbash projects, but went the easy route and used A Line Products stirrups on this one.

NSRC458_03

‘B’-end view. The McKean brake housing was salvaged, but with a Kadee brake wheel and metal wire used for the brake and air lines. A couple of re-bent staples support a Details Associates photo-etched brake platform. That jade green tack-board must have come from an old NYC kit.

They might have been good for their time, but the underbody on these McKean kits needs a lot of work too. First I body-mount scale #158 Kadee couplers in their own boxes (nothing works better than a Kadee in it’s own box), which requires you to remove the molded-on McKean coupler housings. Doing so will expose a square hole which needs to be filled with styrene. After that’s plugged you can drill and tap a #2-56 screw to mount the replacement Kadee coupler boxes.

NSRC458_05

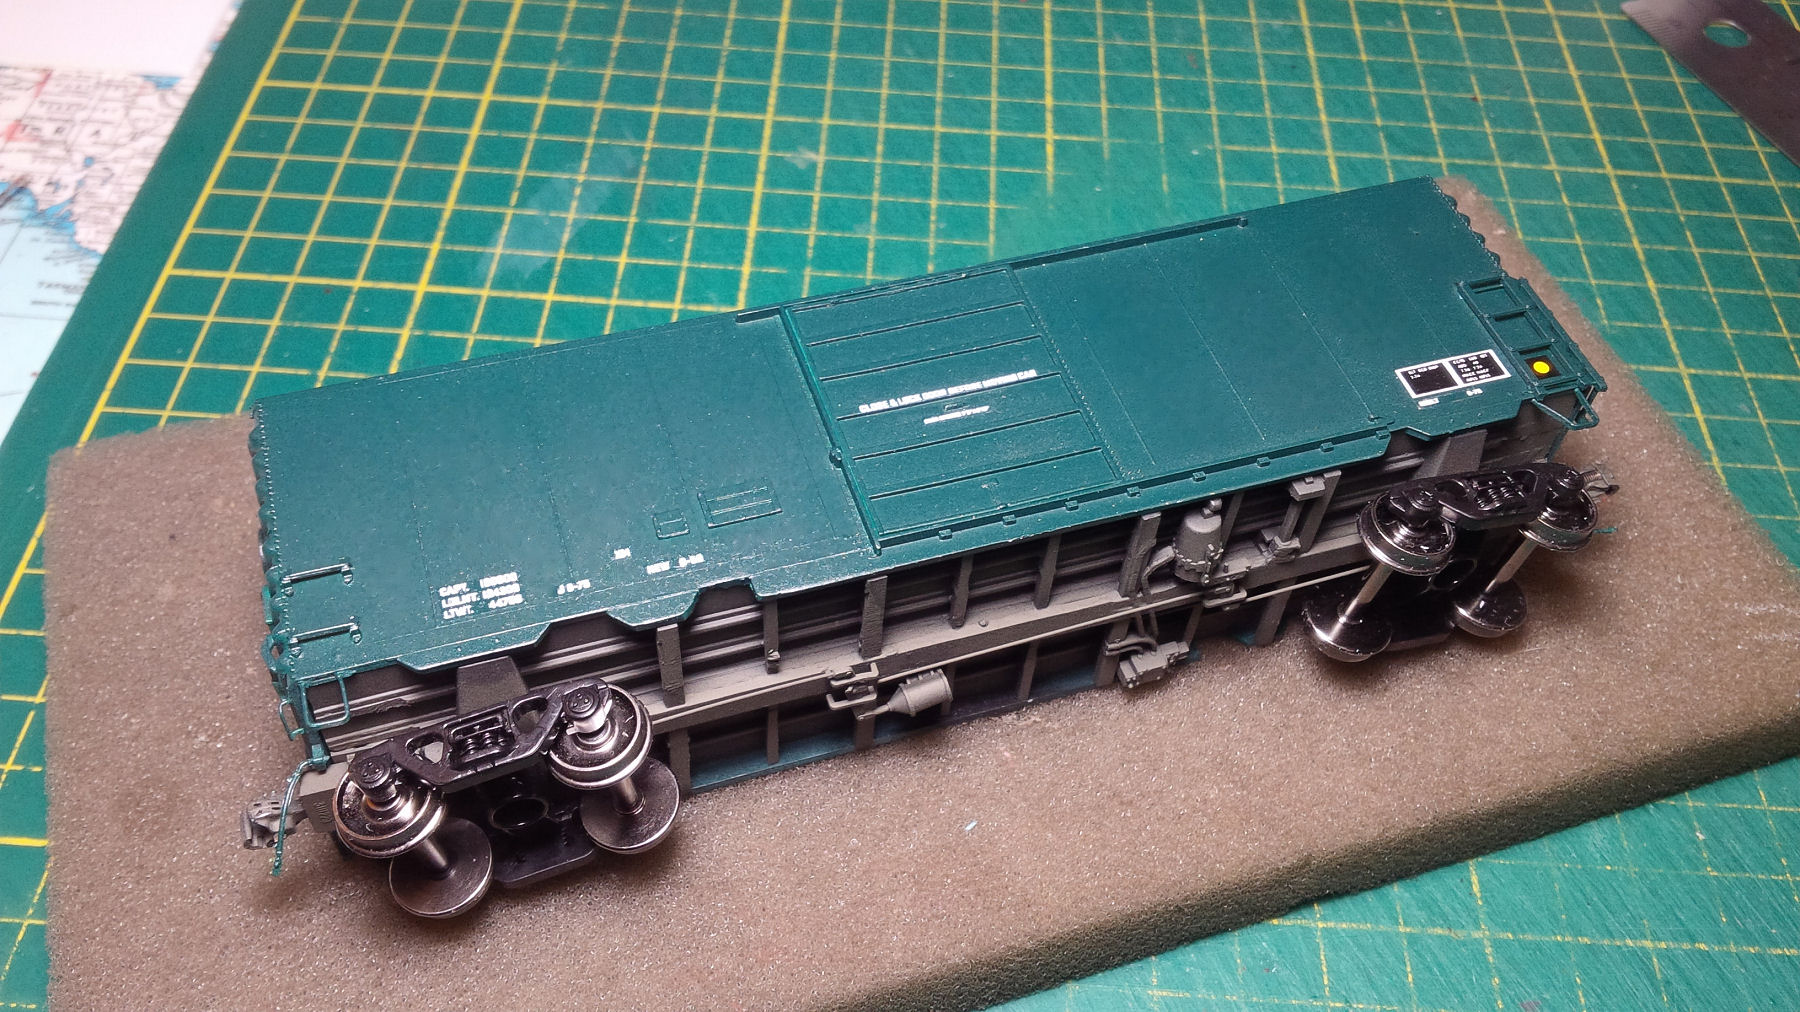
Underbody view. Most of the original details were cut away, and a new Accurail 1-piece underframe brake rod set was installed. Kadee #158 scale couplers were also added.

Though the underframe brake rods look complicated, they are actually very easy to add. The hard work was cutting away most of the old McKean details in order to add them. Once that was all done and cleaned, I installed an Accurail one-piece underframe brake rod set which gives your model the appearance of having a super-detailed underbody with minimal effort. To finish, I installed a set of 50-ton roller bearing trucks equipped with Intermountain 33” wheels. All the NSRC 40-foot PS-1 boxcars rode on these style trucks.

In order to blend together all the different coloured detail parts before paining, the model was first primed with light grey Tamiya Fine Surface Primer.  Yes, right from a rattle can, and you get a wonderful finish. I then looked for whatever green the WRMRC paint collection had that best matched these NSRC boxcars. Photos show a dark green / bluish colour when new, fading to a lighter, truer green as they aged. Needing to replicate a nearly new car I chose PolyScale F414188 CNW Green, unfortunately now long out of production. If you need help, I’m certain the CNW modellers know of a good replacement paint match. I then sprayed Tamiya clear gloss coat, as PolyScale paint is flat and a gloss finish helps with decal adherence.

NSRC458_06g

In progress photo of the decal application. K4 Decals go on well, but you should always read the manufacturer’s instructions beforehand, and apply on a glossy finish to maximize adherence.

As noted earlier, an online search turned up the appropriate NSRC decals from K4 Decals. They are well-printed, good quality decals, fairly easy to work with, and yield excellent results as you can see from the photos. K4 were a new supplier for me, but I’ll definitely buy again from them when the need arises.

However there were some minor miscellaneous odds and ends I needed to add that were not supplied by the K4 sheet. Specifically the near-microscopic bank trust stencil lettering found on the top left of the car, along with the tiny ‘Retaining Valve’ and ‘Defect Card Holder’ stencils along the bottom side-sill of the boxcar. For that I used some Microscale decals I had in my collection to replicate those. For the bank trust lettering I used some N-scale tank car decals I purchased specifically for cases like this. If anyone is able to read them directly off my model with the unaided eye, I’ll buy you a coffee.

NSRC458_07

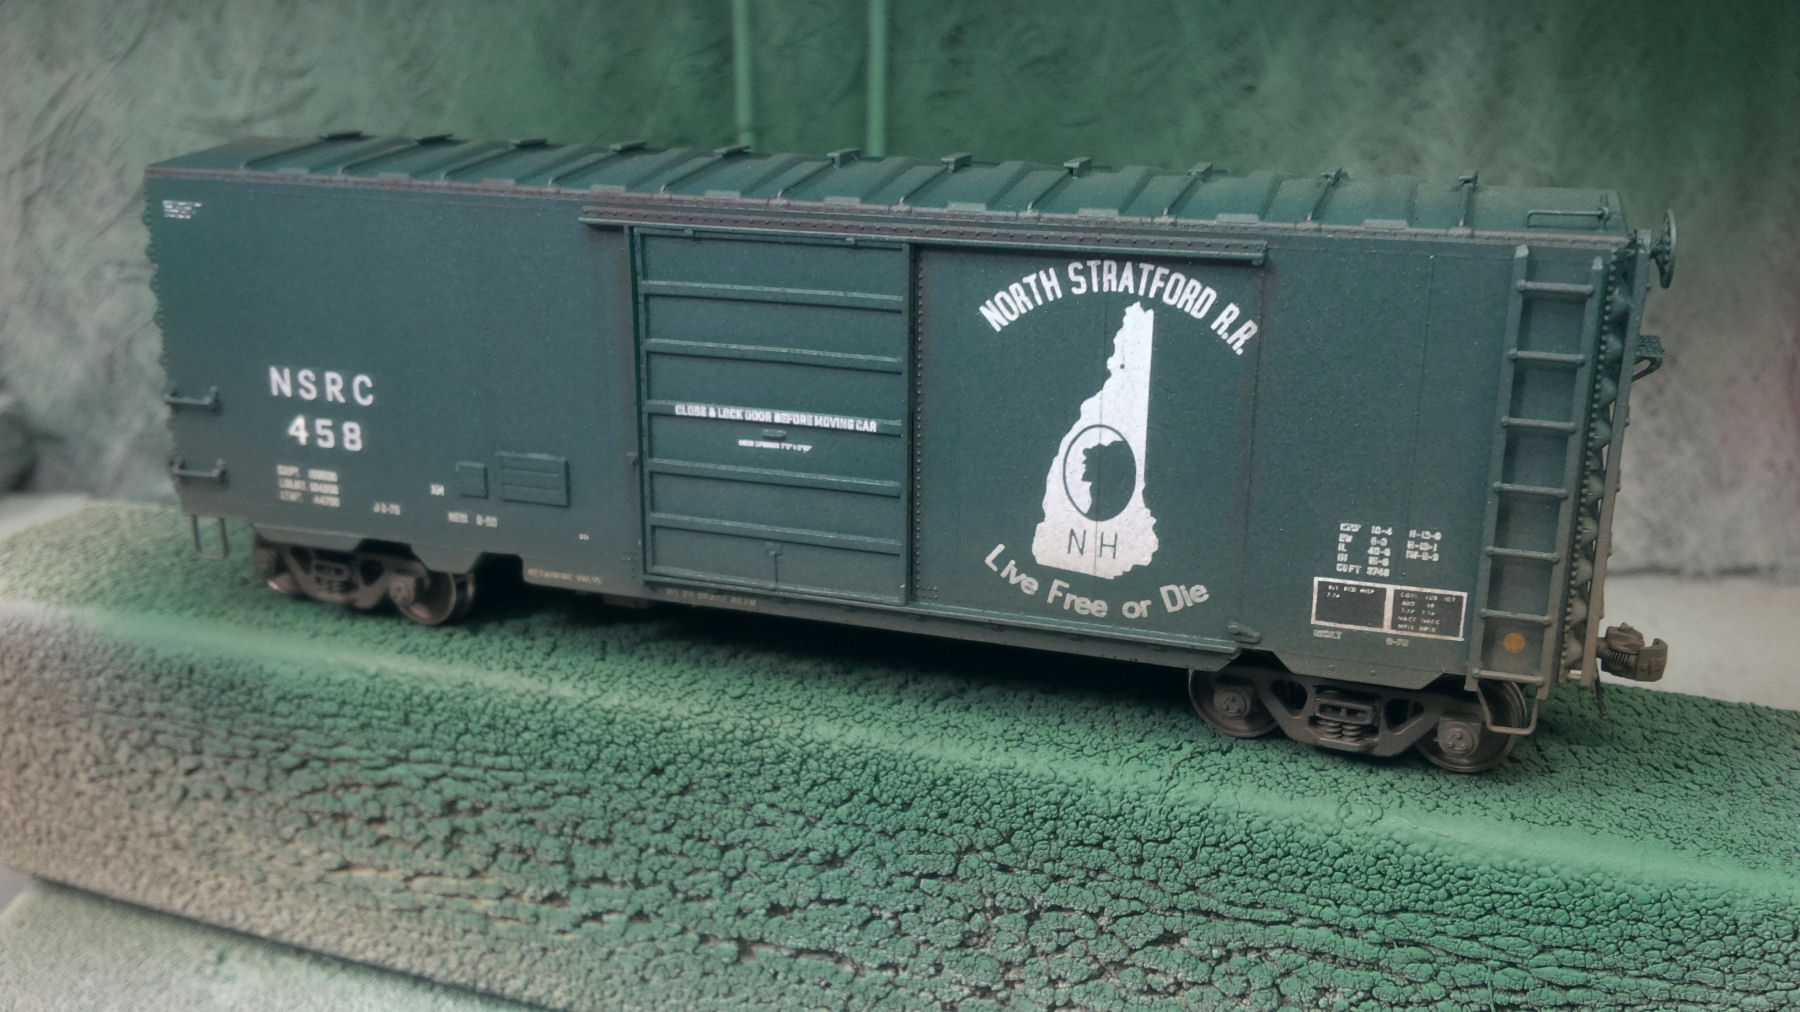
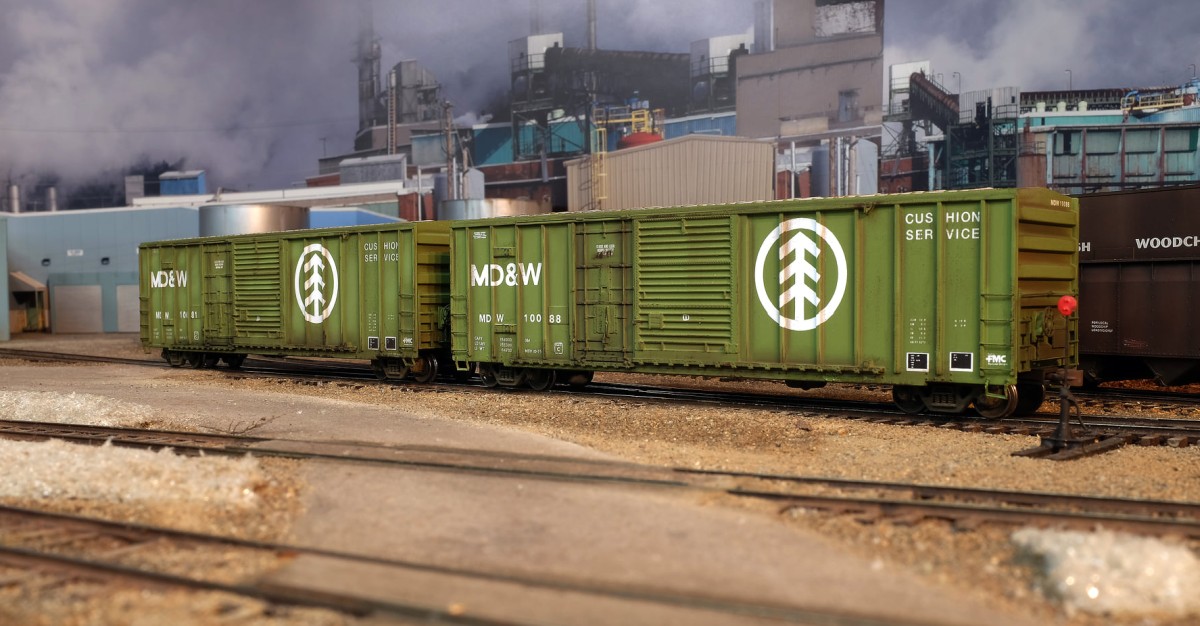
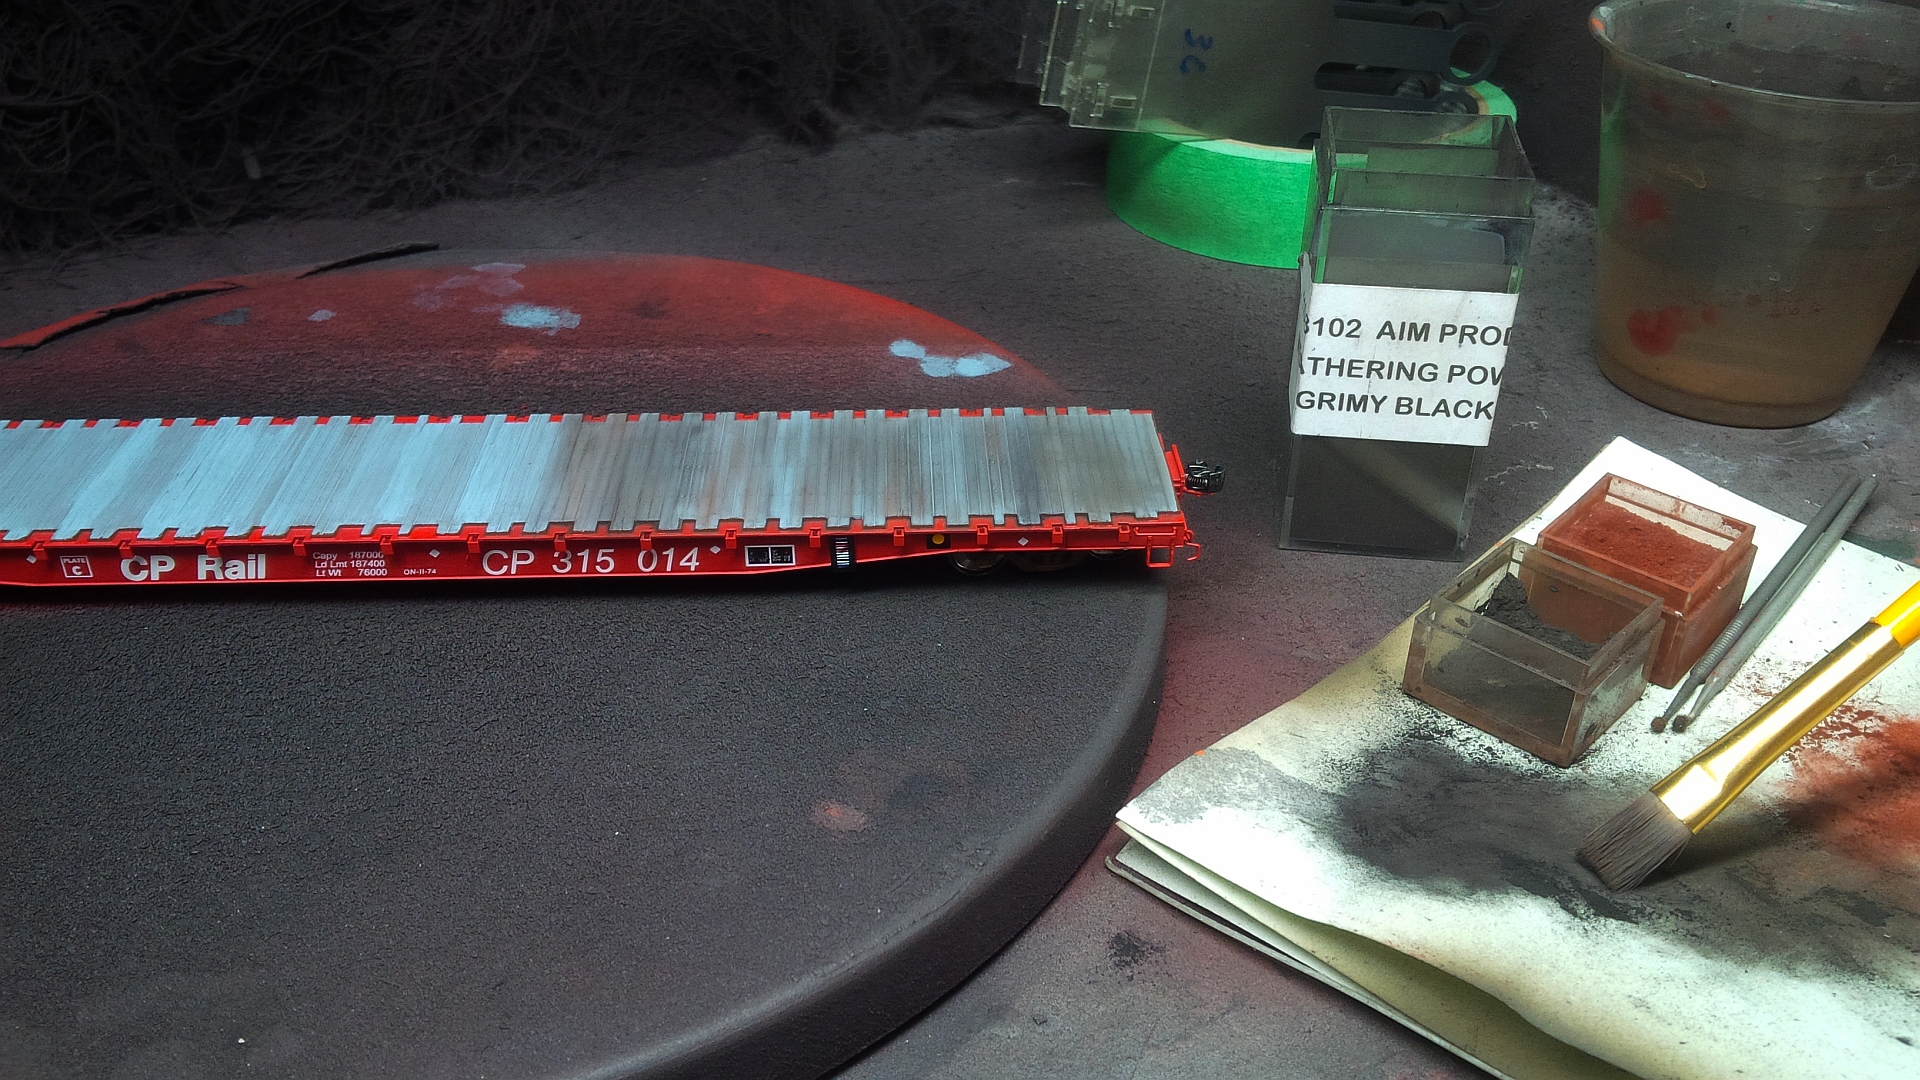
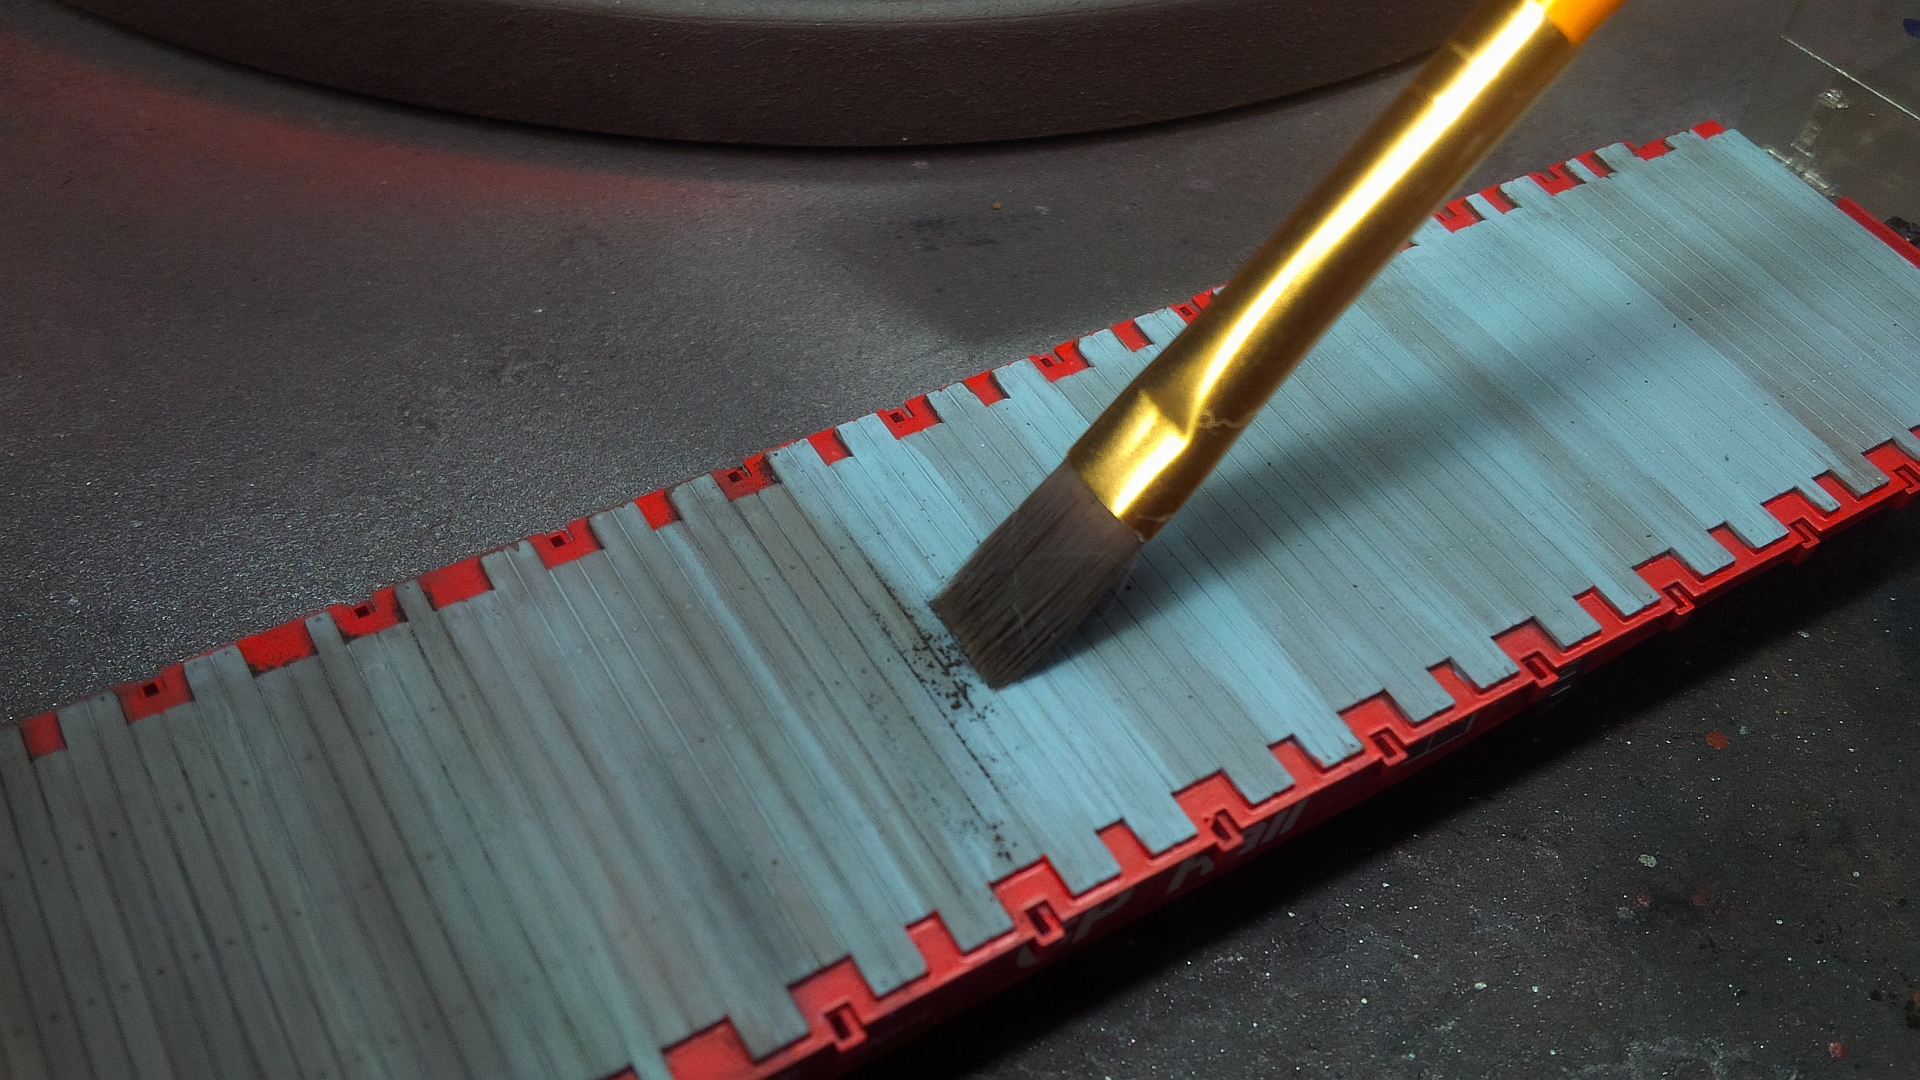
Completed model. Some light weathering was added, mainly road grime around the underbody, and some grunge coming from the roof eaves. A clear flat finish was then sprayed to protect it.

I probably over-weathered this model considering it should still be shiny after it’s rebuilding in 1979, but it just didn’t look right mixed with all the other really grunged-up rolling stock on the club layout. So I airbrushed a light coat of grime along the underbody, and added some dark grungy weathering powder along the roof eaves along with some running down from the door guides. A clear flat coat was then applied to protect the weathering. Combined with the original base gloss finish the model still has a bit of a shine to it, so I’m happy with the over-all result.

In closing, I just wish to reiterate that this kit was up for sale for $5 at the WRMRC table over several Kitchener Train Shows, along with a lot of other surplus ‘fleas.’ For all the complaints on model train forums about the high cost of our hobby, here is proof that if you have the time and are low on cash, you can create quality models while on a budget. You also get the added satisfaction of owning something unique. Personally, I get a kick out of re-creating something I’ve seen in the past, and the research and efforts towards that goal are what make the hobby rewarding. I hope this story inspires others to dig around in future train shows, and look beyond the latest ready-to-run models.

How Do We Do It? Volume.

There is a current trend among prototype railway modellers to build smaller more sustainable layouts. It was once an ideal to construct very large pikes geared towards operations, where you and a good number of fellow hobbyists would operate together. The problem was that layouts of such size rarely ever are completed within one’s lifetime. So modellers have been pursuing smaller layouts designed to be more faithful to the prototype, operated by a small number of friends, and which can be ‘finished’ within a realistic time-frame. This is a positive movement in the hobby, and a roll-call of some of the layouts featured within the Prototype Modelling Layout Links and Blogs section in the ‘Links’ page of this website shows this to be true.

But on the other end of the sustainable layout spectrum, you’ll find the WRMRC CP Sudbury Division layout. After over 20 years of our membership constructing an entire division of the Canadian Pacific Railway, we can report that this is not something any individual modeller should attempt. There is a lot of time, effort, research, and of course money, that is required to build a layout of this scope.

Volume 5 Rapido FAs

Fresh from some basic decoder programming, a bulk purchase of Rapido CP FA-2, FPA-2 and FB-2 locomotives are gathered together for their official company photographs on the WRMRC layout.

This topic came up at a recent Wednesday work night, when a bit of a WRMRC tradition was being observed. Our latest locomotives from a bulk purchase were belatedly gathered together for their group ‘official company photographs’. In this case it was a dozen Rapido MLW FA-2, FPA-2 and FB-2 locomotives, some of which had to be searched for as they were already in service. With the anticipation of club operating sessions being held again in the future, it was best to gather them all together for their official portraits now before the CP Motive Power Bureau scatters them to the four corners of the layout.

Volume 1 Hoppers

Three dozen 4550 CuFt Hawker-Siddeley cylindrical hoppers decorated for Canada Wheat Board (CPWX) and Saskatchewan Potash received from the  North American Car Corporation.

This brought up a discussion later among the membership present about layout size, sustainability and how fortunate we are in the WRMRC where we all get along so well. The obvious advantage of any train club is to be able to finance and construct a layout larger than any individual could. Unless you are independently wealthy, who can afford to buy 10 DCC sound-equipped locomotives in one shot? But there is much more than pooling our time and resources. From its founding the WRMRC set clear goals for modelling the CP Sudbury Division, and from this came not just a combination of talent and resources, but also friendships and an overall camaraderie have developed.

CP vans on WRMRC

After a delivery of 12 Rapido CP Angus wide-vision vans was received, a group photo of our entire cabooses fleet was taken. These include CP wood-sheathed vans from True Line Trains, some Overland brass cabooses, and a few craftsman resin models built from Sylvan kits.

Volume 2 Canadian

Two full sets of ‘The Canadian’ trainsets from Rapido Trains. This delivery made the longstanding WRMRC dream of operating the CPR’s transcontinental passenger flagships come true.

That said, when we do pool our resources together it really is something. One of our members suggested we show some of these bulk equipment pictures. This makes for a bit of a ‘shock and awe’ photo collection, but these are some of the pics taken over the years.

Volume 3 Paper Cars

Two Ontario Northland cars are dwarfed by 15 CP Rail models in a bulk purchase of NSC PD Boxcars from the Atlas Model Railroad Company.

Volume 4 Big Alcos

A delivery of ten MLW model M-636 locomotives from Bowser Trains.

That old advertising line ‘How Do We Do It?’ may be passé, but in regards to large club layouts, it is true.

Sudbury Icehouse

Another WRMRC landmark structure has been completed recently, this time it’s the large icehouse that once stood along the backtracks of the east-end in Sudbury Yard.

IMG_20200722_225225

The newly completed Sudbury icehouse, being set into position on the WRMRC layout.

We have not been able to pinpoint when the icehouse was first erected, but photos show it already standing by the 1920s. It was decommissioned sometime in the mid-1960s after the CPR discontinued “The Dominion”, and the need to ice any heavyweight coaches had ended. However the structure managed to survive until late October of 1974 when it was unceremoniously razed by CPR bulldozers.

Sudbury Icehouse

The Sudbury icehouse, as it appeared in the early 1970s.

This project was seven years in the making, and the first structure (kitbash or scratch-built) ever attempted by our club’s treasurer, Phil. He agreed to tackle the icehouse under the tutelage of our late president (and experienced model builder) Chris Bennett. Armed with official drawings of the CPR standard icehouse provided by the Canadian Pacific Historical Association, Phil and Chris began working out the basic structure out of sheet polystyrene. Chris’ untimely passing resulted in this project being mothballed for years. But Phil began to work on it again recently with fellow member Julius (who constructed the Car Shops building and Doran’s Brewery).

CP_7090_8799_Sudbury_07_08_70

CP RS-18 #8799 and assigned S-2 switcher #7090 share time alongside the icehouse on the morning of 08 July 1970. We can now recreate this scene on the WRMRC Sudbury Division layout.

We believe that this should be classed as an excellent job by a veteran structure builder, let alone someone’s first attempt at scratchbuilding.

IMG_20200722_225115

The icehouse, looking towards the southeast.

Due to the building only surviving the first half of the 1970s, the plan is to make this a removable structure. When operating sessions set in the later ’70s are held, just a foundation will be visible here.

Icehouse_2

Sudbury icehouse, looking west towards the Elm St crossing and CP Express sheds.

As per Phil’s suggestion, our Sudbury Icehouse will be dedicated in fond memory of Chris Bennett. The WRMRC hopes this story inspires some armchair modellers out there to move over to a workbench and start working on an outstanding project.

When a Plan Comes Together

It has taken a long time to collect all the information we have about CP operations over the Sudbury Division. Most of it has been acquired through dedicated research, photo studies, and conversations with former employees. Even though the WRMRC has been at this for, literally, decades now. there will always be new things to learn. Research and education are lifelong pursuits after all.

A case in point; within our photo archives we have discovered three separate instances of CB&Q 2-bay Center-Flow hoppers travelling over the Sudbury Division. As the WRMRC’s chief operations guru, I’ve developed some plausible waybill information for mid-western US covered hoppers to run over our layout (note – we will be publishing a series of club operations posts in the future). However, finding out the prototype shipping information for why these specific CB&Q railcars were showing up in Sudbury would be our desired goal.

Despite the hardships one should normally expect with prototype research, sometimes good stuff just falls into your hands when you’re not even looking. Recently, Mike Confalone‎ posted a model photo on his Allagash RR Facebook page of Minnesota Dakota & Western (MD&W) boxcars being loaded on his layout. He had seen these being used in Maine in real-life back in the 1980s, and had always wanted models of them for his own layout. The problem was that despite these FMC-built combo-door boxcars being available in HO-scale for years now, they were never offered in this particular ’80s re-paint scheme. So he painted and decalled his own.

mdwboxes

Mike Confalone’s MD&W boxcars on his Allagash RR layout.

Mr. Confalone is an incredibly skilled modeller, as you can see, so it is no surprise his efforts would be top notch. The surprise for us was; why the heck are Minnesota Dakota and Western boxcars being used to load paper in Maine? The answer is forestry giant Boise Cascade (parent company of the tiny MD&W RR) owned a paper mill in Rumford ME. Apparently some of these boxcars even had “Return to Rumford ME” stencilling applied to them.

This one model photo along with the real-world information about Boise Cascade’s Maine paper production helped to resolve a number of CP Sudbury Division puzzles, ones we didn’t quite remember even existed. This explained occurrences of Boise Cascade MDW boxcars on prototype photos of CP train 911, a manifest freight that had rolled daily through Sudbury ON. This train operated from St Luc Yard in Montreal to Sault Ste Marie ON; then continued via CP’s US-affiliate SOO Line to their Schiller Park IL Yard within the greater Chicagoland area. CP #911 carried a lot of New England paper traffic bound for Chicago during our 1970s modelling era, as many shippers were avoiding the transit-time mess created by the Penn Central merger. Service was so good in fact that CP Rail continued to ship a decent amount of New England rail traffic well into the 1980s.

4232 leads train at Sault Ste Marie 09 05 1981

MLW C-424 #4232 leads train 911 at Sault Ste Marie ON on 05 Sept. 1981. Note the four MD&W boxcars behind the CP steel-coil service gondola trailing 911’s locomotives.

Our original assumption was that these MD&W boxcars were lumber empties being returned to the US mid-west, with no idea of their true origins. The truth was they were hauling newsprint bound for the Chicago area, and for all intents and purposes are as New Englandy as any paper-service boxcars painted for the Maine Central or Bangor & Aroostock.

Topping this off, one of our club members had purchased two recently released Athearn HO-scale models of FMC-built combo-door boxcars painted in the 1970s as-delivered MD&W white scheme to operate on the WRMRC layout. Being uninformed at the time, they were placed within our “Pool 733 – US mid-western misc boxcars” category (more information about our pools when we publish operations articles) and tried to stretch excuses for why some lumber might be rolling through Sudbury from International Falls MN (where the actual MD&W RR is located). Knowing the real story about why these boxcars were rolling though Sudbury, they have since been re-classed into our New England newsprint service boxcar pool. In fact our layout could now use a few more models.

MDW_10009

Produced by Athearn, MD&W 10009 wears the as-delivered 1970s white Boise Cascade corporate scheme. This car is now in New England paper-service on the WRMRC layout.

This information comes at a great time, as the Coronavirus break from operating sessions has given our club a chance to update and fix a number of older waybill shipping inaccuracies. But this MD&W boxcar mystery has to be one of the easiest puzzles we’ve had solved. When something just falls together like this, one is reminded of that old catch-phrase that Lt Col Hannibal Smith used to say on the old ’80s television series ‘The A-Team’ – “I love it when a plan comes together.”

Signalling the Sudbury Division

Since our club’s initial decision to model the CP Sudbury Division in the 1970s era, it was understood by the membership that at some point railway signals would need to be installed on the layout. Not only did we want our layout scenes to look close to their real place counterparts despite having to selectively compress them, or operate equipment that appeared just like what really ran through northern Ontario in the ’70s, but we also wished to operate the layout in a realistic manner too.

The CP Cartier Subdivision between North Bay and Cartier was all CTC (Centralized Traffic Control) territory during the 1970s, with the exception of the six mile double-track section between Romford and Sudbury yard which was ABS (Automatic Block Signal System) signalled in one direction for current of traffic. Regardless of the two signalling methods it meant the club’s entire east-west mainline was protected by signals, and therefore we would need to duplicate this if we wished to achieve our goals of both looking right, and running right.

That said, we can report that signalling a model railway is very much more easier said than done. However after 20 years of planning, and of delaying a lot of scenery work from being started due to the wiring and complexity of the project, the 1/87 scale Sudbury Division is seeing its first signals begin to sprout around the layout.

RomfordSignals01

Temporary dual-head and permanent dwarf signals installed at Romford. Once fully programmed they will protect this busy junction just like their real-life counterparts.

Though much of the hobby has progressed quite dramatically over the past 40 years, sadly the process of signalling a layout has lagged behind despite the pioneering efforts of Allen MccLelland’s V&O, or Bruce Chubb’s Sunset Valley back in the 1970s. Yes, there are multiple sources of hardware available, and JMRI (Java Model Railroad Interface) software is free, however none of this is really plug and play. You need to program signal scripts and modify JMRI for any of this to work. Between knowing where the signals need to be installed, planning and wiring the signal blocks accordingly, selecting the detectors, switch and signal controllers and then programming it all to work, there is one other big problem for us. No one out there offers ready-to-run Canadian-style searchlight signals.

Romford, ON in October 6, 1971

From the cab of ‘The Canadian’ at Romford, ON – 06 October 1971. Photo by Roger Puta, from Marty Bernard’s Flickr album.

Though searchlight signal kits do exist in HO scale, they are US-based and need to be disassembled and pretty much scratch-build to have them appear like the real deal did. This and both CP and CN did have some differences in their ladder assemblies. For this reason, the WRMRC has decided to build their own, and to use temporary signals in the meantime. But it sure would be nice if a Canadian model manufacturer considered reproducing them for HO modellers at some point. Hello Rapido; wink, wink, nudge, nudge!

RomfordSignals02

Westbound signals guarding Romford. The mainline is on the right. The wye tracks to the left connect with the Parry Sound Sub to Toronto. The track in the middle is a set-off siding.

There is also the little wrinkle of the dispatcher needing a CTC panel for this all to work. However the good news for the WRMRC is the CP Cartier Sub was signalled in the 1960s, and thus never used one of the ‘classic’ CTC panels that railfans usually imagine. CP had their own hybrid system housed on the second floor of the Sudbury Division HQ building, featuring a large white wall panel with a black trackage schematic, and yellow lights displaying track occupancy. The dispatcher set switches and direction of traffic with a keypad assembly. Frankly, this sounds a lot like something you can duplicate on a computer screen and controlled with a keyboard, and so that’s exactly what we will be doing.

RomfordSignals03

Temporary dual-head signals protect the CP Cartier Sub diamond crossing with the CN Bala Sub at Coniston, Ontario. The diamond, much like our signals, is a work in progress.

Regardless of all these difficulties, the WRMRC has a small team working on the project and they’ve been making great strides recently. As you can tell from the photographs, the layout is already looking dramatically different. We look forward to the day we can ‘un-bag’ these signals for a future operating session, and have our engineers operate their trains as per signal indication. This also means scenery can progress in these areas too. The WRMRC’s goals of ‘looking right’ and ‘running right’ are slowly being achieved.


Rescuing Old Kits

A while back I wrote a blog post on the Model Railroad Hobbyist forum about resurrecting old rolling stock kits developed in the ‘80s, back when the hobby finally began to move past the ‘blue-box’ era. Over the course of that decade, companies like Robin’s Rails, McKean, C&BT, Front Range and Innovative Model Works had sprung up to challenge Athearn and MDC. This was a big leap forward for HO modellers; as these kits were based on specific prototypes, were well researched, and offered a core model with all details applied separately.

Since those times we’ve moved into a model railway world of ready-to-run (RTR) pre-assembled models of exquisite quality. New manufacturers like Tangent, ExactRail, Scale Trains and Moloco (just to name a few) now offer 1:87 rolling stock replicas that truly are museum-quality models. However for those who crave the days when we used to build our models, and paid less than $10 for a freight car in the process, there is something to be said for resurrecting these old kits.

My latest example is this old McKean 40ft PS-1 boxcar painted for the Louisville & Nashville RR.

Louisville-Nashville-40-PS-1-Box-Car-No

A good friend and fellow WRMRC member had this kit for sale amongst a pile of surplus model train stuff at a previous Kitchener Train Show. It went through two shows without anyone showing interest. What struck me was its 1960s paint scheme, a relative minority in a model railroad world where the popularity of the ‘40s-‘50s transition era dominates how manufacturers paint their products. However it was dismissed at the time due to it being a southeastern US boxcar, which I assumed would be a rare traffic event over the CP Sudbury Division in the 1970s.

My thoughts changed recently in my continuing efforts to update the club’s traffic/waybill system. It turns out the southeast US offers northern Ontario a lot more than just orange juice and kaolin. Using the OPSIG Industry Database I’ve found a long list of products that one could see routed through the Sudbury Division which are mainly supplied by the southern states. Cotton, rice, peanuts, casting sand and even mining equipment are just a few of the commodities that were uncovered over a couple of hours of research and coffee consumption. So it turns out the WRMRC had been neglecting a traffic source, and  this L&N boxcar was resurrected from the flea market table.

This photo shows it fresh from the ‘grunge factory’ (a.k.a. – the spray booth) after all paint, extra decals and final weathering had been applied; along with one of the prototype photos used to aid in its kitbashing.

L&Nbox_paintshop

As described in the MRH blog, you pretty much have to throw away all the kit-supplied detail parts. I used better ones which are stuffed away in my surplus parts boxes. The underbody was completely gutted, and replaced with Intermountain underbody details – yes, they sell their detail parts separately. The brake detail on the ‘B’ end was fabricated from brass wire, a brake wheel and housing I had lying around, a bit of photo-etched roofwalk material, and a couple of staples I re-bent to hold the brake platform. Likewise I used staples as stirrups to replace the crude ones supplied by McKean.

It should also be noted I used the internet to research these cars, in order to find as many prototype photos as possible. Turns out the L&N 11xxx-12xxx series cars were 1960s rebuilds, with DF loaders, moveable bulkheads and other features added for specified commodities. However with more modern 50-foot cars being purchased, I’m certain that by the 1970s these cars were already relegated back to general service by the L&N.

Though it took a few evenings worth of kit-bashing and research, these efforts are what make the hobby rewarding for me. As the price of RTR models continue to climb, I hope more modellers come to discover these old kits from the ‘80s. There is real value to be found here, and you don’t need to dig too deep to uncover them at any train show.


Old Soldiers

CP_8448

CP # 8448 leads the Espanola Turn through Nairn Ont. in the summer of 1973. In reality; this is a Van Hobbies brass model rebuilt with a Kato RS-3 drive. It is equipped with an ESU LokSound decoder with a 12-cylinder 244 diesel sound file.

Years after most other major North American railways purged their rosters of 244-powered ALCO diesels, CP Rail continued to employ a good-sized fleet of them throughout the ‘70s. Mainly due to chronic motive power shortages, and maybe a little by their corporate desire to milk locomotives for every mile they could to ensure their return on investment; the CPR would continue to operate 244-powered units until 1982.

In this light we find a pair of old soldiers in charge of the Espanola Turn on the CP Webbwood Sub, continuing to battle friction and gravity in defiance of the scrapper’s torch.

CP #8448, built by MLW in 1954, is noteworthy for being the second-last RS-3 to wear maroon and gray paint. She would eventually receive a new coat of Action Red in 1975, only to be retired the following year due to a major mechanical failure.

RS-10 #8464 fared a little better. Rolling out of MLW later the same year as sister #8448, she would persevere to the end of the decade. It should be noted that regardless of the differences in exterior appearance, the RS-10 is mechanically the same as an RS-3.

The model 244-diesel prime mover may have been plagued with reliability issues and earned a notorious reputation as a maintenance hog, but they endure at the time-warp known at the WRMRC – CP Sudbury Division layout. Here the 1970s never ended, and the burbling sounds of 244 diesels continue to echo throughout the Sudbury Basin.

Napanee Industries CP Flatcars

Tips for improving the Wheels of Time model

CP 315122

CP 315122 is a Wheels Of Time flatcar model with new decals added to represent an early ’70s CP Rail repaint, identified by the black capacity data lettering. The ACI label and 2-panel COTS stencil also set the era.

Flatcars are probably the most under-appreciated pieces of rolling stock in the world of railway modelling. Due to their being, well, ‘flat’, they appear very simple and lack the visual impact of a boxcar or covered hopper. But they are actually among the most specialized cars around, possibly second only to tank cars. This under-appreciation is likely why we still need more flatcar variety in model production. Fortunately the various manufactures are helping and have released a number of great new models over the past few years; the ExactRail 53ft GSC, Tangent 60ft GSC and Intermountain 70ton AAR cars just to name three.

Now we can add Wheels of Time to this list with their arrival on the HO scene. The company is not new; they’ve been producing fine quality N-gauge products for a number of years now. However they recently branched into HO scale with a 70ton Gunderson flatcar in both standard and bulkhead versions.

These Wheel of Time flatcars are excellent models. They come with metal grab irons, coupler lift bars, air hoses and #58 Kadee couplers housed in scale draft gear (nice touch). Additionally they come with ASF ride-control trucks equipped with free-rolling metal wheel sets.

This model is a boon for modern modellers (‘70s to present) in general, and a pretty big deal for us on the CP Rail Sudbury Division. Though it is a US prototype car and CP never purchased any Gunderson flats, the model does bear a very strong resemblance to the Napanee Industries 61ft flatcar.

CP 315097

CP 315097 – a Napanee car still wearing its as-delivered basic black scheme at Campbellville, ON on 28 March 2008. Photo by Chris vanderHeide – courtesy canadianfreightcargallery.ca

CP purchased 135 of these cars from Napanee Industries in 1967, numbered CP 315000-315134. All were delivered in the then current black scheme utilizing a larger font for the reporting marks and road name.  However, somewhat surprisingly, close to half the fleet was repainted into CP Rail Action Red by the mid ‘80s, allowing modellers more paint variety. The fleet is still in service today with only a few cars retired, though delivery-black cars are few and far between.

cp 315025

CP 315025 – Though missing an ACI label and sporting a more modern tri-panel COTS stencil, this is an example of an early 1970s repaint as identified by its black (barely legible) capacity data. Photo taken in Woodstock ON by David Graham on 25 March 2007 – courtesy canadianfreightcargallery.ca

The dimensions and details of the WOT model are very close to the Napanee car. The overall length of the model measures one (1) scale foot longer than the prototype, which comes to a little over 3 real millimeters. This a minor discrepancy; for more importantly the deck style, fishbelly profile and the flange running along the bottom of the car all match up well against the prototype. For the rivet-counters among us, the more serious inaccuracies between the two are in the stake pockets.

To begin, there are 18 side pockets on the Napanee car versus 19 on the Gunderson / WOT model. I personally consider this a minor issue, because with that many of them who really has the time to stop and count during an operating session?

The more significant difference is the Napanee car has 8 end-pockets (4 per end) where as the Gunderson / WOT model has none. This is not easy to spot as most photographers shoot these cars trackside, but from any elevated photo you can see these end-pockets. One simple way to simulate these would be to use decals. These pockets appear as little more than small black squares on the deck, and unless you stare down at one on a 90 degree angle, a decal would be a clever way to represent these.

Regardless of the inaccuracies, this is a most welcome car for CP modellers. As new accurate rolling stock models keep being released for Canadian modellers, flatcars were a glaring omission. Hopefully this model is a beginning towards rectifying the situation.

Flat001

This is an unmodified model straight from the box. A few extra decals, weathering, and most especially a repainted deck will make this car really stand out.

Though out of the box these cars look great, with some work you can transform these into stand out models. One can begin by adding additional decals, as I find the models a bit Spartan lettering-wise. That, and our club models the ‘70s decade, so adding ACI labels and appropriate era COTS stencils are musts.

Extra lettering helps, but the biggest improvements comes from re-painting the deck and weathering the car. Wheels of Time painted their decks a greenish brown colour, whereas the lumber weathers to gray on any prototype car I’ve seen. This deck is molded in place, so replacing with laser-cut lumber is not an option.

Flat002

CP 315014 is a factory lettered car with extra decals added. The deck has been hand painted with PollyScale ‘New Gravel Gray’ before weathering is applied.

I begin by hand painting the deck with PollyScale ‘New Gravel Gray’, though any light gray will do. Paint evenly brushing from side-to-side, and continue from one end of the car to the other. If you brush lightly and carefully, you can avoid getting paint on the metal ends of the deck. If you accidentally do, thanks to the deck being raised it’s easy enough to touch these up with Action Red afterwards. Testors has discontinued PollyScale brand paints recently, which is unfortunate as it was almost as wonderful for brush painting as it was for airbrushing. Without thinning and despite taking any extra care, the paint dries flat with no brush strokes. In this case, brush strokes could actually help give the deck a wood grain look. Regardless, with PollyScale’s demise, I recommend any decent acrylic paint for this.

Flat003

Deck weathering on CP 315014 has begun utilizing AIM weathering powders.

After painting, I go over the deck with AIM weathering powders using three colours; grimy black, dark earth, and dark rust. Vary the powders board by board and have fun mixing. You end up with a very convincing deck in no time, and the powders really help the details stand out. The convenience of weathering powders is you can wash them off with water if you don’t like the result, and then try again.

Flat004

Mixing different coloured powders adds realism towards achieving the weathered lumber look.

I finish by weathering the body of the car itself, again mainly with the powders. Here one can use rust colours running down the car to mimic oxidization, and extra dirt where it naturally collects around the trucks. I highly recommend studying real flatcar photos to replicate these patterns.

Next I airbrush some grime on the underbody of the car, and most importantly spray the trucks in order to weather them. The best weathering jobs are thoroughly unconvincing if the trucks are left Delrin-plastic black with shiny metal wheels. Finally I airbrush the entire car with a clear flat coat in order to protect the weathering and extra decals.

Flat005

Weathering the deck really brings out the detail. Click to enlarge.

The first few finished Napanee flatcars have entered revenue service on the WRMRC layout; hauling steel slabs, gas pipelines, farm equipment and numerous other lading across the Sudbury Division. Future additions will see some of these models repainted into the basic black delivery scheme.

We wish Wheels Of Time great success with this car, and we thank them for helping out Canadian modellers.

Got Slag?

An event of some significance for our club layout occurred recently when a trio of Atlas ballast hoppers were grimed-up and weathered over the course of a regular Wednesday work night. While that may not seem particularly significant, after all I paint and weather equipment at the club’s spraybooth all the time, it did signal a big change in the ever-evolving rolling stock fleet of the CP Sudbury Division. These were the final models of a new fleet of slag hoppers to roll out of our shops, and they will replace our old MDC cars that had been in service with the club for over 20 years.

The complete fleet of 16 recently added Atlas ballast hoppers, all weathered and ready to begin hauling slag over the CP Sudbury Division.

Another view of the fleet of new ballast cars entering service on the Sudbury Division.

The MDC-Roundhouse hoppers are crude by today’s standards – the molds were produced in the 1970s and it shows. Not just the thickly molded grab irons and lack of interior details, the worst part of the model was how low the hopper body sat and how shallow that made the unloading bays below. They are almost undetectable. (If someone knows of a prototype car that MDC patterned this after, please post photos/info here in the comments section.) However this was the only longitudinal-bay hopper model available when our club began modelling the CP Sudbury Division, so we assembled a small fleet of MDC models due to lack of alternatives.

Side by side comparison of the Atlas model (left) with the old MDC car (right). Coupled together, it is easy to see why the old Roundhouse models are being retired.

The longitudinal bay ballast hopper is an important car for the ‘70s CP Sudbury Division, all thanks to INCO and the CPR’s maintenance-of-way needs. The byproduct of copper/nickel refining (actually all forms of ore smelting and refining) is called slag; it’s the resulting rock waste you get once all useful minerals have been striped away. INCO has mountains of ugly slag piles growing all around the Sudbury area. And our two big transcon railways, both running through the Sudbury Basin and always on the lookout for cheap solutions to their maintenance needs, began using this crushed slag to ballast their right-of-ways. Take a look at any CP or CN photographs from the ‘60s to the ‘90s. If the tracks are ballasted with a very dark brownish-black rock, that’s Sudbury slag.

The prototype car, CP 360946 see here within a string of longitudinal-bay ballast hoppers in Calgary AB on 21 Oct 1977 – Andy J. Broscoe photo from canadianfreightcargallery.ca

Slag ballast is the reason why these longitudinal-bay hoppers are so important to our layout operations. Strings of these cars were everywhere in the Sudbury area, all to supply ballast system-wide for CP Rail.

So what happened to slag ballast? Well there were two problems with using slag; one that was immediately known, and the other that the Ministry of Environment figured out decades later.

Slag being refined rock was very brittle, and breaks apart relatively easily. This meant CP and CN had to continually re-ballast as the slag was pulverized into mud over time under the weight of heavy freight trains. That was not a big deal as slag, being a waste product, was pretty inexpensive.

CP 360548 was lettered with a combination of C-D-S dry transfers along with Microscale and Highball decals from various sets I had lying around. Outside weathering is a combination of oil paints, weathering powders and some airbrushing – mainly just a quick coat of “grunge” to dirty up the bottom of the car.

The other problem is much more serious. It seems the bedrock of the Sudbury basin contains a trace of naturally occurring mercury. That is not a big deal, provided the rock is undisturbed. Slag, however, is rock that has been disturbed quite a lot. Testing showed mercury was leaching into local water tables from the slag ballast, and so it began to be phased out over time. The situation was worst in the Prairies, where slag ballast was first banned back in the ‘80s. Southern Ontario, with its deeper water tables and lots of limestone, was a safer environment and continued to see slag used until the mid ‘90s.

Our new slag hopper fleet is made up of Atlas’ wonderful model of the ACF-built Hart Ballast Car. These were released about 10 years ago, but our delay in making the switch was due to the Atlas model not being a prefect match for the prototype CP slag hoppers. The actual hoppers, numbered within the CP 360000 to 361277 series, were all built between 1949-53. Though three different manufacturers built them (Eastern Car mostly for the CPR, though Canadian Car & Foundry and NSC produced them too) the visual differences between them are slight.

Weathering the inside of a ballast car is a very different process than for coal hoppers. Coal is acidic, and the hoppers that carry it become a rusty mess inside. Ballast does not corrode the interior, rather it bangs and scrapes the hopper bottoms to polished metal. To capture the look I first airbrushed the interiors with Model Master flat aluminum, then oversprayed the top with grunge (a combination of black, browns and greens to simulate dirt). I finish with Pan Pastels to simulate the rust and dirt that does take hold, and seal all the weathering work with Tamiya flat coat.

There are two visual differences between the real thing and the Atlas model, the first being the top end panels of the hoppers having a notch in them (where the end ladders meet up). The prototype cars feature straight beveled end panels. The other difference is seen in the hopper bays, which are longer and of a different design than the actual CP hoppers.

CP 360413 is lightly weathered, as the CP Rail paint scheme was only a few years old in our club’s modelling era, so it would be a recently repainted car. Weathering was done with Pan Pastels and some airbrushed “grunge” along the bottom of the car.

Despite our hope that maybe, one day, a perfect Canadian ballast car might appear on the market, we decided that the old MDC-Roundhouse cars really needed an upgrade. The influx of amazing new, super-detailed models that have been populating the Sudbury Division layout were really making the old ballast cars look out of place. And the Atlas model is well done, not only from its crisply detailed molding, wire grabirons, nice brake and end details; but this model also featured a fully-detailed interior complete with L-brackets and rivet-detail. The hopper bay doors actually open too, though since we operate these models with live loads we highly recommend our operators DO NOT open them when transporting slag.

Though not 100% perfect, these Atlas models are a very good stand in and they will begin hauling slag on the Sudbury Division starting with our first operating session of the 2016-17 season this September 10th.